Modifications for the Kenwood
TR-7800

19-07-1998 TR-7800
Loss of Memory
Author:
Trio-Kenwood Communication, inc.
Service Bulletin no. 829 (31-7-1980)
Intermittent loss of memory may be corrected by adding one resistor at the
microprocessor on the control unit.
Procedure:
- Remove bottom cover, 4 screws.
- From the Control unit X53-1180-xx unplug the rear mounted connectors 8-11.
- Remove 6 screws from the board.
- Swing the unit forward.
- Install a 470K ohm 1/8 watt or larger resistor from connector 11, "UP"
pin, to ground. (microprocessor pin 35, PA2 port). Space is limited: Be
certain not to create a solder bridge when installing the resistor.
- Reverse steps 4-1 for reassembly.
19-07-1998
TR-7800/TR-9000 Optional Ceramic Filters
10-10-80
FM Adjacent channel rejection in either
unit may be improved by installing an optional narrow ceramic filter.
Filter    Part No.       -6db Bandwidth -70db Bandwidth Retail
CFK-455F  L72-0304-05    +/- 6 kHz      +/- 12 kHz     $ 33.50
CFK-455G  (CFK-455G)*    +/- 4 kHz      +/- 10 kHz     $ 33.50
* Not original part. No computer part number.
Location:
TR-7800,
RX unit X55-1270-10 part, L10
TR-9000, RX unit X55-1260-11 part, CF1
To
install, desolder the original filter and clear the second set of holes for the
optional filter. Solder the new filter in place. Be sure all pins are actually
soldered, and that there are no solder bridges between pins or across the
printed circuit board. Clip the pins flush to the board, and reinstall the
circuit board.
Note: Squelch operation will vary from unit to unit with
an optional narrow filter. Tighter coupling from the detector to the squelch
circuit may be tried to restore "original feel".
19-03-2000 TR-7800
Tone pad conversion for 4th column function
Author: Trio-Kenwood Communication,
inc.
Service Bulletin no. 828 (3-6-1980)
Users who desire ABCD control functions may be accommodate by an alteration
to the Control unit and to the REV switch. This switch will then perform dual
functions.
- Remove top and bottom covers, 4 screws each.
- To free the front panel remove 4 screws securing the front panel bracket
to the side frame.
- Unplug 5 multiconnectors from the Control unit along the front and left
edges of the board.
- Remove 6 screws from the Control unit and swing the board over.
- Remove and save R51 22 Kohm located between IC's Q19 and Q28. (Q28 pin
5).
- Resolder this 22 Kohm resistor to Q28 pin 5, and solder another 22 Kohm
resistor to Q28 pin 9. Using a short piece of hookup wire, extend these
connections t the REV switch as shown.
- Connect a line from the center switch contact to the original feed point
of R51, which is the B3 line.
- To reassemble, reverse steps 4 through 1.
To operate the ABCD column, hold the REV switch IN and key the 3, 6, 9, or #
keys. Normal 3rd column tones are supplied when the REV switch is not depressed.
The receive REV function is not altered by this change.
Note: This switch is a DPDT and many have both sets of contacts
bridged. Free one set of contacts for this new function.

02-04-2000 TR-7800
Pulse noise
Author: Trio-Kenwood
Communication, inc.
Service Bulletin no. 834 (6-1-1981)
Low level Pulse Noise reported in high power TX, or as a buzz from the
speaker during TX, may be reduced or eliminated by the following steps.
- If not already present, install a shield (F11-0781-04) and two 1000pF
capacitors (C52-1710-26) at the final amplifier module M57733 as
shown.

- On the RX unit X55-1270-10 add three additional 1000pF caps (c52-1710-26)
and one additional 470pF cap (C52-1747-16) as shown.
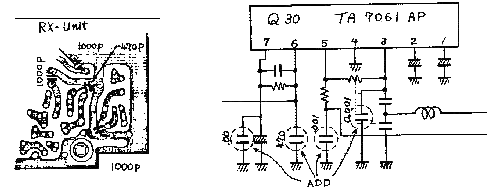
Installattion time for this precedure is approximately ½ hour.
02-04-2000 TR-7800
Optional continuous charge for internal batteries
Author: Trio-Kenwood Communication,
inc.
Service Bulletin no. 836 (19-11-1980)
The internal batteries for memory back-up charge only when the radio is on.
If the radio is used less than 2 hours a day, the internal batteries may not
charge sufficiently to retain memory if the main power is diconnected. This
optional chanhe mey be made to continuously charge the internal batteris from
the main power source, whether the radio is on or off.
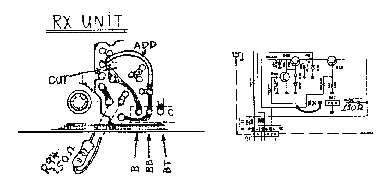
- On the RX unit X55-1270-10, change R94 from 56 ohm to 120 ohm, ½W.
- Cut the foil at the input to Q27 and connect via a 3/4" lead to the BB
terminal on connector 1.
- Battery charge current will be 15mA nominal.
Notes:
- The radio should be connected directly to the vahicle battery and not
through the ignition switch.
- Turn the radio off before connecting or disconnecting the power
cable.
For early units:
- Before closing the case, check alearance from the back of the battery case
to the shassis. If very close, add suitable insulation between the battery
case and chassis.
- Check for the presence of a 470 kohm 1/8W resistor which should be located
on the bottom of the Control unit X53-1180-xx, Connector 11, UP pin. Add if
not already installed (and see Service Bulletin #829).
08-04-2000 Memory
Channel 7 Indicator Erratic
Author: Trio-Kenwood Communication,
inc.
Service Bulletin no. 860 (14-4-1982)
When Memory Channel 7 is selected, the LED may fail to indicate the number 7,
although frequency is correctly recalled and all other operations are normal.
Cause is incorrect voltage level at Q16 & Q17, and is related to individual
differences between these IC's. Correction is by changing one resistor value on
the control unit.
On the control unit X53-1130-xx, replace R38 from 3.9 Kohm to a 1.8 Kohm
resistor (RD14CB2E182J). No adjustments are required.
This change should be perform only as necessary, and applies to units before
serial number 205xxxx.

Installation time for this procedure is ½ hour or less.
08-04-2000 TR-7800,
TR-7850 Memory Improvements
Author: Trio-Kenwood Communication,
inc.
Service Bulletin no. 861 (5-4-1982)
TR-7800 & TR-7850 memory retention may be improved by the following
changes on the control and RX units.
Control unit X53-1180-xx
- If not already present, add a 470 Kohm ½W resistor (RD14BB2B474J) (R54) on
the foil side of the board from connector 11 UP line to ground. (Unite before
serial number 1119391).
- If not already present, add a 470 Kohm ½W resistor (RD14BB2B474J) (R55) on
the foil side of the board connector 11 DOWN line to ground. (Unite before
serial number 1119391).
- Hard-wire the two via holes (through hole without components leads
installed) along the foil trace between Q18 pin 1 and L1.
- Change D1 from an ZX-060 (6V, 5%) to a WZ-040 (VII-4102-40) (4V, 10%)
Zener.
- Check D3 for leakage, which would load the MB line voltage below it normal
5.2 V DC setting.
RX unit X55-1270-xx
- TR-7800: Change R94 from 56 ohm to 150 ohm ½W (RD14CB2E151J).
- TR-7850: Change R94 from 100 ohm to 150 ohm ½W (RD14CB2E151J).
- Cut the foil at the input to Q27, and connect Q27 input to the BB
terminal. Connector 1 for constant battery charge at Power switch Off, and
floating battery charge when using a TK-1 or BC-1 charger unit for memory
back-up in base station operation.
- Check D18 for leakage, loading the MB line.
Note:
- With 13.8V DC applied to the radio, and the power switch OFF, adjust VR2
on the RX unit for 5.2V DC at connector 1, MB terminal.
- We recommend using either Sanyo or GE NiCad Batteries. We suggest not
using Radio Shack or Eveready batteries in these radios.
- If memory loss persists after all changes and checks suspect control unit
Q18 is defective.