A D104 for the 21st Century

Retrofitting a Classic Mic with a Heil HC5.1
While browsing eHam.com one day I noticed reviews for a Heil microphone upgrade kit targeted at old microphones, in particular the Astatic D104 (aka Big Chrome Lollypop).
This got me thinking about the idea of adapting one of these classic microphones for use with my Flex-1500. I was encouraged by one of the reviews posted by a local ham (VA3PUX) that did just that for use with his Flex-3000.
(Note that the HC-104 Conversion kit talked about in the earlier reviews seems to have been replaced by the HC5.1 Retro Kit. )
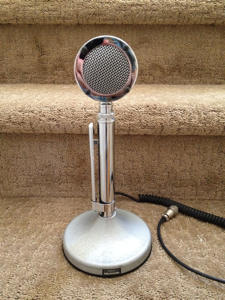
The Astatic D104 was mass produced for a number of decades and became a big favorite with the CB crowd back in the 1970s so there are still a lot of these kicking around at reasonable prices and some are in excellent physical shape. Astatic did a great job on building these so the materials and construction are excellent.
Expect to pay around $50 for a basic model and closer to $100 for the Silver Eagle Model (all chrome with TUP-9 base and an Eagle etched into the back plate of the mic head). The D104 uses a high impedance crystal mic element, which is not very suitable for use with modern transceivers. Also many of these elements have not aged so well and many (including mine) seem to have fallen prey to an “old CB wives tale” that poking some holes into the element diaphragm with a needle would improve the sound (not true BTW).
With a little bit of effort I managed to find a very nice D104 on a TUG-9 stand locally for under $50 and I ordered the Heil HC5.1 Retro Kit from DX Engineering ($50). I also discovered that W2ENY sells an upgrade kit that utilizes an electret mic element, but decided to go with the Heil solution based on the recommendation of VA3PUX who had tried both upgrade options with his Flex-3000 but felt that the Heil HC5.1 was a better performer. Note that either of these kits can be used in many other Classic microphones as well.
This project turned out to be about an afternoon’s worth of work. The replacement of the mic element is quite well documented in the info sheet that comes with the Retro kit from DX Engineering, except that it fails to mention that the HC5.1 element has a polarity (MIC+ is marked by a small blue dot next to the solder pad on the back of the element .. confirmed via a quick call to Heil). Wiring up the element was fairly easy after spending some time deciphering the internal mic wiring (hint there is a paper schematic on the inside of the D104 metal base).
Now I have a great sounding mic for my Flex-1500, with a vintage look, all at a very reasonable price !
Michael VE3WMB / VA2NB
Key points worth highlighting for anyone who wishes to try this on their own with a D104 :
-
1)The internals of the D104 are built around a 9 terminal strip in the base used to interconnect the mic wiring, the pre-amp (if your mic has one) your mic cord and the DPTT (Double Pole, Triple Throw) PTT switch. Check the inside of the metal base for a small attached paper schematic of your microphone (wiring will vary depending on model/base-type).
-
2)If you have a D104 model with the internal preamp you want to totally bypass this as it is neither needed nor desirable for use with the HC5.1. In my D104 it was the amp board that was physically supporting the terminal strip so I opted to leave it in place but isolate it by cutting unneeded wiring. I found it easiest to cut any wiring to the strip that wasn’t needed and hijack a few terminals for my own wiring configuration (you only need to use one set of contacts for PTT).
-
3)The head of the D104 can be carefully removed by loosening the threaded ring on the neck of the mic under the head, sliding it up and then gently rocking the head as you pull it off .. this makes it a lot easier to maneuver when replacing the mic element as you don’t have the stand in tow.
-
4)The 4 screws that appear on both sides of the mic head are not all really screws. The head is composed of a metal ring attached to the neck and two sides that fit together like a clamshell on either side of this ring. The screws on the back side really are screws, the ones on the grill side have screw heads but they are small metal cylinders with internal threads (likely there is a proper name for this) that the screws on the opposite side thread into. I recommend that you loosen the screws on the back, keeping in mind that the front grill may also fall off once you remove the last screw. I also suggest performing disassembly and reassembly of the mic on a towel to avoid damaging both your desk and the mic finish.
-
5)Astatic plays a bit of a wiring trick .. the wires in the head of the mic are white and red. These connect to a 3 pin connector in the bottom of the mic head that mates with the top of the neck on the stand. The wires coming down the neck of the microphone from the bottom of this connector are not red and white. In my case the red wire mapped to a yellow wire and the white wire was a green wire. This is another good reason to remove the mic head so you can do some continuity measurements to ensure that you really are hooking things up correctly.
-
6)I needed a modular plug on the end of my mic cord to attach to my Flex (same mic wiring as the Yaesu FT-817/FT-897/FT857). Rather than try to figure out how to crimp one of these things onto the existing mic cord, I opted instead to replace the cord with half of a 7ft shielded CAT 5E computer patch cable (connector already installed). The shielded CAT5 patch cables are designated STP (not UTP). Since RFI is always a bit of concern with SDRs I figured that going with a shielded cable was worth the effort and I easily found one online at Tiger Direct.
-
7)I highly recommend, prior to reinstalling the upgraded mic head, that you take the time to verify all of your wiring out to the pins on mic connector using an ohmmeter or continuity checker. Don’t forget to verify that the PTT is wired correctly as well.
-
8)Have fun and enjoy your Retro Mic. I discovered from a stamp on schematic in the base of mine that it was made in December of 1976.
Wednesday, September 10, 2014