Assorted RV Modifications (and Hints) :
The Ideas here are ones I believe are unique, and
each solved a problem for me. These notes may give you some ideas for fixups
of your own. This is my third
motorhome and I have made most of these changes on each one to make my
life a little bit simpler.
----------------------------------------------------------------------
RV Idea 1.
Timer for Outside Lights:
I
always add a
60 minute timer to control
the outside
patio light. Too many times we forget to turn off the light
and
only notice it is still on the the next day. The mechanical timer
is
available from most hardware stores in various timing
ranges. This solved
the
problem. It is hooked in parallel with the existing patio light
switch, which is left in place and is still useable. The bulb was
replaced with an LED lamp..
---------------------------------------------------------------------
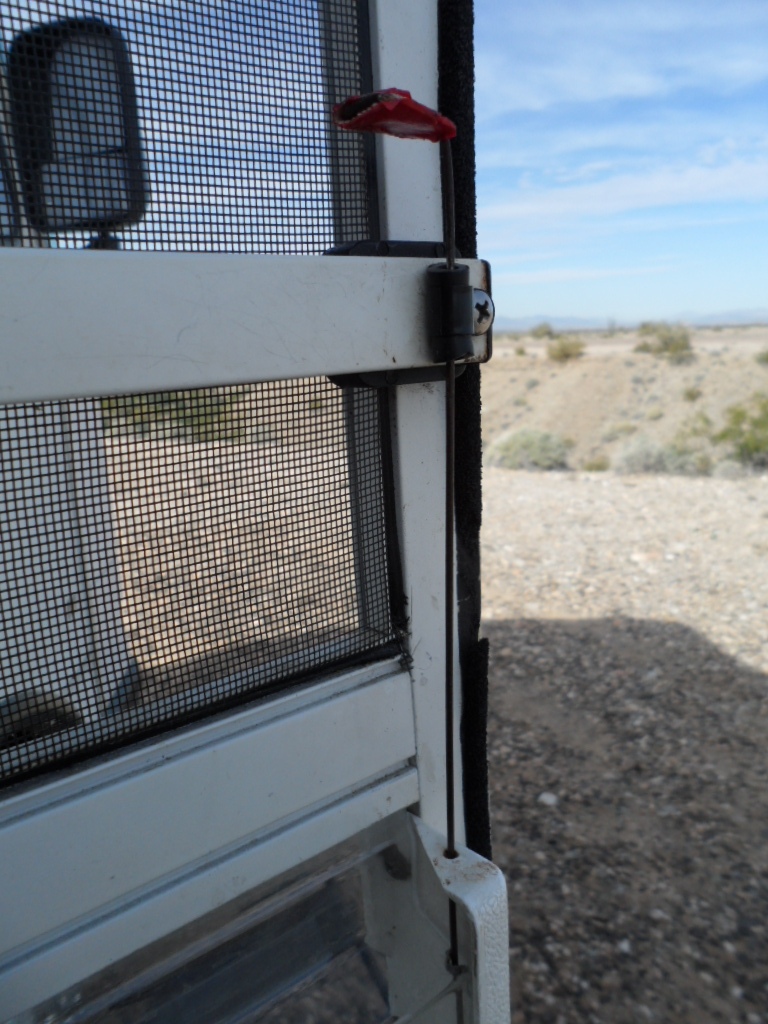
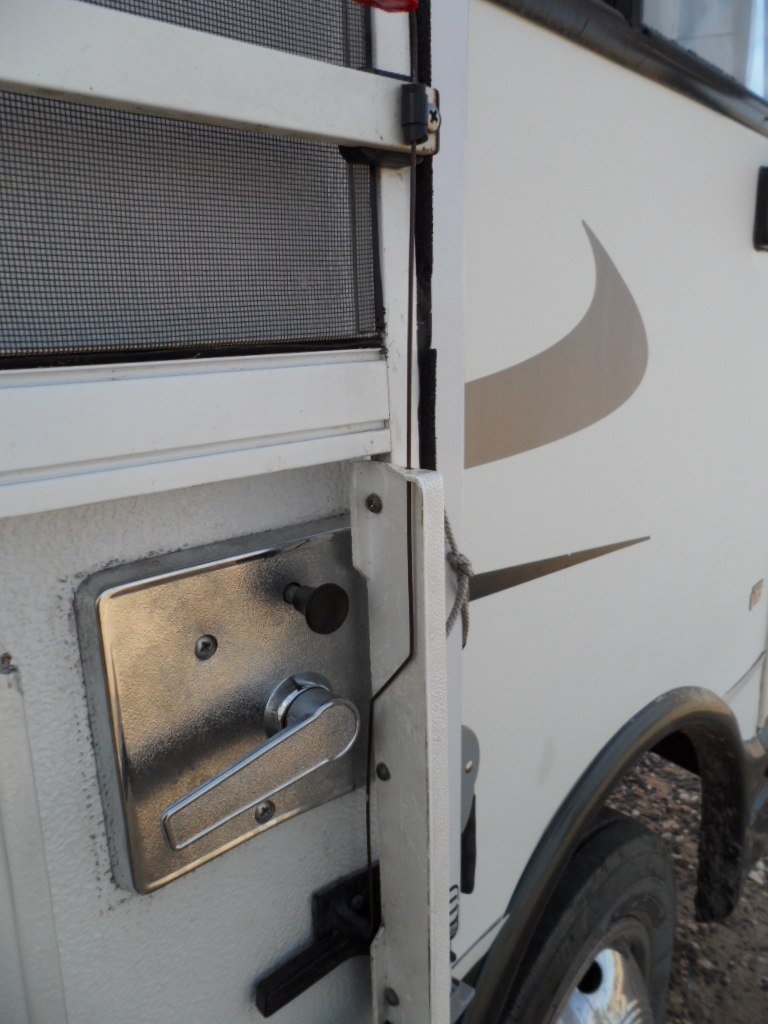
RV Idea 2.
Screen Door Latch :
A home made arrangement was
made to allow opening the screen
door
without opening the slide. This was fabricated from
a stiff
wire with an offset to push down on the outside latch handle from the
inside. A bar was added across the screen just above the slide to allow
easier closing of the door , also giving visitors somewhere to push
against instead of the screen. The wire was once a buried cable marker
on the roadside with a small orange flag. The pushbar came from
the frame of a collapsed screen tent.
The first shot shows the
deails of the push bar, the upper wire support bushing and the red
button to push down to unlatch the door. (The background is the Desert Mesa south of Ehrenberg Az)
This
second shot shows the detail of the wire bending and the hole drilled
in the white slide seal cover. A small grove was necessary in the slide
itself to allow full closure of the slide. I used a soldering
iron to melt the required slot.
The stiff wire support at the pushbar was made from a wire holder,
around a piece of rubber tubing.
----------------------------------------------------------------------
RV Idea 3.
Fixing Flexible Water Jugs:
We
leave Ontario in early November, and have all systems winterized.
Water is in 5 gallon flexible water carriers, which can be
folded and stored when empty. We keep them in the
shower. The problem is that folding usually results in pinhole
leaks which according to Reliance Industries (the maufacturer) are not
repairable. I had tried many patching materials over the years
but found only one method works. Use a glue gun. The carrier is made of
polyethylene and so is the glue material. Use enough heat to soften the
bag material enough to bond with the glue, and the patch will hold
forever. Hobby glue guns are usually not hot enough.. But be careful
not to melt an even bigger hole.
---------------------------------------------------------------------
RV Idea 4.
Simple Parking Light Warning:
All my motorhomes have never had a buzzer to alert me if the parking or headlights lights are left on after parking.
I
made the following simple circuit, consisting of a 2000 ohm
resistor in series with the negative wire of a 12 volt buzzer from
Radio Shack. You can use either a mechanical buzzer or a piezo alarm.
Resistor size is not critical, 1000, 2000 or 3300 ohms should work.
Connect
the +12 volt wire from the buzzer to a point that is live
when the lights are on. I use the parking light. Connect to loose
end of the resistor to ground. And then connect the mid point (where
the resistor and -12 v. from the buzzer are connect together) to a source which is live
when the key is on. That's all. Very simple. Do you really need a drawing?
Turn
on the lights and buzzer sounds. Turn on the key with the lights on,
then both sides of the buzzer are at the same potential. Buzzer goes
silent. Turn on the key with lights off and 12 volts is only across the
resistor, drawing a few milliamps but the buzzer remains silent.
----------------------------------------------------------------------
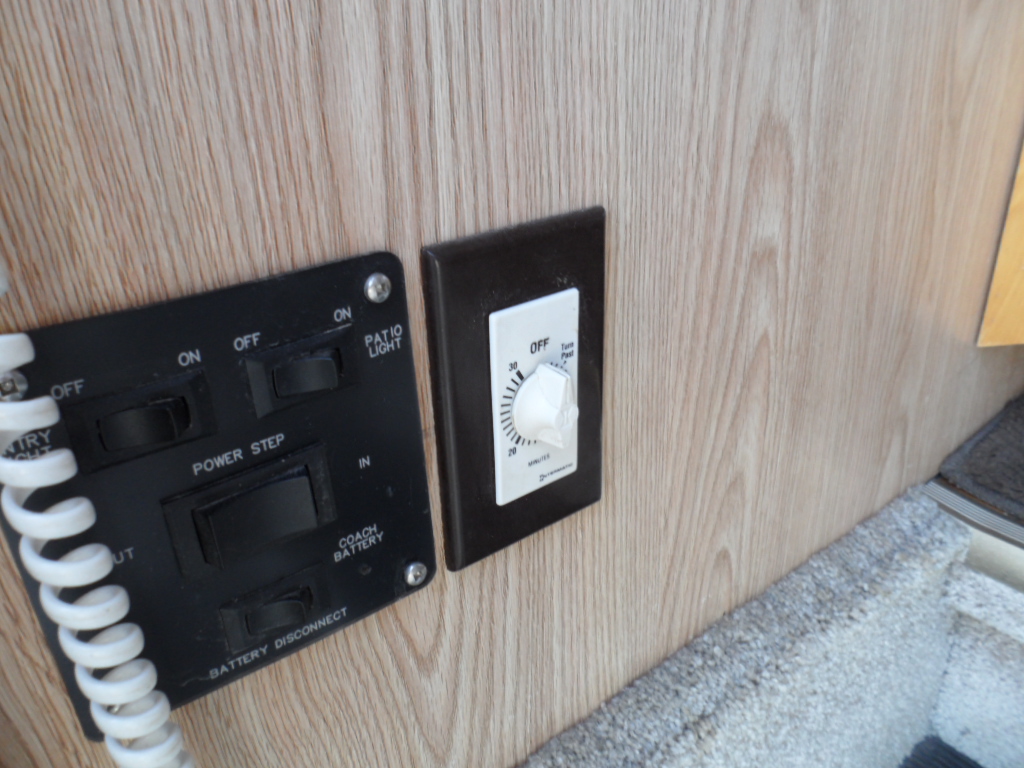
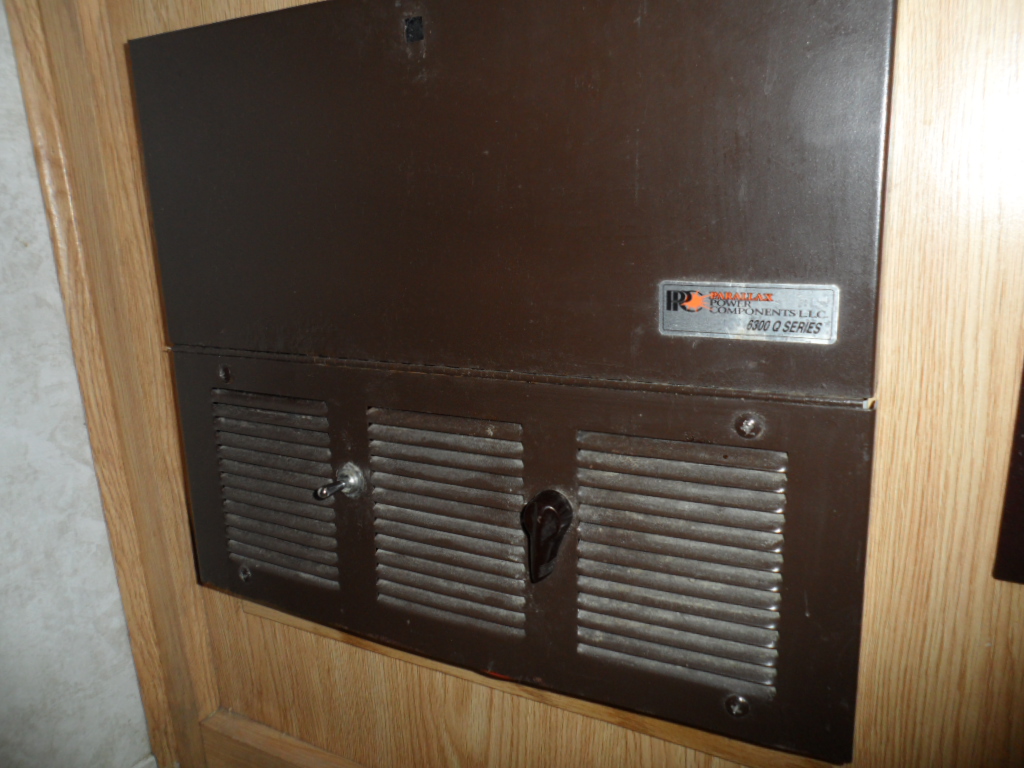
RV Idea 5.
6300 Series Power Converter:
This
electrical mod is more complicated and can vary depending on the
maufacturer of your RV's converter. Mine is a Parallax 6345 120/12 volt
converter as shown in this photo.
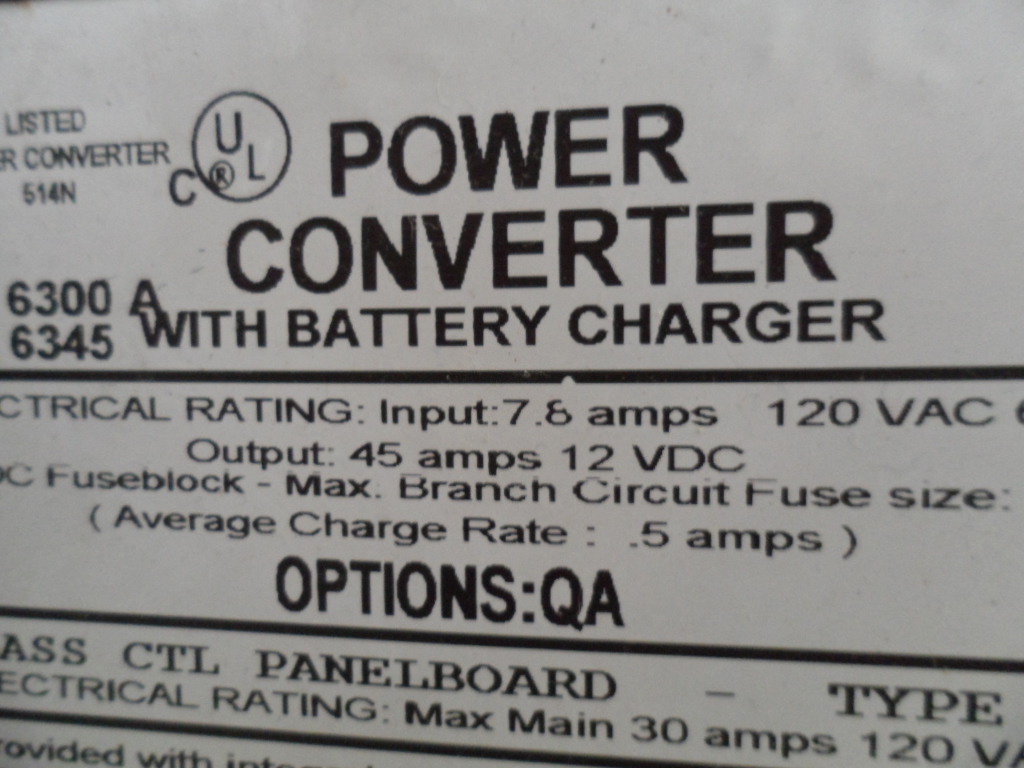
But the principle is the same for most.
Step 1.
I
put a 120 volt switch in the internal wire from the main breaker to the
transformer. It is usually black. Since I have plenty of
regulated
charging current available from solar, I wanted to prevent the
unregulated built in trickle charger from overcharging the
batteries and boiling away the water whenever plugged into 120 service.
Switch it off and you disable all charging.
You can see the switch on the left in this next photo.
After
exploring the innards of the Converter , I wondered why the converter
was rated at 45 amperes but the charger was averaging only 0.5 amperes.
Maybe I could fiddle the converter portion wiring to create a
more robust charger and decrease generator run times if needed.
Step 2.
Where
were the converter amps going? I traced more wires and found that there
were two power supplies inside. One small rectifier was used to
energize the coil of a transfer relay, and the other fed the
charger and the converter. The transfer relay switched a portion of the
12 volt fuse bank off the battery when the RV was powered from 120
volt. The remainder of the fuses remained connected to the batteries, I
assume as a sort of noise filter.
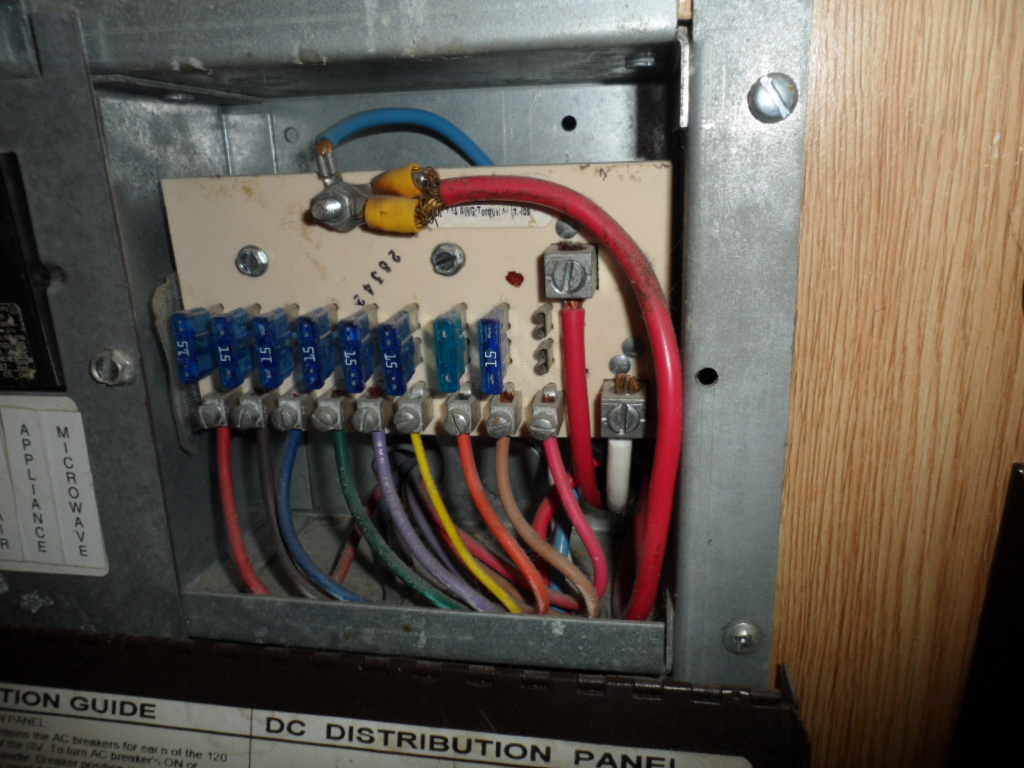
The
next step was to connect both left and right portions of the fuse
panel together. The New Heavy Red jumper wire with two yellow
lugs is connected to the stud with the blue wire coming from the
transfer relay. It is sized to handle the full output of the
converter. It goes behind the fuse panel and connects at the back
of the panel directly behind the Screw Connector with the smaller
red wire. At that location (behind) I first removed and taped the
output wire that feeds from the trickle charger and parallels the two
sections of the fuse panel (red , not visible in the photo).
Really simple, once you have traced the wiring. If you cannot do
this yourself , get someeone who can. I won't provide a diagram
as every converter is slightly different and ratings are all over the
map.
Now
I had something. A real boost charger at little cost. Testing showed
over 35 amperes initially, dropping slowly to about 30 amperes after 5
minutes or so.
What about over charging? I then added a timer
identical to the one used for the patio light, in series with the wire
from the small diode rectifier to the transfer relay coil. It times out
in 60 minutes, shutting down the 30 ampere section and flipping back to
trickle. The timer is located on the right side of the Panel front view
photo. The brown lever arm made it easier to set and then view status
from afar. The timer shuts down at whatever time I preset. It
also forces me to be around when running a boost charge that needs more
than an hour. ------------------------------------------------------------------
RV Idea 6
Onan Fuel Pump:
I
had continuous problems with my Onan fuel pump. Failed several times.
It might be a heat problem. It might be due to the gas tank seal filler
cap being sealed and the pump cannot overcome the vacuum. No one knew. Onan
replaced the carburetor. Failed again. Onan replaced the pump. Failed
again. This was getting expensive. The location made it difficult to
replace by myself.
Following
a discussion with a 18 wheeler
driver who mentioned he always adds a second fuel pump in series with
the standard pump, just in case. If one fails the other takes
over. It gave me an idea. I bought a replacement and found
a place to install it in the front of the Generator compartment where
it was easier to access. Leaving the old pump in place, I put the new
pump #2 flow in series with the output of the old pump #1, and
connected the output of pump #2 to the carburetor. Then
I electrically wired up the old and new pumps in parallel so they were
both energized at the same time. (It seems there is a solenoid in the
old pump which must be energized to allow through flow to the new
pump). It has worked perfectly ever since..
But if it does fail, I can now replace it myself.
Here is the photo Of
my placement of the second fuel pump.
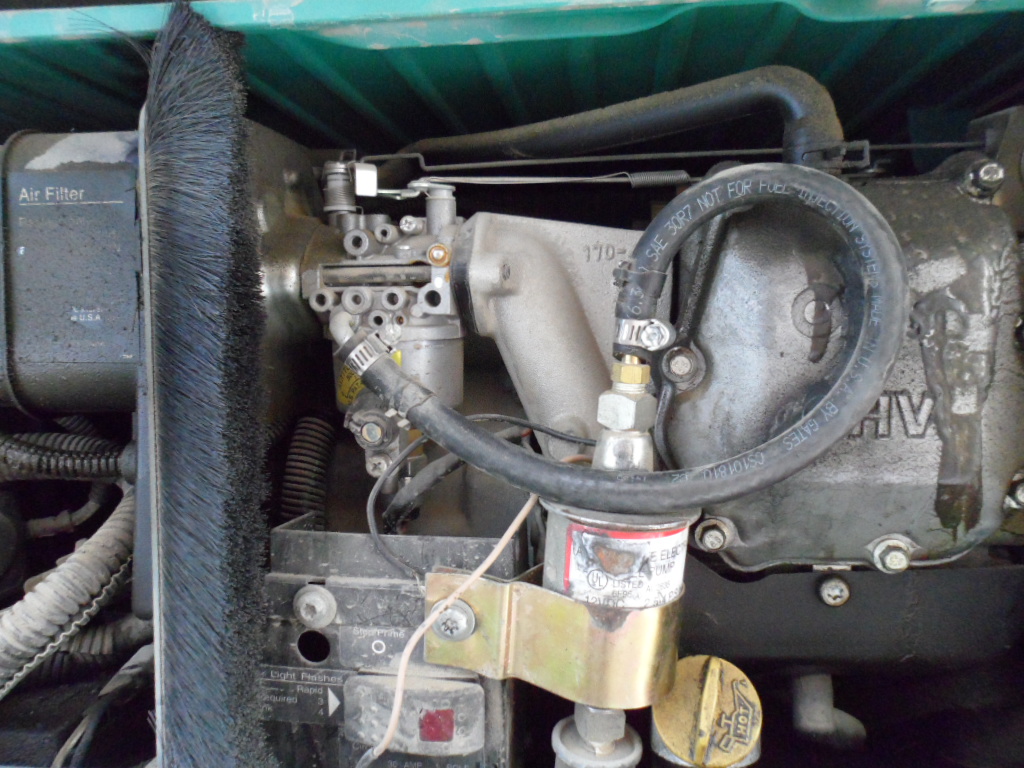
It is a little crude and shows the signs of years of bouncing on gravel backroads. There is not much
choice of placement. I do have to lift the pump slightly to check oil
level, but so far twice a year has been sufficient. With 360 watts
solar, I only put about 10hours a year on the generator, running
it monthly to flow fuel through the carburetor and keep it out of the
shop.
--------------------------------------------------------------------------
RV Idea 7
Water Heater Temperature Control.
Water
and Propane saving are at the top of my list for extending boondocking
periods. We allowed 3/4 gallon of fresh water per person per day when
living on the boat. During our first years RVing we attempted to
meet these numbers. The shower was the biggest user. It needed lots of
propane if left on all day and wasted good water just geting the
temperature adjusted.. We soon learned to only heat the tank if
needed for showers. That saved propane, but water was still
going down the drain while adjusting the temperature. Ok, so we then
caught the initial water from the shower head in a bucket. That
saved some water.
But the real problem was the tank was too hot and it needed cold water to make it comfortable to shower.
I
bought an indoor outdoor thermometer and tucked the sensor on the tank
inside the insulation. The readout was placed where it was visible
inside the rig. Now we heat the tank to 100F (you pick your own
setting), and then shut down the water heater. We no longer have
any need to fiddle with the tap mixture. Problem solved.
----------------------------------------------------------------------
RV Idea 8.
Buddy Heater:
This
is more a suggestion than a mod, but is perhaps something of a new idea
for most. The small Buddy Propane Heaters will only run on the green
1lb bottles for 3 hours at full output, and maybe 6 hours at half
output. But when run on pilot alone will run for over 40 hours. In our
RV, the pilot flame alone will raise and hold the temperature
inside about 15F above outside , enough to keep us comfortable on
evenings, and cool days. It is like having a 300 to 400 watt heater
that does not need electricity. Works for tent campers also.
----------------------------------------------------------------------------------------
RV Idea 9.
Towing Car with Automatic Transmission :
In
keeping with the theme of showing ideas which have not been seen
elsewhere I must mention that in spite of what you read about not
beeing able to tow most automatic transmission vehicles, you can. Just
leave the engine running, and tow anywhere. This allows the lube pump
to circulate and the engine cooling to dissipate the transmission heat.
---------------------------------------------------------------------------------------------------------------
RV Idea 10.
Backing with Towed Vehicle attached:
Most
literature warns against trying to back a motorhome with Toad
attached. After towing for several years I realized
that as long as backing straight I could move a fair distance before
the car would jackknife. The problem was knowing when the car was
getting out of control. By the time it was visible in either
mirror, it was too late. To solve the problem I drew lines
showing the straight back outline of the car on the backup monitor. If
the car drifts towards the outline then move the top of the steering
wheel towards that edge. It will correct itself and you will be able to
continue backing. As long as it is kept straight backing can continue.
This led me to develop a procedure for turning around. Find a place
where the road makes a "T". Approach the "T" and make the turn and go
until the auto is centered straight behind. Now backup across the
"T" using the technique above. Now you can leave via the road you
entered .
More to come......
73 de VE3LGS
Return to boondock page: