
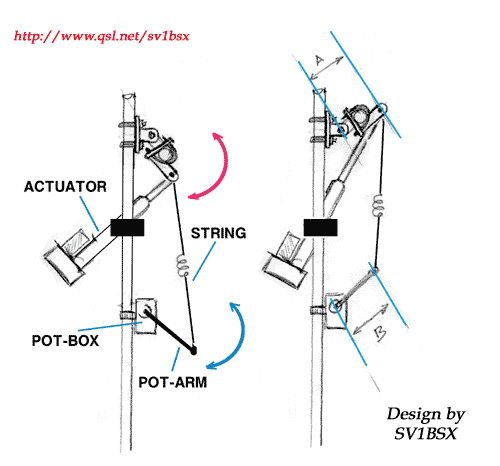
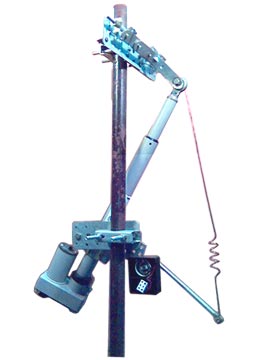
On my page "How to build a Homebrew Elevator system", I have been reported briefly to the "Elevator" that I've used on my QTH, without details. The following picture shows my
basic setup. As you can see, the edge of elevation hinge is coupled with the pot-arm by using a wire-string.
Thus, the hinge and the pot-arm moved "in step" (in synchronism). That way we don't need the internal pulse-switch of Actuator (which is not compatible with Sat-track programs), in order to read-out the Elevation angle.
I received a lot of Emails where you asked me about the details of my Elevation's "read-out" method.
I wrote few ideas for homebrewing "read-out" with wheels etc., but finally I used on my system the pot-arm method. I decided that is the simplest method.
In other words, If the Elevation's hinge moves to up (increasing Elevation), the wire-string drags the pot-arm also up, and the opposite.
Thus, the runner of pot (pot = potentiometer) gives variable resistance, depended on the Elevation angle. The variable resistance can be easily converted to a variable voltage.
|
The most important point for the relationship between the Elevation and the pot's movement, its the "spacing" A ( & B). The "A" is between the axial of Hinge up to the "point", where is coupled the upper edge of the "string".
The spacing "B" is between the axial of pot and the edge, where is coupled the lower point of the wire-string.
Example: if the "A" = 15cm and the B = 15 cm, thus the relationship in movement between Elevation angle and Pots angle is equal. If the Elevation varies 90°, also the pot moves 90°.
The angle that varies the pot, depend on the formula:
(where P = percentage of pot's angle * Elevation's angle) |
Example2: we supposed that, the A=15cm & B=20cm.
P = 15 / 20 => P = 0.75
Thus if the maximum Elevation = 90°, the pot's angle 0.75 x 90° = 67.5°.
In other words, if the Elevation-hinge moves 0-90°, the pot moves 0-67.5°.
This way, we can prearrange the movement-angle of pot.
Keep in mind that, for this kind of coupling the pot-arm (space B) must be equal or larger of the hinge spacing "A". Never, I repeat NEVER A>B.
Contruction
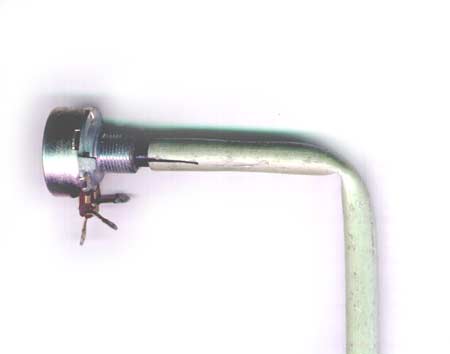
The "string" is made by using a hard wire, about 2 mm diam. It has a coil-form in the middle of string, in order to gives some flexibility if the wire is hard (i.e. steel).
The pot-arm has been constructed by using 8mm ext. diam. aluminium tube . This dimemsion is perfect, because the internal diameter of tube is equal to pot's axial, so the axial can be easily inserted into the tube (the majority of pot-axials have 6mm diam.).
|
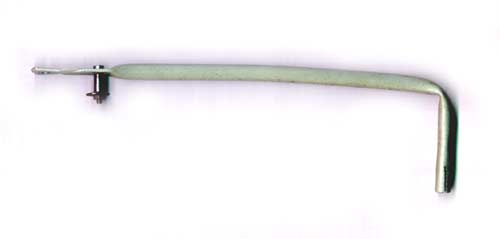
After the insertion, the tube is bent by 90°, in order to make the final form of the pot-arm, like a "Gamma", as shown in the picture above & below.
 |
|
 | 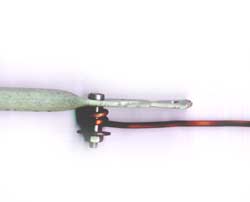 |
A small hole through the arm & axial for a pin or a mini-screw helps, in order to prevent any sliding between the pot-arm and the axial of pot. Thus, we secured the stabilization between the pot-arm and pot-axial.
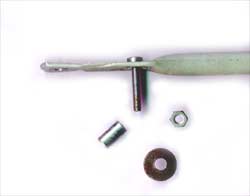
The "coupling-point" on the outer edge of arm is made by using a screw, a PCB spacer, a grommet and a nut. The lower edge of wire-string is winding over the tubular spacer (like a coil) as shown on the pictures above. Thus, we have good connectivity between the arm and the wire- string, without lash and friction. On the other hand, the lower edge of wire-string which is coiled over the spacer, it can easily move (slide) at this point , in order to transfer the angle's movement from the upper part (hinge) down to the pot.
Also the upper coupling-point, close to the Elevation's hinge, is made by using the same technique.
Limitation notice: if the Pot is moved 0-90°, the voltage output is the 1/3 of pot's voltage-feeding (pot has 270° full arc, so 90° = 270° / 3). So, if your Tracking interface needs a variable voltage 0 - 5 V for 0-90° Elavation-reading, the pot's feeding must be 15 Volts and DON't forget:
always should be used a High-Quality wire-pot (i.e. Burns), enclosured in a weather-proof box with good enough supporting from the mast, for stability. Thus, you will have a readout sensor without problems, for many years.
 |
Have Fun with Ham-radio
Makis SV1BSX (Mar. 2005)
![]()