MEDIDOR
DE SWR "FALADO" (for English please scroll down)
Video em
portugues
TALKING SWR
METER (video english)
Outro medidor (another meter) SWR
by tone ...ROE por variação de tom
Mais uma aplicação do Arduino, especial para
radioamadores cegos.
O primeiro desta série foi o frequencimetro falante ,
onde explicamos algumas coisas a mais que neste documento.
Com uma ponte de
ROE / SWR comum o arduino lê e fala a
relação de ondas estacionárias.
Como funciona :
Algoritmo:
O valor lido de SWR entre 1:1 e 1:5, na realidade é calculada a
relação entre a tensão de RF incidente
(Vinc) com a tensão refletida (Vref); com 50 Ohms na saida a
relação das tensões fica em 1:1, com 250 Ohms na
saida a relação fica em 1:5.
A formula é dada :
SWR = (Vinc + Vref) / (Vinc-Vref)
Assim teremos como resultado numeros entre 1 e limitados por software a
5, no algoritmo que usamos multiplicamos o valor de SWR por 10 para
conseguir o valor do numero logo abaixo da virgula ex 1,3324 , primeiro
somamos 0,05 para arredondar a casa significativa do numero desejado
1,3324 será 1,3824 (caso fosse 1,3624 teriamos apos a soma
1,4324), multiplicamos por 10 obtendo swr= 13,324 e
aplicamos o comando abs() resultando em swr=13 ...
Do numero 13 dividimos por 10
d=swr/10
d=13/10 = 1 resulta somente a parte inteira
e apos isto obtemos u
u=(swr -(d*10))
u= (13- (1*10)) =13-10=3
Falando :
Gravamos arquivos de formato .WAV com as palavras necessarias assim
1.wav é "um"
e 1:1.3 temos os arquivos "estacionaria um para" o valor de d =
1.wav "um" o arquivo ponto.wav "ponto" e por fim o valor u =3.wav
"tres".... "estacionaria um para tres"
A biblioteca escolhida lê os arquivos .wav, gravado no Sdcard e
reproduz em sinal analogico, um amplificador com 2n2222 e um LM386 faz
o audio ser amplificado apra um pequeno alto falante.
Gravando arquivos .wav :
Os arquivos de voz (disponivel em vários idiomas) foram gerados
no seguinte link :
http://www.oddcast.com/home/demos/tts/tts_example.php
Colocamos em
portugues, e usamos um software (da Creative) "Gravador Inteligente",
onde é gravado o que se ouve, assim gravamos o som de UM, DOIS
...NOVE, assim por diante ... depois com o
software "WAVE STUDIO" (tambem da Creative) editamos cada arquivo
retirando as partes não necessarias e aumentamos o volume quando
fosse preciso.
Gravamos em um SDcard e usamos um shield do arduino que lê o
SDcard.
É possivel gravar em outras linguas, e gravamos tambem em ingles
:
Video em
ingles
Esquema :
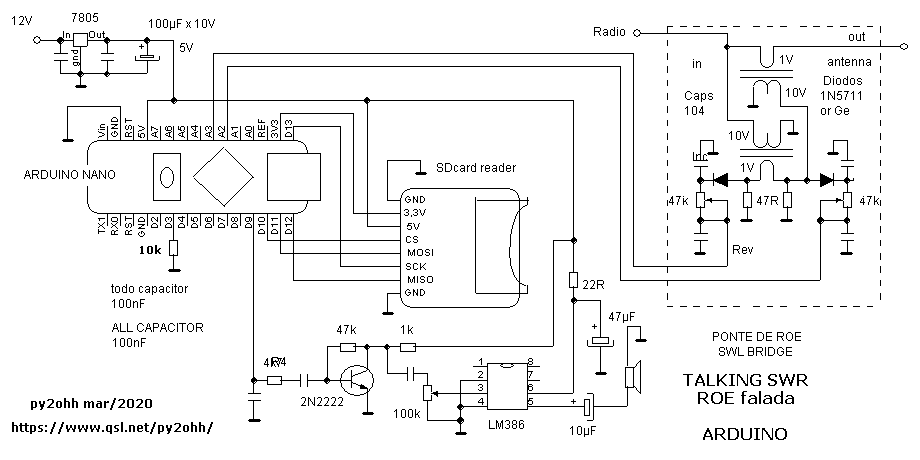
Montagem :
Cuidado na montagem da ponte de SWR, blindagem são necessarias,
leia mais sobre potencia etc em:
PONTE DE SWR
Nota :
Para desativar a leitura da ROE, basta ligar o pino D3 do arduino ao 5V
via resistor de 10k.
Ou incluir um transistor para unção mute como no frequencimetro falante.
Duvidas sugestões escreva para [email protected] remova o XX.
Biblioteca TMRpcm
Para este sketch usamos a IDE arduino versão 1.6.1
Arquivos wave para serem gravados no Sdcard.
Sketch :
#include <SPI.h>
#include <SD.h>
#include <TMRpcm.h>
TMRpcm tmrpcm;
#define SD_ChipSelectPin 10
float ax = 0 ;
const int bPin = 3;
int bestado = 1;
float Vinc, Vref = 0, SWR;
int d, u, dezena, unidade ;
void setup() {
Serial.begin(9600);
tmrpcm.speakerPin = 9;
pinMode(bPin, INPUT);
if (!SD.begin(SD_ChipSelectPin)) { // see if the card is
present and can be initialized:
Serial.println("SD fail");
return;
}
tmrpcm.setVolume(5);
tmrpcm.play("py2ohh1.WAV");
delay (5000);
Serial.println("py2ohh");
}
void loop() {
Vinc = analogRead(2);
while (Vinc<100) {
Vinc = analogRead(2);
}
delay(100);
Vinc = analogRead(2);
Vref = analogRead(3);
SWR = (Vinc + Vref) / (Vinc - Vref);
SWR=SWR + 0.05;
ax = abs(10 * SWR);
bestado = digitalRead(bPin);
if (bestado == LOW) {
if (SWR > 4.9) {
tmrpcm.play("ealta.WAV");
delay(4000);
}
else {
debulhando();
falando();
}
}
delay(1000);
}
void undde() {
if (unidade == 1) {
tmrpcm.play("1.WAV");
delay(1000);
}
else if (unidade == 2) {
tmrpcm.play("2.WAV");
delay(1000);
}
else if (unidade == 3) {
tmrpcm.play("3.WAV");
delay(1000);
}
else if (unidade == 4) {
tmrpcm.play("4.WAV");
delay(1000);
}
else if (unidade == 5) {
tmrpcm.play("5.WAV");
delay(1000);
}
else if (unidade == 6) {
tmrpcm.play("6.WAV");
delay(1000);
}
else if (unidade == 7) {
tmrpcm.play("7.WAV");
delay(1000);
}
else if (unidade == 8) {
tmrpcm.play("8.WAV");
delay(1000);
}
else if (unidade == 9) {
Serial.println("nove");
tmrpcm.play("9.WAV");
delay(1000);
}
}
void dzn() {
if (dezena == 1) {
tmrpcm.play("1.WAV");
delay(1000);
}
else if (dezena == 2) {
tmrpcm.play("2.WAV");
delay(1000);
}
else if (dezena == 3) {
tmrpcm.play("3.WAV");
delay(1000);
}
else if (dezena == 4) {
tmrpcm.play("4.WAV");
delay(1000);
}
else if (dezena == 5) {
tmrpcm.play("5.WAV");
delay(1000);
}
else if (dezena == 6) {
tmrpcm.play("6.WAV");
delay(1000);
}
else if (dezena == 7) {
tmrpcm.play("7.WAV");
delay(1000);
}
else if (dezena == 8) {
tmrpcm.play("8.WAV");
delay(1000);
}
else if (dezena == 9) {
tmrpcm.play("9.WAV");
delay(1000);
}
}
void falando() {
if (u != 0) {
dezena = d;
tmrpcm.play("eumpr.WAV");
delay(2500);
dzn();
tmrpcm.play("ponto.WAV");
delay(1000);
unidade = u;
undde();
}
if ((u == 0) ) {
dezena = d;
tmrpcm.play("eumpr.WAV");
delay(2500);
dzn();
}
}
void debulhando() {
Serial.println(ax);
Serial.println();
d = (ax / 10);
Serial.println(d);
Serial.println();
u = (ax - (d * 10));
Serial.println(u);
Serial.println();
}
73 de py2ohh miguel
XXXXXXXXXXXXXXXXXXXXXXXXXXXXXXXXXXXXXXXXXX
English
ARDUINO TALKING SWR METER
TALKING SWR
METER (video english)
this is another application of Arduino, especially for blind radio
amateurs.
The first in this series was the talking frequency meter talking frequency meter
(portuguese) , where we
explained a few more things than in this document.
With a common ROE / SWR bridge the arduino reads and speaks the
standing wave ratio.
How it works :
Algorithm:
The SWR value read between 1: 1 and 1: 5, in reality, the relationship
between the incident RF voltage (Vinc) and the reflected voltage (Vref)
is calculated; with 50 Ohms at the output the voltage ratio is 1: 1,
with 250 Ohms at the output the ratio is 1: 5.
The formula is given:
SWR = (Vinc + Vref) / (Vinc-Vref)
So we will have as a result numbers between 1 and limited by software
to 5, in the algorithm we use we multiply the SWR value by 10 to get
the value of the number just below the point ex 1.3324, first we add
0.05 to round the significant place of the desired number 1.3324 will
be 1.3824 (if it were 1.3624 we would have after the sum 1.4324),
multiply by 10 obtaining swr = 13.324 and apply the command abs ()
resulting in swr = 13
From number 13 we divide by 10
d = swr / 10
d = 13/10 = 1 results only the entire part
and after that we get u
u = (swr - (d * 10))
u = (13- (1 * 10)) = 13-10 = 3
Speaking :
We write .WAV format files with the necessary words so 1e.wav is "one"
and 1: 1.3 we have the files "SWR one for" the value of d = 1e.wav
"one" the file point.wav "point" and finally the value u = 3e.wav
"three" .... "SWR one to three "
The chosen library reads the .wav files, recorded on the Sdcard and
reproduces in analog signal, an amplifier with 2n2222 and an LM386
makes the audio amplified to a small speaker.
Writing .wav files:
The voice files (available in several languages) were generated at the
following link:
http://www.oddcast.com/home/demos/tts/tts_example.php
We put it in English, and we use a software (from Creative)
"Intelligent Recorder", where what is heard is recorded, so we record
the sound of ONE, TWO ... NINE and so on .. then
with the software "WAVE STUDIO" (also from Creative) we edit each file
removing the unnecessary parts and increase the volume when necessary.
We write to an SDcard and use an arduino shield that reads the SDcard.
It is possible to record in other languages.
Assembly :
Care in the assembly of the SWR bridge, shielding is necessary, read
more about power etc in:
SWR BRIDGE
Note :
To disable the ROE reading, simply connect the D3 pin on the arduino to
the 5V via a 10k resistor.
Or include a transistor for mute anointing as in the (sechematic) talking frequency meter
(portuguese).
Doubtful, suggestions, english corrections write to
[email protected] remove the XX.
TMRpcm library
For this sketch we use the arduino IDE version 1.6.1
Wave files to be recorded on the Sdcard.
Sketch in english :
#include <SPI.h>
#include <SD.h>
#include <TMRpcm.h>
TMRpcm tmrpcm;
#define SD_ChipSelectPin 10
float ax = 0 ;
const int bPin = 3;
int bestado = 1;
float Vinc, Vref = 0, SWR;
int d, u, dezena, unidade ;
void setup() {
Serial.begin(9600);
tmrpcm.speakerPin = 9;
pinMode(bPin, INPUT);
if (!SD.begin(SD_ChipSelectPin)) { // see if the card is
present and can be initialized:
Serial.println("SD fail");
return;
}
tmrpcm.setVolume(6);
tmrpcm.play("pye12.WAV");//change for your call .wav file
delay (5000);
}
void loop() {
Vinc = analogRead(2);
while (Vinc < 100) {
Vinc = analogRead(2);
}
delay(100);
Vinc = analogRead(2);
Vref = analogRead(3);
SWR = (Vinc + Vref) / (Vinc - Vref);
SWR = SWR + 0.05;
ax = abs(10 * SWR);
bestado = digitalRead(bPin);
if (bestado == LOW) {
if (SWR > 4.9) {
tmrpcm.play("hswr.WAV");
delay(1000);
}
else {
debulhando();
falando();
}
}
delay(1000);
}
void undde() {
if (unidade == 1) {
tmrpcm.play("1e.WAV");
delay(1000);
}
else if (unidade == 2) {
tmrpcm.play("2e.WAV");
delay(1000);
}
else if (unidade == 3) {
tmrpcm.play("3e.WAV");
delay(1000);
}
else if (unidade == 4) {
tmrpcm.play("4e.WAV");
delay(1000);
}
else if (unidade == 5) {
tmrpcm.play("5e.WAV");
delay(1000);
}
else if (unidade == 6) {
tmrpcm.play("6e.WAV");
delay(1000);
}
else if (unidade == 7) {
tmrpcm.play("7e.WAV");
delay(1000);
}
else if (unidade == 8) {
tmrpcm.play("8e.WAV");
delay(1000);
}
else if (unidade == 9) {
Serial.println("nove");
tmrpcm.play("9e.WAV");
delay(1000);
}
}
void dzn() {
if (dezena == 1) {
tmrpcm.play("1e.WAV");
delay(1000);
}
else if (dezena == 2) {
tmrpcm.play("2e.WAV");
delay(1000);
}
else if (dezena == 3) {
tmrpcm.play("3e.WAV");
delay(1000);
}
else if (dezena == 4) {
tmrpcm.play("4e.WAV");
delay(1000);
}
else if (dezena == 5) {
tmrpcm.play("5e.WAV");
delay(1000);
}
else if (dezena == 6) {
tmrpcm.play("6e.WAV");
delay(1000);
}
else if (dezena == 7) {
tmrpcm.play("7e.WAV");
delay(1000);
}
else if (dezena == 8) {
tmrpcm.play("8e.WAV");
delay(1000);
}
else if (dezena == 9) {
Serial.println("nove");
tmrpcm.play("9e.WAV");
delay(1000);
}
}
void falando() {
if (u != 0) {
dezena = d;
tmrpcm.play("swr12.WAV");
delay(3000);
dzn();
tmrpcm.play("point.WAV");
delay(1000);
unidade = u;
undde();
}
if ((u == 0) ) {
dezena = d;
tmrpcm.play("swr12.WAV");
delay(3000);
dzn();
}
}
void debulhando() {
Serial.println(ax);
Serial.println();
d = (ax / 10);
Serial.println(d);
Serial.println();
u = (ax - (d * 10));
Serial.println(u);
Serial.println();
}
73 from py2ohh miguel