SIMPLE QRSS RECEPTION WITH VERSION 4 RTL-SDR BLOG DONGLES
(2024)

Is the new Version 4 RTL-SDR blog dongle the simple solution for a simple QRSS grabber?
We're going to try it out! Barefoot on the way too cold tiled floor to prevent static electricity!
New version 4 of the RTL-SDR blog dongle!
A Simple QRSS grabber is what I want!
Is the new Version 4 RTL-SDR blog dongle suitable for such a simple QRSS grabber? We're going to try it out! This new version 4 of the famous RTL-SDR blog dongle uses a built in upconverter instead of using a direct sampling circuit. So the reception on HF bands is much better than the previous version 3!
Once I wanted a new radio life. Only simple and cheap radio projects and very sober barefoot in the shack. Barefoot to prevent static electricity and because it's simple! And I want to stick to my principles! Only 8C degrees but barefoot on the ice cold tiled floor of the shack! Far too cold for my bare feet and very soon my toes were like ice cubes! Indeed, I am very motivated and don't want to wait until summer! A small, inconspicuous miniwhip antenna and a very cheap RTL-SDR dongle instead of a big antenna and expensive equipment! That is too good to be true!

The dongle is directly connected to the PA0RDT miniwhip antenna (without a bandfilter!) and is controlled by RTLSDRlop QRSS software.
Really suitable for a QRSS grabber? I want to test that better and much longer!
The dongle is directly connected to the PA0RDT miniwhip antenna (without any bandfilter!) and is controlled by RTLSDRlop QRSS software with a Windows laptop. And the first results were very exciting! Unbelievable! The first impression is that the performance is more or less comparable with my normal QRSS receivers!!!
Ice cold bare feet on the much too cold tiled floor and dangerously cold toes that have scary red-purple colors! But no pity for my poor toes, I want to test this exciting simple setup for QRSS reception much longer! Without anything being damaged by electrostatic discharges! How is the sensitivity of the RTL-SDR dongle? Do we need a HF amplifier or just the opposite, an attenuator to prevent overload? Do we need a complex bandfilter and what are the best software settings?

Very simple test method!
Very simple test method!
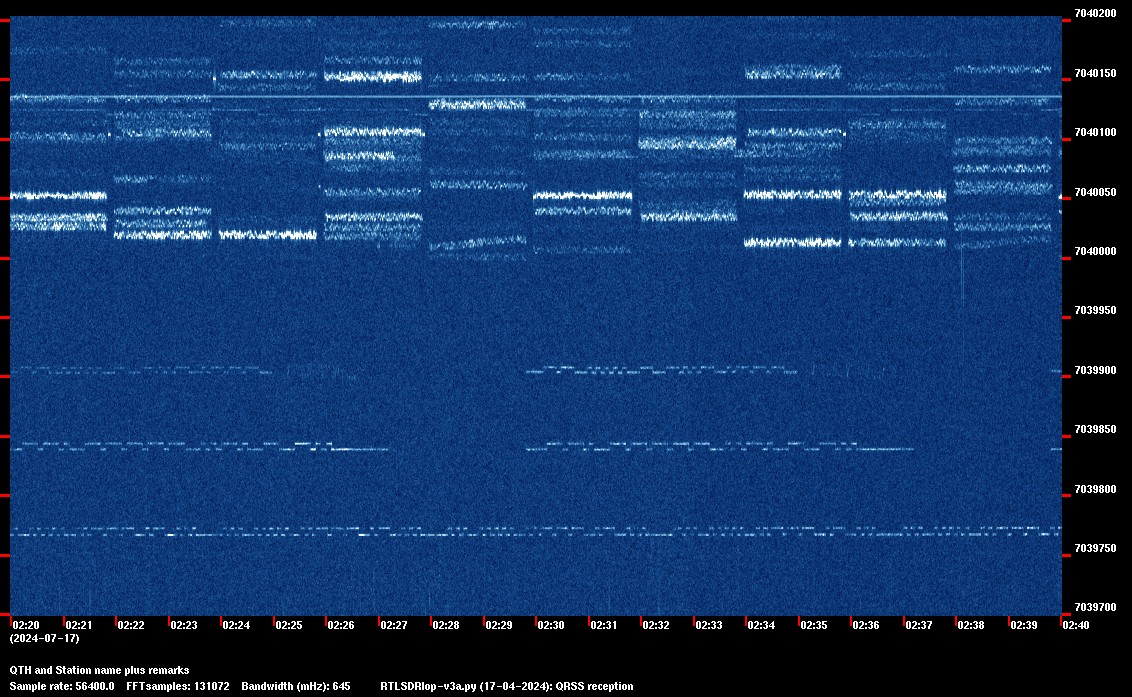
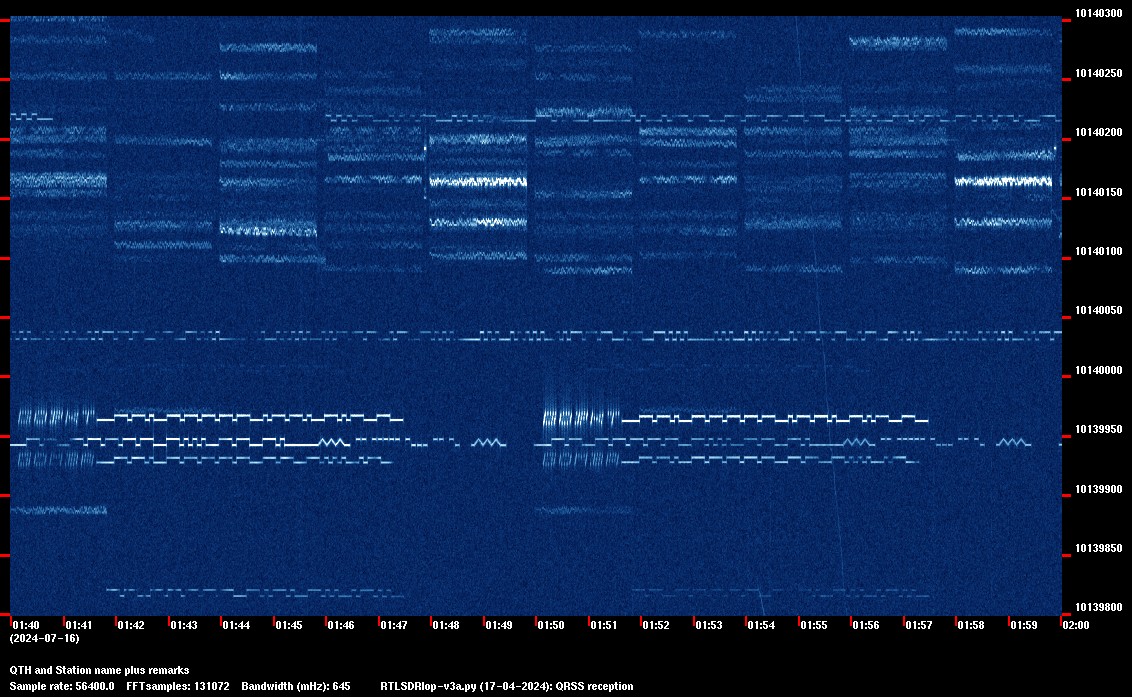
I had a very simple test method to test the RTL-SDR dongle with miniwhip antenna. See the picture above.
-
At the left from 18.40 till 18.43 you see a perfect QRSS reception. But at 18.43 the antenna is disconnected and the background darkens as the background noise of the antenna disappears. When the disappearance of that background noise is visible, then the sensitivity is sufficient!
-
And at 18.45 the gain is increased from 40 to 50. Ghost signals become visible, the dongle is overloaded by too strong signals. Reduce the gain till the ghost signals disappear and check if the sensitivity is still sufficient.
Good results with Windows, bad results with Linux!
And the results were excellent with Windows, but really bad with Linux... With Windows, I had even more or less the same performance on all QRSS bands as my normal QRSS receivers! On 40 meters, the gain had to be reduced a little from 50 to 40 to prevent overloading the dongle during the evenings. But even at a gain setting of 40, the sensitivity was more than good enough with the small PA0RDT miniwhip antenna! However, the darkening of the background noise was hardly visible at 10 meters, the sensitivity at 10 meters is just good enough. We cannot afford any additional attenuation on 10 meters!
Bad results with Linux, what was the problem?
Good results with Windows, bad results with Linux but identical software...
It took me much effort and many days to find the problem... Barefoot on the much too cold tiled floor, horribly cold red-purple toes, my toes barely survived that cold torture. But after many days and with much effort the problem was found!
The Linux driver rtl-sdr-blog did not support the Python command of the bandwidth setting of the tuner in the dongle. This bandwidth is comparable with the IF bandwidth in a superhet receiver. Instead of a narrow bandwidth of 290 kHz around the reception frequency, almost the whole shortwave band was fed to the A/D converter! I could not solve that driver problem.
The project was suspended till the summer, then I discovered that there was a new version of the rtlsdrlib driver available, suitable for the Version 4 dongle and that supported the bandwidth setting. It was simple to replace the rtl-sdr-blog driver with this new driver and... Excellent results with Linux now! Now it was possible to use the dongle with a Raspberry Pi!
Installation of librtlsdr driver that supports -set and get tuner bandwidth-
A divider box to connect more RTL-SDR dongles to one miniwhip antenna
It worked! One Version 4 RTL-SDR blog dongle and a small, inconspicuous miniwhip antenna! But I wanted to connect more dongles for more QRSS frequencies to the same miniwhip antenna. A divider box was made for that purpose. Every dongle is connected to the antenna via a resonant series circuit of a capacitor and an inductance that is tuned to the receiving frequency. For this resonant frequency, such a circuit has a low impedance, but for other frequencies a high impedance. So the dongle only loads the antenna on its own reception frequency and not on the frequencies of the other dongles! In addition, some extra selectivity is added by this simple filter.
And it does more, it is also an extra protection for if the BIAS-T voltage is accidentally activated. And it suppresses high voltage spikes and pulses!
At the picture below you can also see an older Version 3 dongle. Why? For 10 meters (above 27 MHz) the upconverter is not used anymore and then you can also use the older Version 3 dongle with identical or even better results.

The divider-filter box. Four dongles can be coupled to one antenna and a little extra selectivity has been added!
Design of the divider box
Take a value for the inductance of approximately 200 to 500 ohms at the reception frequency. A low impedance means less losses, a high impedance more losses but also a better selectivity.
3.5 MHz (80 meter):
Z = 1034 ohm
L = 47 uH
C = 40 - 45 pF
Note:
The high impedance causes more losses but also a better selectivity.
And more losses are acceptable as the sensitivity is more than good enough.
5 - 7 MHz (60 and 40 meter):
Z = 830 ohm
L = 22 uH
C = 24 - 46 pF
Note:
The high impedance causes more losses but also a better selectivity.
And more losses are acceptable as the sensitivity is more than good enough.
10 - 14 MHz (30 and 20 meter):
Z = 512 ohm
L = 6,8 uH
C = 19 - 38 pF
18 - 25 MHz:
Z = 435 ohm
L = 3,3 uH
C = 12 - 24 pF
Note:
Can also be tuned to 14 MHz:
Z = 292 ohm; C = 39 pF
28 MHz (10 meter):
Z = 175 ohm
L = 1,0 uH
C = 32 pF
Note:
A low impedance as we want a low loss and do not need a high selectivity.
At this frequency, the upconverter is not used anymore (not above 27 MHz).
I used inductors of average quality. For high impedance filters it is better to use two inductors in series. So for example not one of 100 uH but two of 47 uH in series.
The divider-filter box. Four dongles can be coupled to one antenna and a little extra selectivity has been added!
Simple construction!
I used inductors of average quality, bought once a cheap bag with 100 various values. And also the trimmers of 30 pF was a cheap bag filled with trimmers. If the value of the trimmer is too low, a capacitor of 18 pF or 22 pF is connected in parallel. Indeed, I also have a cheap big bag with those capacitors...
The cables were purchased ready-made with connectors attached and cut in half.
The preferred bands are: Always 30 meters plus 40, 20 and 10 meters. It are the bands with the most QRSS activities.
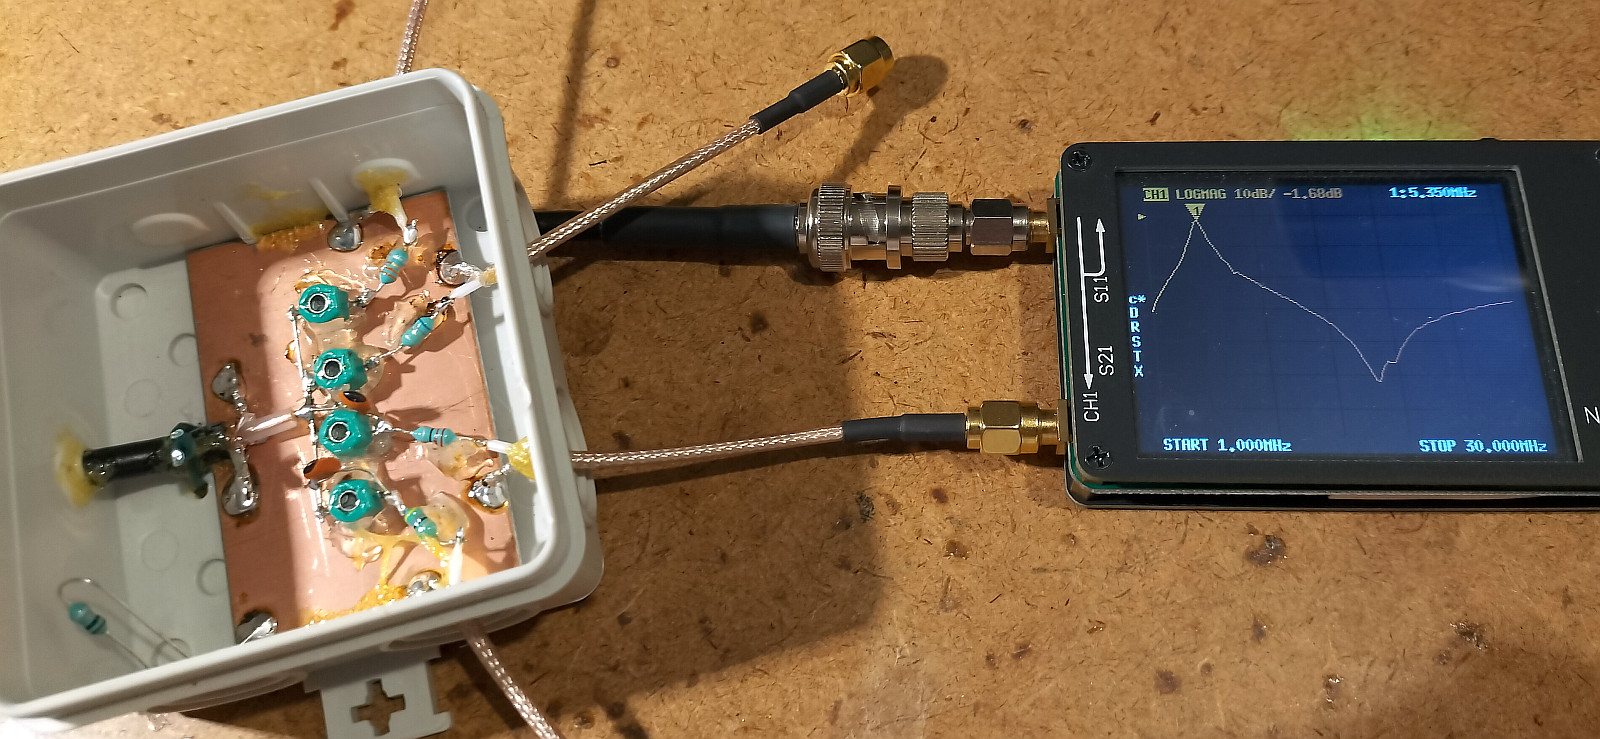
The adjustment of the filters is done with the indispensable NanoVNA!
The adjustment of the filters is done with the indispensable NanoVNA. Every radio amateur should have one of these! It only costs 60 euros and you can adjust all kinds of HF filters and antennas with it and measure their properties like losses! It was my best purchase ever! It is even possible to generate a QRSS test signal with it!
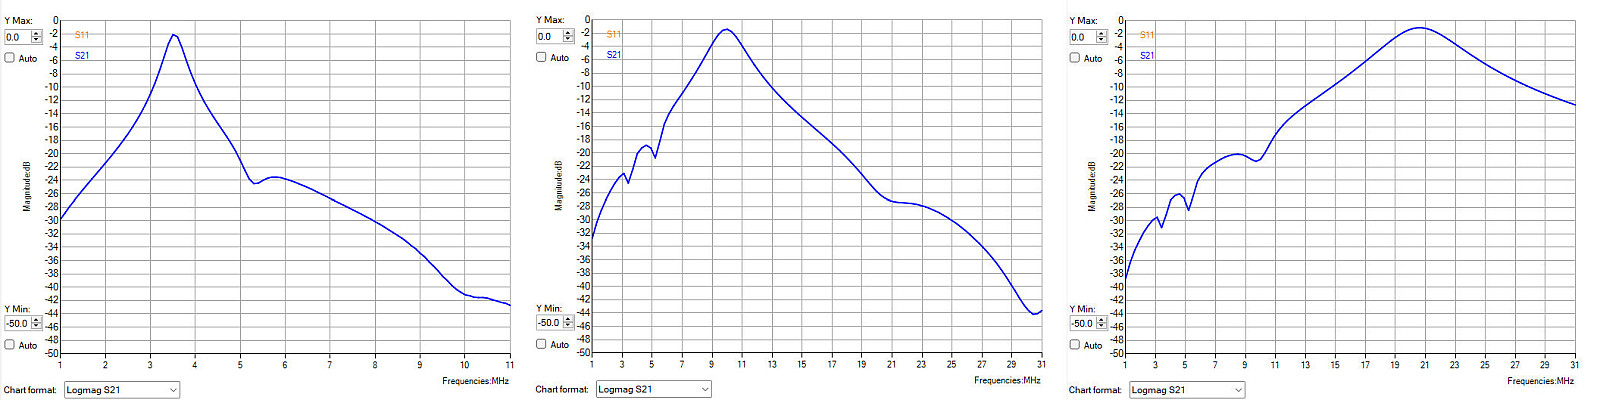
The bandwidth characteristics of the 80 meter, 30 meter and 15 meter filters measured with the NanoVNA.
So also some additional useful extra selectivity is added before the HF upconverter!
Radio interference suppression
Radio interference suppression is important. Nowadays there are so many interference sources like computers and all kinds of other digital equipment.
We can use ferrite absorbers for that. I bought them on Aliexpress and... I could measure the performance with that great NanoVNA!
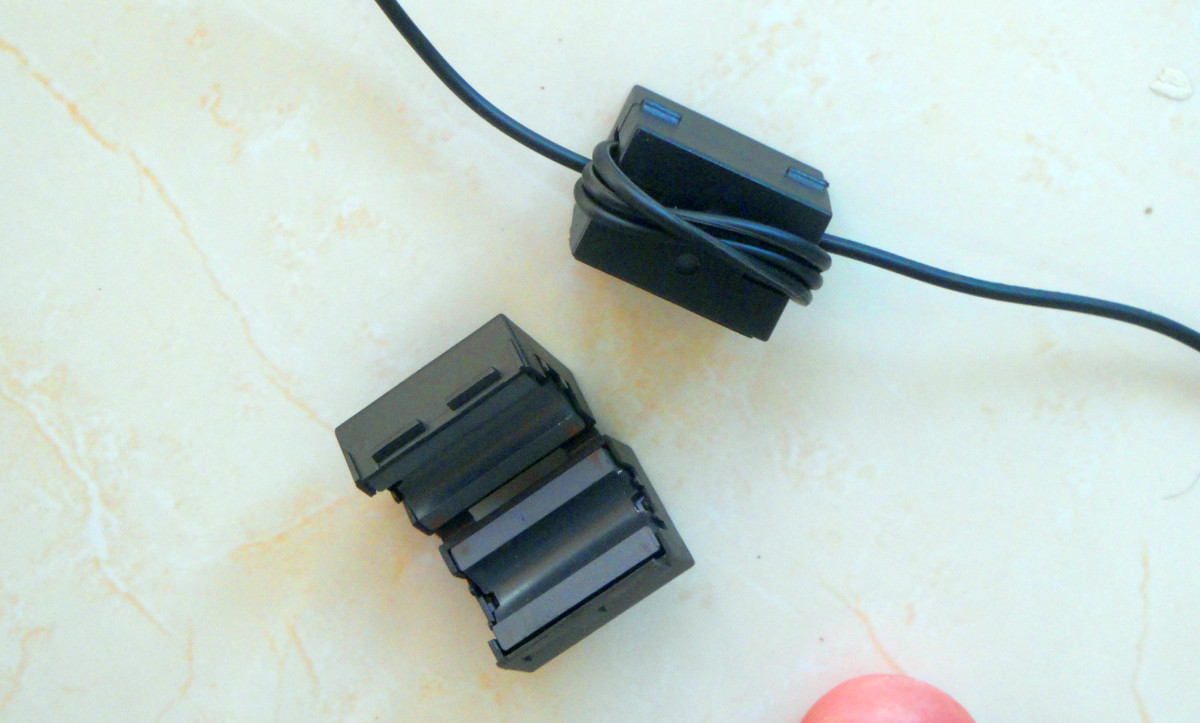
Ferrite absorber for radio interference suppression.
4 to 5 windings around the ferrite.
Do 4 to 5 windings around the ferrite as is shown on the picture above in the following cables:
-
The 5 volt supply cable between AC-DC adapter and Raspberry Pi.
-
The DC supply cable to the antenna if you have an active antenna.
-
The coax cable to the antenna, near the receiver. Use thin RG174 or so. The active miniwhip was delivered with such thin coax cable.
-
The coax cable to the antenna, near the DC coupling box. Use thin RG174 or so. The active miniwhip was delivered with such thin coax cable.
-
Try to connect the Raspberry Pi to safety ground and see what the effect is.
Excellent results!
Excellent results! Look at the two pictures below!
Nice results on 40 meters, during the evenings the most difficult band because of the strong broadcast transmitters just above that frequency!
Nice results on 30 meters, the by far most used and most interesting QRSS band!
The simple QRSS grabber project is a success!
This simple Barefoot QRSS grabber project with Version 4 RTL-SDR blog dongle and the miniwhip antenna is a success! It is also possible to use the excellent QrssPiG software with the Raspberry Pi!
PA0RDT miniwhip antenna
RTLSDRlop software for QRSS reception with the RTL-SDR dongle
You can also use the excellent QrssPiG software!!!
Index PA2OHH