NAVTEX TEST MESSAGES
(2024)

Barefoot with way too cold toes on the horribly cold tiled floor of my workshop in winter!
Why? To play with Navtex!
I need Navtex test messages in winter, not in summer!
Barefoot with way too cold toes on the horribly cold tiled floor of my workshop in winter! Why? To play with Navtex! My little Spartan sailing yacht did not have Navtex on board. However, during the winter months I like to play with Navtex at home! Barefoot, even when it is winter and only 8C degrees in my ice cold unheated workshop! Shoes, socks and carpets are forbidden because of static electricity! Ice cold bare feet! Much too cold, stiff suffering toes that even have purple-red colors! But the suffering of my terribly cold bare feet with way too cold stiff red toes was rewarded with exciting, challenging Navtex projects!
It was an exciting challenge to make my own NAVTEXsnoop decoding software! And to design a simple Navtex receiver, the barefoot Navtex receiver! Barefoot is the symbol for simplicity and that barefoot Navtex receiver is very simple! But I always had to wait for transmitted Navtex messages to test the software. I wanted to make my own Navtex Test Messages!
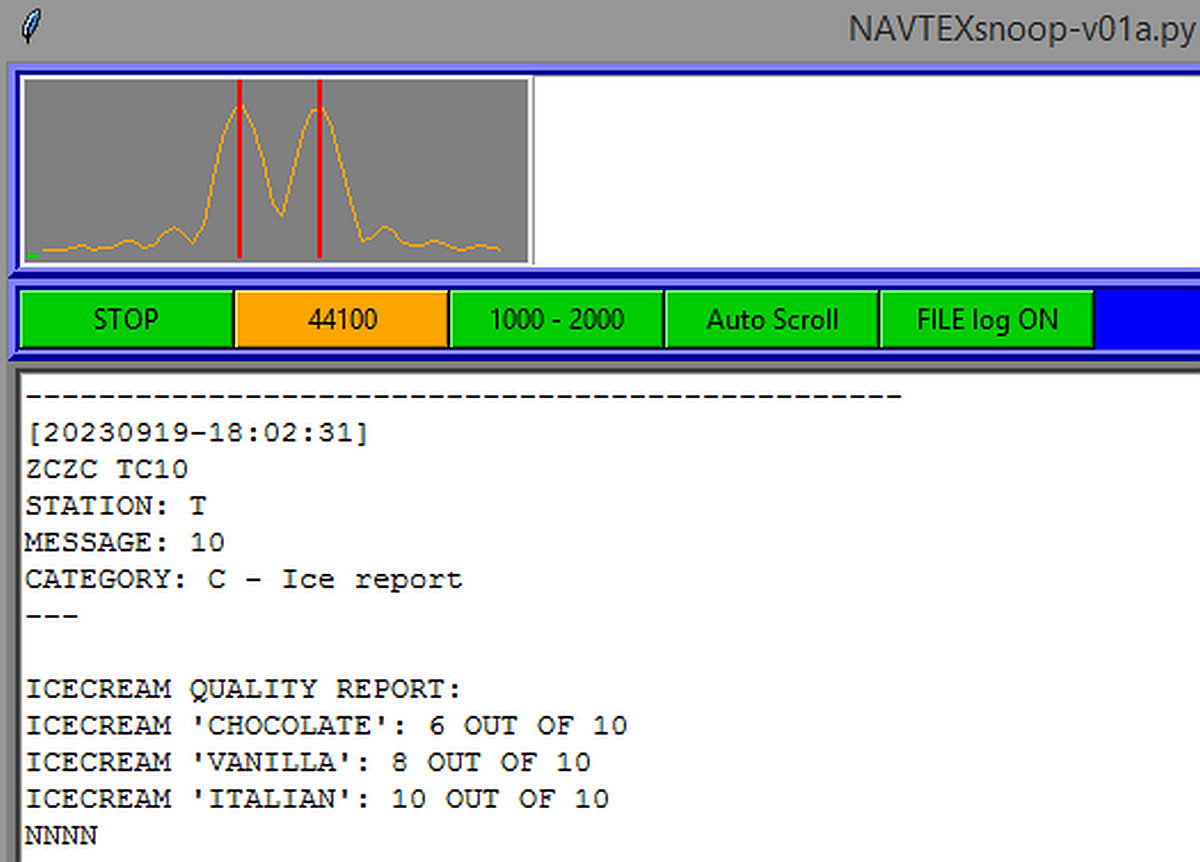
What is that for a strange NAVTEX ice report???
What do I want
Navtex test messages! With noise and extra interfering tones! Then it is possible to perform and repeat tests with well defined Navtex signals and interfering signals with various settings in the software! And it is possible to add bit-errors and other interesting experiments. So I want noise, an interfering audio tone, bit-errors and oh yes, fading too!!! And my own text! An ice report for example!

The technical format of a Navtex message
The Navtex character set with two columns, a letter case and a figure case
Step 1, make a Navtex test message in readable text with an ASCII text editor
The simple idea is to make the Navtex message in readable text with an ordinary ASCII editor like Notepad or my favorite Geany.
The first line is just a comment line.
The second line is the message header, something like BC04.
Then follows the text of the message in upper case letters. Lower case letters have a specific meaning:
p = phasing1 - idle character
c = carriage return
l = line feed
a = Letter shift (alphanumeric)
n = figure shift (numeric)
u = unperforated tape
b = audible signal (bell)
x = combination no 4 of Figure cases
s = space (for better readability, a normal space is also acceptable)
There are two case columns, a letter case and a figure case. You have to change between the cases by inserting a letter shift "a" or a figure shift "n". Otherwise, the Navtex decoder will use the wrong column. I thought about inserting the shifts automatically, but that makes the program more complex and less flexible!
The test message ends with idle characters "p" during 2 seconds.
The test messages have the extension ".msg" but are normal ascii files!
That is all! A very simple first step! No extra software needed, just a simple text editor!

The Navtex message template. See how p, c, l, n and a are used!
Made with just an ASCII text editor, like Geany, Leaf or Notepad etc.
Step 2, convert the Navtex .msg message to an YBY file
Now the Navtex.msg file has to be converted to a Navtex.yby file. The characters are converted to the YBYBY... representations. B represents the higher emitted frequency, Y the 170 Hz lower.
But there is more, each character is transmitted twice in an interleaved mode with four characters delay. We also have to do that in this step 2! It are the lines commented with (RTX) in the "Navtex.yby" files. And also the phasing signals are added in this step 2.
Give the name of the Navtex.msg file and it will convert it into a Navtex.yby file. Again a normal readable text file. And... you can edit this file to change an Y into a B for example to make bit errors!
This step 2 is activated by pressing the button "MAKEyby".

The Navtex.yby file with interleaved characters commented with (RTX)
Step 3, convert the YBY file to a WAV audio file and add interferers and fading
Step 3 is the most exciting part! The WAV file with a sample rate of 48000 samples/s is made and we have to add the interferer tone, noise and fading.
Let's have a look at the program. At the left the button "MAKEyby" for step 2, to make the "Navtex.yby" file. Then the button "MAKEwav" for step 3 to make the "Navtex.wav" file. But there is a third button," "Configuration". That is to set all the parameters that are needed to make the WAV file.
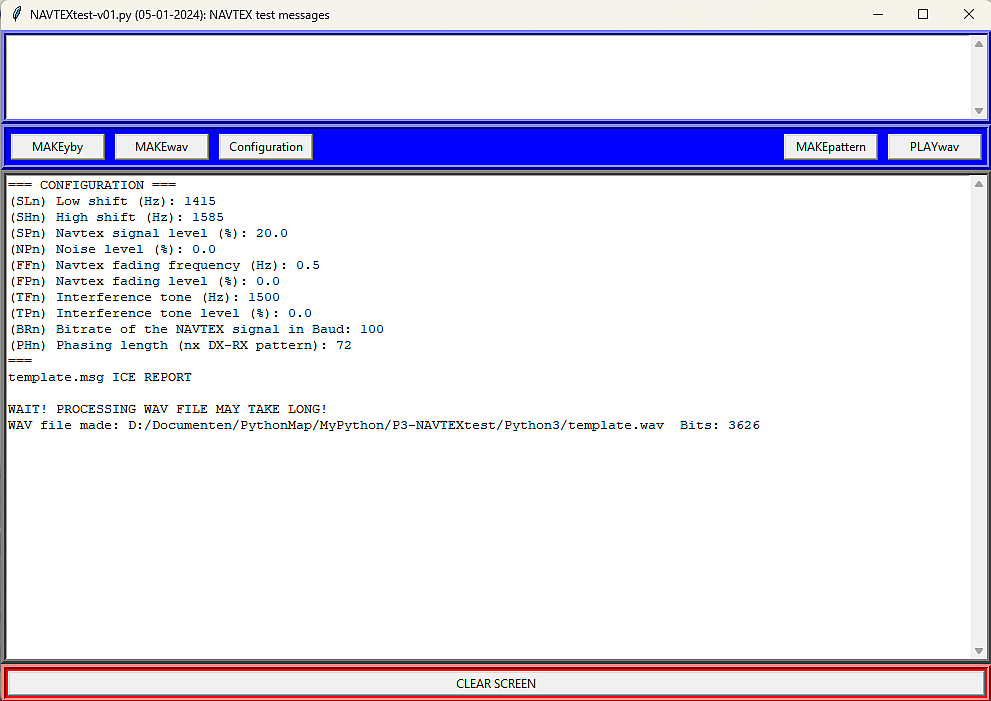
The program NAVTEXtest.py. With the ""MAKEpattern" button, you can generate a test pattern.
With the "PLAYwav" button you can play a WAV file, but I prefer to use the standard Music Player of the PC.
Configuration button needs some explanation!
And that button "Configuration" certainly needs some explanation. It does not work as you should expect. Not a long row of input screens, only one input screen. It's a simple method I came up with to program all the parameters.
When you press the button, there is a data input screen. The first two letters that you type is the parameter that you want to modify. And the following characters is the value of that parameter. Examples:
BR99 Changes the bitrate to 99.
SL1715 Changes the low shift to 1715 Hz
SH1885 Changes the high shift to 1885 Hz (Indeed you can program a different shift than 170 Hz)
NP20 Set the Interfering Noise level to 20%
Here are the parameters that you can modify. Between the round brackets the first two letters you have to type, "n" is the value:
(SLn) Low shift (Hz)
(SHn) High shift (Hz)
(SPn) Navtex signal level (%)
(NPn) Noise level (%)
(FFn) Navtex fading frequency (Hz)
(FPn) Navtex fading level (%)
(TFn) Interference tone (Hz)
(TPn) Interference tone level (%)
(BRn) Bitrate of the NAVTEX signal in Baud
(PHn) Phasing length (nx DX-RX pattern)
The last parameter Phasing length will be applied when the .yby file is made! It should be 72 for the standard 10 seconds length.
So it is even possible to program a different shift than 170 Hz, for example 155 Hz to see what the effect is on the Navtex decoder.
Or you can make a Lower Side Band signal by by exchanging the two shift frequencies!
All the percentages added shall be less than 100%. Except when you want to use a clipped signal, that is also possible!
An interesting experiment is to set an interference tone exactly in the center between the two shifts, where the carrier is.
SOFTWARE
Before using this program, you have to install Python. That is very simple. But read first something about Python by clicking the following link:
WHAT IS PYTHON AND HOW DO YOU INSTALL PYTHON
As the source code of Python is written in ASCII, it is very simple to modify the program to you own requirements. Think for example about the size of the screen, the colors etc.
Required Python version:
Required external modules (site-packages for the correct Python version!):
Link to download the ZIP file with "NAVTEXtest.py" and "template.msg"
NAVTEX RECEIVER AND SOFTWARE TESTS
How do I test the receiver?
We do not need the navtex test software to test the receiver!
Most people think that a more sensitive receiver performs better, but that is not the case! When you connect the antenna, the noise should increase, but not too much. What you hear is the natural background noise emitted by the earth, the sun and the universe. If you can hear that noise, then the sensitivity is good enough. If the noise increases too much, then the sensitivity is too good and that will reduce the dynamic range of the receiver! The noise floor of my barefoot Navtex receiver increases when the antenna is connected, but not too much. So the sensitivity is okay!
The second simple test is the suppression of the mirror frequency. The input filter was measured and it suppresses the mirror frequency by more than 20 dB. It only has to suppress the natural noise on that mirror frequency so that it will not affect the sensitivity. There are never other strong signals on that mirror frequeny! Two simple tests proved that the very simple barefoot Navtex receiver is not that bad at all!
Or no, there is a third very simple test. Listen if you do not hear strange sounds from for example medium wave broadcast stations etc. Connected to the PA0RDT miniwhip, no strange sounds were audible.

Testing the simple Barefoot Navtex receiver. How? Simple of course!
How do I test the NAVTEXsnoop software?
I just need an audio signal with a Navtex message and noise to test with which Signal to Noise Ratio the software works! I heard that 45 baud Telex should still work with a SNR of -5 dB in a 2500 Hz audio bandwidth. That is the usual bandwidth of a SSB shortwave receiver. And I made my own estimation. Not a scientific study, just a simple estimation:
The bandwidth of the NAVTEXsnoop FFT is approximately 100 Hz. So that is 25x less than the noise bandwidth of 2500 Hz or 13.97 dB. Decoding of data needs approximately 10 dB SNR. That means that NAVTEXsnoop should work with 10 - 13.97 dB = -3.97 dB or rounded -4 dB SNR. So I hope that NAVTEXsnoop will work with a -4 dB SNR!
The Navtex signal is set to 5%. How much percentage noise do I need?
First we have to make a correction for the bandwidth of the WAV signal with a sample rate of 48000, that is a bandwidth of 24000 Hz and we need the noise in a 2500 Hz bandwidth:
Correction for 24000 to 2500 Hz bandwidth:
Correction factor 1: 10 x log(24000 / 2500) = +9.82 dB
And a correction for the difference of the Crest factor of the Navtex signal (a sine) and the Noise:
Crest factor of a sine: 1.414 and the Crest factor of the Noise can be compared with a triangle wave: 1.732
Correction factor 2: 20 x log(1.732 / 1.414) = +1.76 dB
Now we can make the following simple table to set the Noise percentage. The Navtex message signal is set to 5%:
-4 dB SNR: 4.0 + 9.82 + 1.76 = 15.58 dB = 30.0%
-5 dB SNR: 5.0 + 9.82 + 1.76 = 16.58 dB = 33.7%
-6 dB SNR: 6.0 + 9.82 + 1.76 = 17.58 dB = 37.8%
And... NAVTEXsnoop can decode messages with -4 dB SNR and -5 dB SNR, so good enough! Also YAND can do that. But not with -6 dB SNR...
SeaTTY is just marginally better and I hoped to test that program at -6 dB SNR. But the evaluation period had expired...
Index PA2OHH