
Navtex receiver on board of a ship. But I want to receive Navtex with any SSB receiver!
RECEPTION OF NAVTEX
(2023)
Navtex receiver on board of a ship. But I want to receive Navtex with any SSB receiver!

The Python program for the reception of NAVTEX
Buttons:
-START-
Press this button to start the reception or to stop the reception.
-48000-
This is the sample rate of your audio device. If you have a slow PC, then you can select 12000 samples/sec., that will reduce the processing power a lot! But then you need to use an audio device that supports this sample rate. It is also possible to select 44100 samples/sec.
-400 - 2400-
This is the audio range that is scanned for usable signals. Normally it is set to 400 - 2400 Hz. But if you have some unwanted signals in the spectrum you can select other ranges. For 1500 Hz center frequency you can select 1000 - 2000 Hz or 1200 - 1800 Hz. For a 1500 Hz center frequency, you have to tune the SSB receiver 1500 Hz lower than the NAVTEX frequency. So 516,5 kHz for the 518 kHz NAVTEX frequency and 488,5 kHz for the NAVTEX frequency of 490 kHz. Selection is done by pressing the button, the range is given by the button text.
For the Barefoot Navtex Receiver there is a special setting 17500 - 18500 Hz for the special 18 kHz center frequency. It has a mixer oscillator frequency of 500 kHz.
-Noise ID-
The new version has a Noise Indicator button. It has no scientific use whatsoever! Only useful for fixed gain receivers!
Noise is measured in the half hour before the message. Average and Peak noise of the lowest level during one minute is displayed. A low level means good condx. A high peak level is usually caused by thunderstorms.
-Auto Scroll-
Normally activated, the last message is shown on the display.
-FILE log ON-
If OFF, saving of the NAVTEX data to the files is stopped.
-Mode-
BASIC Mode: DX-RX errors in the message header are not allowed.
DX Mode: DX-RX errors in the message header are allowed and shown. Shows also Statistical Information.
DEBUG Mode: DX-RX errors shown - Invalid Header Characters allowed - Shows Control Characters.

The spectrum display

The file structure
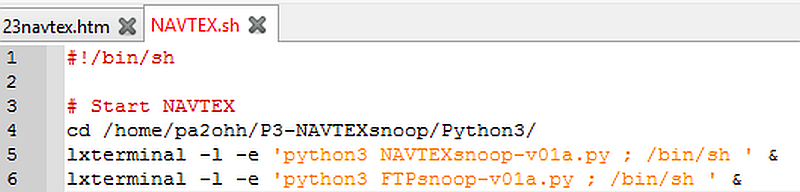
The script that is used to start NAVTEXsnoop on a Raspberry Pi
Downsampling
You can use the program with the Raspberry Pi version 4. The CPU percentage is approximately 25%, so it should also be possible to excecute it with a 3x slower Raspberry Pi version 3. But it might be that you have to downsample the audio stream. Before pressing Start, press the orange "48000" button and the sample rate can be reduced to 12000. Then the CPU percentage is lower than 10% on my Raspberry Pi version 4 and it should certainly be possible to excecute it with a Raspberry Pi version 3. My USB sound device supports a sample rate of 12000. It is a Behringer type UFO202 and even supports a 8000 Hz sampling rate. But if your device does not support it, you can do the downsampling with Pulseaudio. Then you have to install the "Pulse" audio platform on the Raspberry Pi. Pulse is then selected as audio input device and is used for the downsampling of the audio stream. Type the following commands in a terminal window:
sudo apt-get install pulseaudio
sudo apt-get install pavucontrol
Error handling
Every character is transmitted twice, once in the DX position and once 5 characters later in the RX position. And every byte of 7 bits is specially coded. If one bit or more bits of the same "Y" or "B" value is disturbed, it will become an invalid character.
To eliminate problems with fading, two zero crossings are combined ("YB" and "BY" crossings) for the bit synchronisation.
There is a special symbol to switch from letters to numbers. This will be activated if only one of the RX and DX transmissions contain that symbol.
Special settings
You can edit and modify the Python program with IDLE. There are two special settings that you perhaps want to change:
# Special settings for the user
LowerSideBand = False # If True then LSB instead of normal USB reception
Click this link to download the ZIP file with the Python programs and other scripts
FTPsnoop.py

You have to edit the first lines with login codes of FTPsnoop.py.

Receiving marine radio signals is a nice relaxing hobby!
SOFTWARE
Before you are using this program, you have to install Python. That is very simple. But read first something about Python by clicking the following link:WHAT IS PYTHON AND HOW DO YOU INSTALL PYTHON
As the source code of Python is written in ASCII, it is very simple to modify the program to you own requirements. Think for example about the size of the screen, the colors etc.
Required Python version: