is ideal for ssb audio improvement.
Why? well this radio does transmit from 40 Hz to over 3KHz..
SSB-AUDIO
Most radio amateurs use their radio with a normal
handmicrophone or a table microphone.
This, in general, sounds okay but you can make your audio sounds more smoother
to add various frequencies, the use of a dynamics prossessor and an external
microphone.
There are two audio frequency's that are paramount within the limited bandwidth we use!
40
- 100 Hz for the low-bass frequency's
3.1 - 4.0 KHz for the high frequency's
These are the most important and must be set into your pre audio system first.
Any
other frequency should enhance the two primary frequency's, 40 -
d 3.1 kHz.
Although the bandwith of a ssb-tranceiver is
generally about 2,4KHz. you can approach an AM broadcast sound.
Beneath I will explain how I did it.
The equipment:
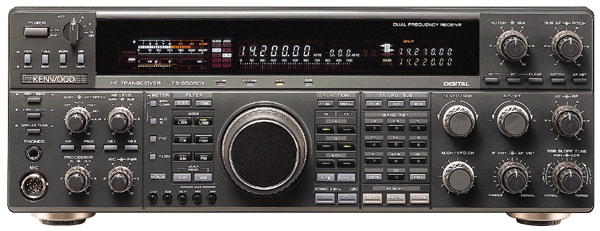
The tranceiver
On the HF-bands i'm using the Kenwood TS950SD,
special this radio
is ideal for ssb audio improvement.
Why? well this radio does transmit from 40 Hz to over 3KHz..
The microphone
You can imagine that the right choice of the
microphone is quite important.
First of all the size of the element is important, because it determines if the
microphone is capable of producing all frequencies in the voice spectrum.
Then you have the choice between a dynamic mike or a condensor microphone. A
dynamic microphone works like an inverted loudspeaker,
it puts the element via air-waves (voice) in movement.
Automaticly their excists a low voltage witch will be reinforced to a hearable
sound.
A condensor microphone is (as the word says) built around a condensator.
The utter thin, conducting membrame moves with regard to a likewise conducting
rearplate witch will give a certain voltage.
The signal is being reinforced, through a built in amplifier, therefore a
condensor microphone needs a separate power supply.
The so called "phantom power supply" mostly 48V.
The advantage of dynamic microphone is that they
are more payable than a condensor microphone.
Here you see my professional
studio condensor microphone, the Behringer B1. The newest among the Behringer
microphones.
This microphone is really sounding smooth and the price-performance ratio is
very good.
This is what Behringer says about the B1
| "Designed especially with home-studio owners, musicians (and HAM radio amateurs...hi) in mind, the B-1 features a 1" capsule that captures your sounds with incredible realism, sensitivity and accuracy. Its wide frequency response from 20 Hz to 20 kHz is enhanced by a pronounced presence boost, making equalization unnecessary in many cases. Its cardioid polar pattern, switchable high-pass filter and -10 dB pad, SPL of 148 dB and unusually low inherent noise make it perfect for close miking and extremely flexible. The B-1 also comes with a carrying case, shock mount and windscreen." |
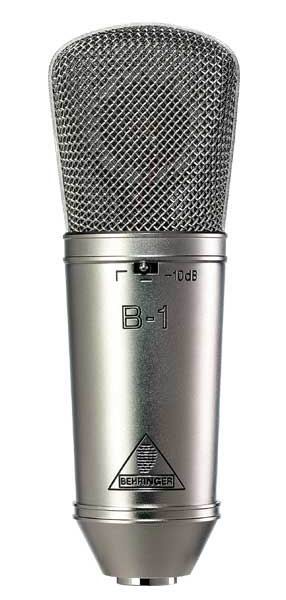 The
Behringer B1
The
Behringer B1

The complete package for 120 euro,
nice suitcase too!!
And the specifications:

Here you see my spare mike it's the Sennheiser E835.
It is a dynamic mike with a good frequency-responce for a very very good
price.
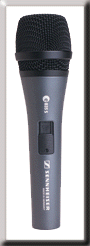 Quality
vocal mic with performance and build characteristics never before
available at this price. Quality
vocal mic with performance and build characteristics never before
available at this price.
Uniform frequency pick-up pattern maintains signal quality when moving on and off axis during performance. Gentle presence boost to even tonal response ensures clarity and projection. Minimal proximity effect provides consistently clear bass end performance when singing closer to or further from capsule. Cardioid
pick-up pattern provides good signal isolation and feedback rejection,
enabling higher sound levels to be obtained. Metal construction and
internal shock-mount system minimises handling noise. Lead vocal stage
mic, designed to perform under pressure.
|
||||||||||||||||||||||||
|
||||||||||||||||||||||||
The audio processing
If you think you are ready now with a good tx/rx
and mike, well wrong.
Before the audio signal goes into the transceiver there needs to be some
processing (amplitude and frequency responce).
After the processing you can place even more equipment such as: reverb, d-esser
and enhancers.
My line up is as follows:
1. microphone
2. mike pre-amp
3. parametric equalizer
4. gate/expander
5. compressor
6. d-esser
1. microphone (see above)
2. mike
pre-amp
Herefore i'm using a small mixer unit (I only need one mike channal) by Behringer, MX602A.
The
mixer has a
built in phantom power supply for the condensor mike.

3. parametric equalizer
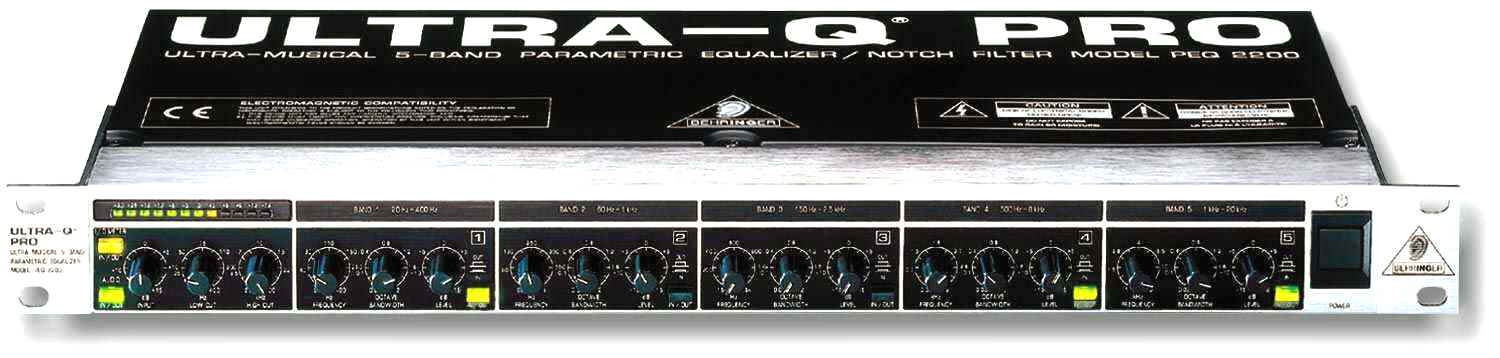
On the top of the page I was
telling you about 2 very important frequency ranges, they are: 40
- 100 Hz for the low-bass frequency's and 3.1 - 4.0 KHz for the high frequency's.
With a parametric equalizer we are going to optimize the mentioned frequencies.
(it must be a parametric equalizer, not a graphic equalizer!!).
With a parametric EQ you can set center frequency, bandwith and gain on each
band. This EQ has 5 bands. It cost me several hours to get the right settings
done. By the way audio is subjective. I mean some like the audio, some
not. It's all about personal preference.
Here are my personal EQ settings:
Band 1 f = 140 Hz. Q = 0.8 G = +10 dB
Band 2 f = 450 Hz. Q = 0.8 G = - 8 dB
Band 3 f = 2.5 kHz. Q = 0.4 G = + 8 dB
Band 4 f = 2.4 kHz. Q = 0.7 G = + 5 dB
Band 5 f = 3.8 kHz. Q =0.8 G = +10 dB
4. + 5. gate/expander
compressor

For the gate/expander and
compressor i'm using one piece of equipment, the Behringer MDX2200, composer pro.
The gate/expender unit takes care for background noises, the gate opens if the
audio-level is above a present value. Every noise under that level will not
pass. So computernoise, amplifiers, fan's etc. will no be heared.
So a noisy shack can be turned into a quiet studio.
The compressor is used to reduce the dynamic range of the audio.
That is why a compressor is used to reduce
the dynamic range of the audio. Below a preset value, the compressor lets the
signal pass with unity gain. Above that value, the gain of the compressor is
reduced. This way, the difference between the lowest and highest level of the
audio is reduced. This has to be done very smoothly, otherwise it will add too
much distorsion. A 4 to 5 dB of compression is appropriate for voice
applications. Another usefull side effect of the compressor is that the average
transmit power will increase (only for SSB and AM transmissions).

Figure 1: Flow diagram of an expander.
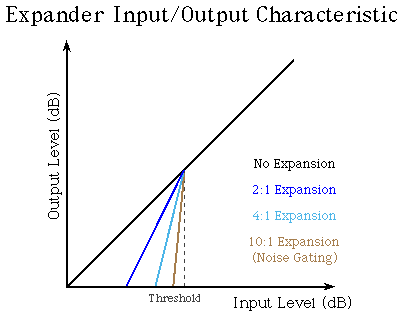
We often represent the input/output relationship of the expander with a simple graph, like the one in Figure 2. The level of the input signal is given by the horizontal axis, and the output level is given by the vertical axis. When the slope of the line is unity (angled at 45 degrees), the gain of the expander is one - the output level is identical to the input level. A change in the line's slope means a change in the expander's gain. For the expander, part of the line will have larger slope (a steeper line). The point where the slope of the line changes is called the threshold, which is adjustable in many expanders. When the input signal level is above the threshold nothing happens, but when it drops below the threshold, the gain reduction kicks in. The gain reduction lowers the input level, increasing or expanding the dynamic range. These signal levels generally are NOT the actual values of the signal at a single point in time, but rather an average over some short time interval, often a root-mean-square (RMS) calculation. For example, a pure sine wave may be zero at certain times, but that doesn't mean there is no signal. The expander's gain control will see a signal with a fairly smooth, non-zero level.
Figure
2:
The expander only reduces the input signal level only when
it drops below the threshold value.
The amount of expansion that is applied is usually expressed as a ratio, such as 2:1, 4:1, etc. This is telling you that while the input is below the threshold, a change in the input level produces a change in the output that is two times, four times, etc, as large. So with a 4:1 expansion ratio (with the input level below the threshold), a dip of 3 dB in the input will produce a drop of 12 dB in the output.
When an expander is used with extreme settings where the input/output characteristic becomes almost vertical below the threshold (say, and expansion ratio larger than 10:1), it is often called a noise gate. In this case, the input signal may be very heavily attenuated or removed entirely. This is kind of an on/off switch for an audio signal. When the signal is high enough, the switch is on and input appears at the output, but when it drops below the threshold, the switch is off and there is no output. The key parameter in this case is the threshold.
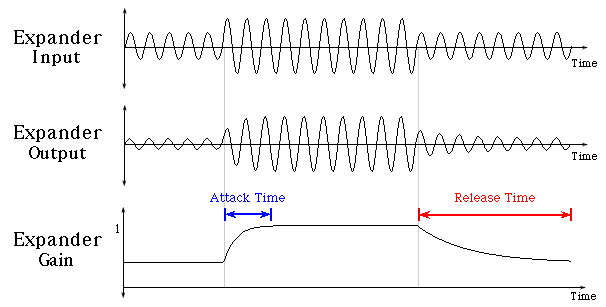
Since
the level sensing function is a short time average, it takes some time for a
change in the input level to be detected which then triggers the change in the
gain. Like the compressor, we characterize the expander by its attack and
release times. The attack time is the time required for the expander to restore
the gain to one once the input level rises above the threshold. Likewise, the
time taken for the expander to reduce its gain after the input drops below the
threshold is the release time. The attack and release times give the expander a
smoother change in the gain, rather than abrupt changes that may produce pops
and other noise. Figure 3 shows how the attack and release times affect an
example input signal.
|
Figure
3: |
The bigger application for expanders is probably in noise reduction. They will help reduce feedback and unwanted audio - ambiance sounds and bleeding from other instruments. Noise gates are most often used to eliminate noise or hiss which may otherwise be amplified and heard when an instrument is not being played. The threshold needs to be high enough such that the ambient noise falls below it, but not so high that the instrument's sound and sustained notes are cut off prematurely.
Expanders can also be used along with compressors to reduce the effects of noise when transmitting a signal, audio or otherwise. The transmission channel has some limited dynamic range capacity. Compressing the signal you want to transmit allows you to increase the average level of the signal with respect to the noise in the system, reducing the effect of the noise. An expander is then used on the receiving end to return the transmitted signal back to its original dynamic range. This process of compressing and then expanding a signal is called companding. For a more tangible example, the transmission channel above could be a cassette tape that is being recorded on. Compressing the signal when recording and then expanding it on playback reduces the overall noise level. This is the basic idea behind the Dolby A noise reduction technique.
6. D-esser + more

Finaly the D-esser, also by Behringer type VX2000, this black box has more
facilties but I only use the d-esser
and the tube-emulation.
The d-esser control can be used to cut "ssssss" sounds if
necessary, if you listen to some folks who, speak low and "mouth" the
microphone you will hear a spit/sputter/chalkboard
screech, like air passing through their teeth and at times what we call
"lip-smacking"....this control can tone down that type of noise down.
The tube emulation is
used to get more warmth in
the voice.
The results
Here's a recording SM0FLY (Bram)
made of my transmission.
The recording is in MP3-format so you need WINAMP or other for playback.
Click here for WINAMP
download.
Some recordings are in WAVE format, for playback use your built in player or
more advanced
Windows Player.
PA3HEP
in MP3 format recorded by SM0FLY
PA3HEP
in WAV format recorded by CT1FSL
Click on "links"
in the left bar for more HAM's who are into SSB-audio!!
