Building Enclosures for Microwave Circuits
By Rus Healy, NJ2L
Many microwave projects are offered as etched circuit boards and board-level kits. Microstrip filters and amplifier circuits, etched on PC-board material, give home builders access to microwave technology that was previously available to only those who were willing to reproduce complex discrete circuits and spend a lot of time tuning them. So now, for reasonable prices, we can build microwave transverters, oscillators, filters, preamplifiers and power amplifiers that work well with few or no tuning adjustments. But one issue remains critical to success with these projects: proper packaging techniques.
The packaging problem is really several individual issues. For one thing, if a board is part of a project that contains many gain stages, the packaging of each board must isolate the stages well enough so that they don't oscillate. It must also provide for low-loss, low-inductance RF input and output connections, and appropriate decoupling of power and bias voltages coming from outside the circuit. These aren't difficult matters to address, but require some thought and preparation. You just can't mount a microwave circuit into any convenient enclosure, run long leads to it, and expect it to work right.
An effective approach that's much less expensive than commercial boxes is to build an enclosure to fit the board you're working with. After all, you're building the rest of the circuit, so you may as well build the box!
Unetched fiberglass-epoxy PC-board material and hobby brass
make great enclosures. Although PC-board material is widely available,
it's a bit less convenient to work with than hobby brass. Brass stock
is also widely available (many hobby shops stock K&S brand brass
and aluminum stock). It comes in a wide range of widths and
thicknesses. A useful size, 0.5 inch wide and 0.025 inch (25 mils)
thick, comes in 1-foot lengths that list for $0.50. Using this
material, you can box three or four microwave preamplifiers for a
dollar. Now that's economical packaging!
Building a Box from Brass
For boxing preamplifiers and other small circuits, half-inch-wide, 25-mil brass strip stock is nearly ideal (other common thicknesses are 20 and 31 mils). Half-inch-wide stock is most convenient because it's the same width as industry standard, four-hole-flange SMA connectors. SMA connectors are best for microwave circuits, because they work well and are widely available in male and female forms for every size of coax commonly used at these frequencies.
Before beginning the brass preparation, clean the brass with a ScotchBrite pad or emery paper. This makes it much easier to solder. Also, drill any necessary holes in the PC board for bias components, transistors, through-hole grounds, and so forth. This is much more difficult after the board is in its case. Look over the circuit and the part-placement diagram carefully so you don't miss anything.
Preparing the sides of the box requires some attention to
detail and some common tools. Before you start, collect some brass
stock, a drill, the necessary RF and dc connectors, a steel rule,
square, file, center punch, scribe, utility knife, pencil, and a flat
work surface (a piece of plywood is fine). A drill press and small vise
come in handy, but aren't necessary. (You may want to drill and tap the
connector holes
for #2-56 or #3-48 screws, but that's not necessary; gold-plated
connectors can be soldered directly to the brass walls.) The following
procedure assumes you're packaging a typical, small microwave project,
such as a preamplifier.
Step-by-Step Procedure
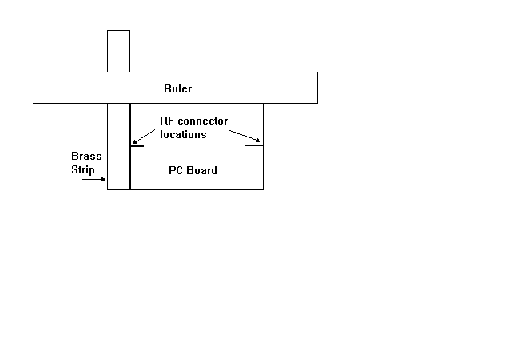
1) Start with an end of the circuit board that requires an RF
connector. Lay a piece of brass along that edge of the board, with one
end of the brass flush with one end of the board. Lay the steel rule
along the edge of the board so that it lies flush with the board and
crosses the brass. See Figure 1. Mark the brass where the ruler, PC
board and brass strip meet. You're marking the brass piece so that it's
exactly
as long as the RF-connector end of the board. Using a square along a
long edge of the brass, mark a cut line across the brass with a pencil
or scribe.
Figure 1Measuring the
first end piece.
2) Using a straight edge or square, mark the center position of the RF connector.
3) Measure along the line you just marked, to the center of the brass
strip. This is the center point of the connector. Using a center punch,
dimple that point for drilling.
4) Repeat steps 2 and 3 for any remaining RF connectors. It's good
practice to mount dc connectors on the same sides as RF connectors for
ease of mounting the finished assembly inside another case. You may
want to standardize on mounting dc connections on the RF-input side, to
minimize the possibility of connecting the assembly backwards later.
(Stranger things happen every day!) Mark the dc connector hole
positions, keeping in mind that the PC board will sit in the center of
the finished brass case. Don't locate any feed-through capacitors in
places where they'll interfere with the PC board.
5) Lay the steel rule along the cut line you scribed or marked for the
edge of the board. Using a utility knife, cut along that line, at first
using light to moderate pressure. Make sure to follow the scribed line.
It's a good idea to cut slightly outside the line, to allow for filing
the brass to its final size. Increase the pressure after the first few
cuts, once the cut line has been well established. When you've cut
about halfway through the strip, grasp the brass between your thumbs
and forefingers just on either side of the cut. Flex the brass until it
snaps at the cut line, being careful to keep the brass from bending
anywhere except the cut line. File the cut edge just enough to clean up
the rough edge. Lay the cut piece along the edge of the board to make
sure it's the right length and the connector hole centers line up with
the appropriate PC-board traces. If the piece is too long, file it to
length, keeping in mind that how much material you remove from each end
will affect connector position.
6) Drill or punch the connector-mounting center holes. The holes should
be several times the diameter of the connector center pin, and at least
slightly wider than the microstrip trace to which the connector's
center pin will be soldered. If you're drilling the hole, start with a
small drill (#43 or smaller) and open the hole to its finished size
with a larger one. Deburr the hole by hand
using a drill bit about twice
the size of the finished hole. Spin the drill bit between your fingers
while applying enough pressure to remove the drilling burrs. This is
also a useful technique for clearing the foil away from ground-plane
side of a PC board hole where a wire will pass through the board.
7) If you want to drill and tap the connector mounting holes (necessary
for stainless steel connectors, but optional for gold-plated ones), do
the following; otherwise, skip to the next step. Place the connector in
the hole and visually center the center pin. While holding the
connector
in place, mark the flange hole locations on the brass with a pencil or
scribe. Remove the connector. Center-punch, drill and tap each hole,
then mount the connector using short screws (0.25 inch or less).
8) Wear a heavy cloth or leather work glove for this step. Place the
connector in its hole and visually center the center pin. Using a stout
soldering implement, heat and solder the connector in place.
(Inexpensive soldering pencils sold for stained glass work deliver just
the right amount of heat for this job.)
9) Repeat steps 1 through 8 for the opposite end of the board.
10) Measure the sides of the PC board that won't hold any connectors.
Add 0.25 inch to the measurement and mark two pieces of brass to this
length. Cut them as described in step 5, then file the edges clean and
round the corners slightly so that you won't gouge yourself on them
later.
11) With the RF connectors mounted to the brass end plates, align their
center pins with their respective microstrip traces. Solder the center
pins flat to the appropriate traces while holding the board in its
final
position with respect to the brass. Reheat the center pin and make any
small adjustments. Do not
attempt to adjust the position by twisting the brass or the board
without reheating the solder; this can lift the trace from the board,
ruining it.
12) Using a stout soldering implement, solder the board to the brass stock along the bottom (ground-plane side) of the board.
13) Repeat steps 11 and 12 for the other connector end of the board.
14) Align the side pieces with the brass end plates that are soldered
to the board. This is most easily done by laying the side piece flat on
a wooden work surface, then holding the assembly in place above it.
Solder
the seams formed where the side piece meets the ground-plane side of
the board and the brass end plates.
15) Repeat step 14 for the other side plate. Be careful to keep the
side plates aligned during this process; the whole assembly should sit
flat when you're done.
Tips
Rather than using separate side and end plates, some builders elect to
use only two L-shaped pieces of brass, as shown in Figure 2, bending
them at 90-degree angles. Each L-shaped piece forms one end and one
side of the box. This results in only two seams in the brass enclosure,
at
opposite corners of the board. This approach makes it easier to make
boxes that sit flat, and requires making fewer cuts. But it takes extra
care to get the bends in exactly the right places so that the connector
holes are properly centered.
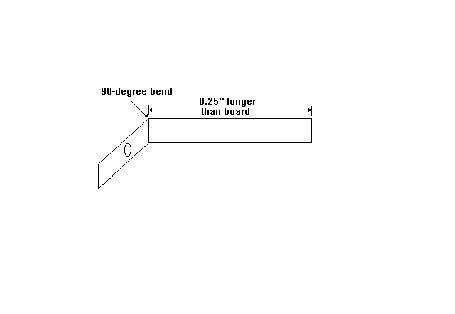
Figure 2Using a single
brass piece to form one end and one side of a box.
You should now have an assembly that's relatively inflexible. You can now solder on the board-mounted parts. Although it requires good dexterity and physically small parts, it's possible to build active bias circuits for amplifiers and preamplifiers onto the back side of the board once its enclosure is completed. This isn't recommended for first-time builders, and is unnecessary for boards that use only MMICs, but is worth the effort in compactness, simplicity and idiot-proofing for complicated projects with lots of separate modules, such as 10-GHz transverters.
Thanks to Zack Lau, KH6CP, whose work has provided me, over the
past several years, with a lot of the visual cues I use to make and
package microwave circuits.