Homebrew projects for radio & electronics enthusiasts
- AUDIO PAGE -
How to adjust your rig for the best transmitting audio.
back to HOME page
NYLO'S NOTEPAD
Homebrew projects for radio
& electronics enthusiasts
- AUDIO PAGE -
How to adjust your rig for the best
transmitting audio.
back to HOME page
MARK'S FAVORITE IC-7300 SETTINGS - scroll down below to see a complete separate section for my favorite TX and RX audio settings for the popular icom ic-7300
MIC POSITION - For best audio
pickup, turn the mic sideways and park it right next to the
corner of your mouth, so that you are speaking across
the pickup element. Speak using your normal,
conversational volume voice, as if the person you are speaking to is just one foot away. The fullest range of your
voice is available to the microphone, especially the
higher-frequency sibilance, which does not rise in the same
proportion with the rest of your voice when you talk loudly. This
is the part of speech that makes you easily understood. Ask
somebody with a hearing aid just how important this speech
component is!
When you are mobile, develop the habit of touching your cheek
with part of the mic or the hand holding the mic so that as your
head turns or moves around, the mic follows, maintaining a
consistent audio pickup. Letting the mic drift away definitely
drops off your volume and intelligibility
DO NOT put the mic directly in front of your
mouth or you will create that obnoxious-sounding breath noise as
puffs of air from your lips during speech produce annoying bursts
of white noise. This will destroy your clean sound.
Headsets with boom mics, unfortunately, seem to be designed to
place the pickup in the worst place: right in front of your lips.
In the case of the Heil headset, however, the boom is bendable
and by forming a gentle curve into it, and you can place the
pickup at the corner of your mouth, out of the way of your
breath.
MIC GRIP - Yes, that's right! The way you grip
your mic can have an effect. Many hand mics are made completely
of plastic and they can get creaky! Plastic rubbing on
plastic causes sticktion: as the strength of your finger varies
on your plastic key, or if you roll it back and forth a little
while you are keying, it will produce an annoying creaking sound.
You can even feel the vibrations sometimes in the body of the mic
when it occurs. This can be quieted somewhat with a tiny dab of
grease. All mics will be sensitive to any vibrations conducted to
the mic body. Try not to move your mic hand or cord around too
much while you are transmitting, if you can help it. Sometimes,
you can carefully trim plastic parts in the mic, such as the key
and the housing, to keep them from rubbing together.
KEYING TECHNIQUE - Some microphones introduce an
audible transient ('key clunk') when you press and release the
key quickly. This is typically mechanical in nature, and is the
result of the key hitting its limit of travel, causing an impact
that is picked up by the element and often described as a 'clunk'
When you are involved in a qso and are anxious to speak, you
naturally tend to key your mic quickly. Keying your mic slowly
will help reduce this problem. Gluing a piece of felt on the key
stop(s) can also help reduce the impact. Some amplified
microphones will produce a transient when you key them that is
generated in the circuit of the mic itself when the key switch
connects the battery to the circuit. In this case, there is not
much you can do unless you can modify the internal circuitry.
MIC GAIN - Set up the gain for the 'close
talking' position described above. This is so important to reject
background noise. That is, of course, unless you want
listeners to hear your kids or TV playing, dogs barking, or the
vehicle engine or blower fan whining. This is especially
important in mobile situations with one or more windows down or
inside the cabin of a commercial vehicle or boat. If you are
using an amplified microphone having an adjustable output power,
set it to the minimum output that will give you full drive
(determined below) when the mic gain adjustment on the radio
itself is set to its maximum. This will extend the microphone's
battery life and help insure that you never accidentally
overdrive the radio's input if you inadvertantly move the
adjustment pot on the mic. Fine drive adjustments can be made
with the mic gain on the radio.
It is a law of physics and acoustics: If you set
up the gain for adequate drive with the mic more than a few
inches away you will start picking up other sounds
around you. If you set it up for 12-18 inches away in the average
room, people will eventually say you sound like you're
"talking in a barrel!", because the microphone will pick up reflections and the ambience of the room that you are in. If you are in a relatively live room, with hard surface walls such as brick or plain drywall with no coverings, there will be lots of reflections and will make the problem worse. If you have sound dampening materials on the walls of your radio shack, this will be less of a problem.
Tune your radio to your
voice. Every voice waveform is unique. Most men's voices
have more noise, less pure waveforms, and are somewhat loud. Most
women's voices have a more pure (more like a sine wave) waveform
and are quieter. Regardless of gender, some people talk louder or
quieter than others. Each nuance of voice will modulate the same
radio differently.
SINGLE SIDEBAND SETUP.
You don't really need an oscilloscope to do this
effectively. Connect your rig through a peak-reading
wattmeter to a dummy load. You can also read the radios internal output power meter, if so equipped. Start with the mic gain turned
down. If you use an adjustable speech processor, set if
for about one-third to one-half of its strength at
the most. NOTE: for radios with a HIGH or LOW mic
gain setting in a menu and an internal gain pot only,
select the HIGH setting. Then, open the case and use the
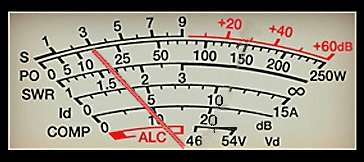
pot for adjustments during this setup. If your radio has an ALC meter function, turn the compressor off and perform the mic gain adjustment until the deflection is about 50% of the maximum ALC range indication.
Using what you think is your typical voice volume (see
below), say "Aaaaaaaahhh" as steadily
as you can and watch the peak power.
When you make a steady syllable like this, you are
producing a personalized, repeating waveform test-tone
with your own unique signature. This represents the
largest portion (the 'body') of your speech but does not
produce any of the higher frequencies that deliver speech
intelligibility. Don't get carried away with "Audio...audio...auuudeeeeoooo....etc".
<*grin*> Just hold the syllable in a normal voice!
Turn up the gain and watch the peak power/ALC deflection go up. As soon
as the power stops rising ('flat-topping'), stop turning
up the gain, and back it off a little. Repeat several
times and make a note of that setting with that
particular microphone.
An adjustable speech processor allows the mic to pick up
progessively quieter and quieter sounds to the point
where background noises are almost as loud as your voice.
If the meter in your rig can be switched to measure the
actual compression level in dB used by the speech
processor, turn it on and adjust the processor level to achieve the desired level of compression. As a good starting point, set the processor level
high enough to hit around 10 dB on occasional voice peaks. For DX work, if you have a quiet room, you can push it higher to 15 dB or so. If you use any
more than this, the microphone may start picking up too
much background noise, or your radio may start splattering with a TX bandwith wider than it is supposed to.
Next, perform a dead key test: Make sure the power drops to zero on the Po meter function when you stop speaking while you are still keying the mic. This is critical test to make sure you're not picking up background noise or getting feedback. High levels of compression will bring in too much ambient sound if you're not careful. Go by the internal TX Po output meter or by the meter on your amplifier, if using one.
For ragchew on the low bands where signals can be extremely strong and 20 dB or more over the noise level, I generally lower my compression level without changing anything else.
AM SETUP. As with the SSB setup, connect your rig through a peak-reading wattmeter to a dummy load. Start with the mic gain turned down. Key the mic without speaking and measure your unmodulated carrier power. Then, turn on your personalized test tone ( "Ahhhhhhhh" ) and bring up the mic gain until the peak power is just double the unmodulated carrier power, then back off just a little. At this point you will be achieving 100% modulation, or just slightly over, resulting in very clean audio. If you just can't resist cranking it up higher, you will only add distortion to your voice and your rig will start splattering. That is, with more than 100% modulation, you will actually start transmitting hash ( 'spreading' ) on frequencies well beyond 3 KHz above and below the one that you're tuned to ( 'bleed over' ).
FM SETUP. Adjusting FM
rigs, like your typical VHF or UHF mobile, is entirely
different. Just as the name implies, the frequency is
modulated by your audio. The transmitter's power is not
modulated, so it never changes. The strength of your
audio depends entirely on the deviation, not the power.
On the amateur bands, FM deviation should be no more than
5 kilohertz. However, many rigs have no external
adjustment for the mic gain. You must identify the pot
inside that controls the deviation. This is what controls
the volume of your audio.
So you see, a power meter is no help for measuring FM
deviation. You really need an instrument called a service
monitor or an oscilloscope to measure your actual
deviation. For the 2 meter amateur band, you can use a
much cheaper analyzer available from MFJ, the 224 FM
Signalyzer, for reasonably accurate measurements. If you
don't have any of these instruments, you have to rely on
signal reports from a trusted friend. If you're
frequently told that your audio is low, even when
close-talking your mic (see above), you can be sure that
your deviation is too low. However, if listeners note a
lot of background noises or distortion, it may be too
high.
Using either test instrument and again, your personalized
test tone, set your deviation to 3.5 to 3.75 KHz max. You
will be plenty loud without picking up background noise.
If your vehicle has a noisy cab, like my old van, set it
a little lower, say around 3KHz. this will really help
reject cabin noise. If you have a quiet voice, you may be
suprised to find that your deviation is only 2 KHz or so,
and you can really get a boost. If you operate at home in
a quiet room, you can get away with more, say around 4 to
4.5 KHz. If you talk through a repeater, and deviate more
than 4 KHz, you may sound distorted if the repeater can't
handle full 5 KHz deviation. You should still sound just
fine on simplex.
FOLLOW-UP ADJUSTMENT. If you operate your radio in a noisy environment, or you are excitable, don't be surprised if your friends say that you are over-driving your rig. Again, it's a natural tendency to raise your voice in a noisy environment without even realizing it. Tweak the gain back down as necessary, or try to develop an awareness of your speech and hold it down. Another technique is to simply pull the mic away from your mouth a few inches momentarily during loud comments (such as laughter) that you are aware of <*grin*>. Singers who use this technique, for instance, call this "working a mic."
SSB TONE ADJUSTMENT. Many modern rigs allow for built-in TX (and RX) audio shaping via equalization schemes that vary. You generally want to add some increased treble response above 1800-2000 Hz or so to improve intelligibility. You also want to reduce the bass response somewhat to avoid wasting transmit energy on frequencies below 300-400 Hz or so that do not help with intelligibility. Older single-sideband rigs that have no apparent TX EQ settings may have an adjustment that you may not be aware of that can have a major effect on the tonal response of your transmitted audio. Look in your owner's manual and see if you can find any references to "carrier insertion point" or "RF processor shift." Once you have the close-talk mic position, mic gain, and compression level set appropriately, as described above, this remaining adjustment will really fine-tune your audio. If you haven't yet discovered this trick, you're not getting the most from your rig. In effect, this adjustment shifts the overal tone response of your voice from bass to treble, which is generally a good thing. There is usually a numeric setting, available in a range, and there are separate adjustments for the upper and lower sidebands. There may actually be an adjustment potentiometer on the circuit board inside the radio. Consult your manual. Some microphones have tone adjustments built into them, and it can be difficult to decide which to adjust first: the rig or the mic. It's much more convenient to adjust your mic on the fly, for instance, when you want to work DX or any station that has a poor copy on you, and you need to add 'punch' (see below). Each setting will have an optimum mic gain level, too.
Near one end of the adjustment range, the higher frequencies (fricatives and sibilants) of your speech will be emphasized, and the bass will be rolled off. This can be excellent for working DX stations when your signal may be just barely above their noise level. This setting, along with the speech processor, helps deliver that 'punchy' sound that cuts through noise. However, if you go too far, you will sound thin and nasal, or 'cold', as more and more bass and midrange frequencies are lost. Typically, when you emphasize treble response, the peak power drops slightly. You can add more mic gain to compensate without causing flat-topping (see mic gain section), maximizing the high frequency boost effect.
At the other end of the range, as you might expect, your voice sounds 'warmer' and has more bass, at the expense of some intelligibility. Remember, the intelligibility comes from the higher frequencies. This setting is usually more pleasing for ragchewing with friends when they have a good copy on your station. Again, your voice quality degrades as you go too far, and you begin to sound muffled from the loss of high frequency content. Some people make a note of the settings for DX and ragchew, and actively readjust their audio for their intended mode of operation. Others pick one setting for good, all-around use. It helps to have a nearby friend, who is familiar with your voice in-person, to listen to you and guide your adjustments.
HIGH FREQUENCY RESPONSE AND KEYING TRANSIENT TESTS. Here's an easy way to see if your rig has good high frequency response, and therefore, good intelligibility. For SSB and AM testing, you will need the dummy load and peak-reading wattmeter as described earlier. For an FM rig, you will need a service monitor, deviation meter or oscilloscope. Without these instruments, you can still conduct a test, but you will have to rely on another person's subjective perception and description of how you sound (see the section on soliciting a meaningful audio report).
PRELIMINARY MEASUREMENT. Using your personalized test tone ("Ahhhhhhhh") as described above, measure the total modulation effect delivered by the body of your voice. For SSB, this will be the total peak power. For AM, this will be the difference between the unmodulated carrier power ('dead key') and the modulated peak power (the 'swing'). For FM, this will be the total deviation.
TEST 1. For this test, you speak the word "Rush" and hold the 'sh' sound at the end, so you get "Rushhhhhhhhhhh." The tendency is to say it too loudly, as if you're trying to tell someone to be quiet. Speak the word first in your normal voice, then hold the end, to get the volume in proportion to your normal speech. If your meter has a long hold time, don't speak the whole word and just make the "shhhhhhh" sound. This sound produces moderate to high frequencies in the speech passband. If your audio has decent high frequency response, this test will produce 80 to 100% of the modulation in the preliminary measurement.
TEST 2. This test is for the highest possible frequencies in the speech passband and is a good measure of what makes your audio sparkle and sound 'crisp'. This time, use the word "Bus", and draw it out to get "Bussssssssss." Once you get used to this process you can just go straight to the "sssssss" part. Again, don't go overboard with the volume, here. If you get 5 to 10% of the preliminary amount, you definitely have sparkle. If the meter wiggles, it's not bad at all. If it doesn't move at all, your audio probably doesn't contain much of the highest frequencies and you may want to try a different mic. If you are testing on single-sideband and get poor response, try adjusting the tone more toward treble using the "carrier insertion point" or "RF processor shift" adjustment described above.
TEST 3. This test is for revealing any audio transients that are produced when you key and unkey your microphone. This includes 'key clunk' as well as any transients generated internally by the radio. Using your normal mic position, key and unkey your mic several times normally and observe the total modulation effect. Next, press and release the key as slowly as possible to engage the transmit mode of your radio. This second method should reveal internal keying transients that are not mechanical.
MEANINGFUL AUDIO REPORT - This
is not to be confused with a signal report, where signal
strength or FM quieting is all that is required. An audio
report is best given by someone who is familiar with the
transmitting operator's voice in person, but this is not
absolutely necessary to determine if there is any distortion. A
solid copy of the ransmitting operator is a must: 5X9 on sideband
or AM and full quieting on FM simplex. On an FM repeater, the
listener should have a full quieting copy on the repeater itself,
which can be determined by listening to the repeater tail, after
the coutesy tone, and before it drops out. The typical speech
passband for communications is 300 Hz to 3000 Hz. This doesn't
fully capture the entire range of human speech, but it is enough
for good communications.
A meaningful audio report should include the following:
Noting any serious problem sounds such as AC hum, alternator whine, audio feedback (squealing), intermittent dropouts, etc.
Noting existence of, and strength of, distracting background noises, keying transients or other strange sounds that are not part of the transmitting operator's speech.
A subjective (hey - everbody's ears are
different) description of the tonal response of the
speech itself, covering bass, midrange, and treble. The
most important portion for intelligibility is Treble, or
high frequency response. This can be determined by how
well you can hear the sibilants and fricatives of the
operator's speech: the strength of the sound of the some
representative letters (in approximate order from weakest
to strongest) F, D, T, Z, J, S, SH, CH. Bass response is
somewhat limited by the speech passband itself, but
enough at the 300 Hz end of the passband is noticeable,
especially on headphones. Midrange is where most of the
speech energy is concentrated, and lack of both midrange
and bass will leave very little energy in the passband,
like listening on a tiny speaker.
MARK'S FAVORITE IC-7300 SETTINGS FOR SSB
TX AUDIO - Here are my current favorite transmit audio settings for my 7300. Speech compression begins in your own mouth with a quiet voice and good enunciation to naturally balance out the volume levels between loud, lower-frequency vowel sounds and the quieter, higher-frequency sibilants and fricatives in your speech. The stock hand mic has an amazingly good electret element. I see no need to upgrade microphones, especially when you close talk the mic, with it turned sideways to eliminate breath noise. The close distance maximizes the pickup of articulation and high frequencies for intelligibility.
First turn the compressor function OFF to read the ALC and set the mic gain, then turn the compressor back ON to complete your setup in the listed order. Note that the compressor is absolutely required for good performance on SSB.
Good luck with your rig!
--...MARK_N1LO...--
Have you found something useful here? Got a
comment? Drop me a line: n1lo (remove 'nospam' from address when sending)
You are visitor number since 12/21/99