Installing the Linux Mint Distribution
In PC Bios turn off secure boot (if this is enabled you won’t be able to remote logon after a reboot until password entered)
Download and install Linux Mint Cinnamon 22.1
o Goto Linux Mint Download Page and download the ISO
o Burn ISO to USB Stick or DVD (I use balena Etcher for this)
o Boot from the USB Stick or DVD you just created, and it will boot into a live CD version of Linux Mint
o Follow the instructions at Linux Mint Installation Guide to then install Linux Mint onto the hard disk
Remote Access
I use VNC as its simple to use, safe as long a not enabled for access over the internet and it can be configured to start before logon, there are other remote access programs You can ignore the Vino removal section as not relevant on Linux Mint 22.1• Enable remote access via VNC
o See section 2 about half way down this page Install X11VNC
Screen Configuration
If you have multiple monitors like me then you will likely want the Icons and badges for your key applications on the bar (panel) at the bottom of the screen• Set up “Panels” on the 2nd monitor
o Right click a blank space on the bottom bar of the primary screen (the one with the
 )
) o Click “Panel Settings”
o Click “Add Panel” and you will get RED Bars round both screens, and click the red bar at the bottom of the second screen
o The next and previous panel button at the top of the dialogue box should now switch between the panel on each screen
• Setting up the Applets on the 2nd monitor
o Right click the panel on the 2nd monitor and click on “Applets”
o You get a list of applets to install on the panel, select the applet and click the “+” at the bottom of the window to add it to the panel (I use “Grouped Window list”, “Network Manager” and “Window List” applets)
Turn off screen saver
Turning off screen savers, (note certainly on windows machines, and possibly linux when the screen saver activates it can stop audio, so if you run FT8, SSTV or other digital modes they will potentially stop processing when a screen saver starts)
o Click on the menu, go to “preferences > screensaver”
o Change the “Delay before starting screen saver” (I set mine to ‘Never’ as I leave my radios running WSPR or QRSS grabbers overnight so I don’t want the screen locking)
Power Management
Turning off power saving, if power saving is enabled you may find USB ports get shutdown, which means no CAT control or possible Audio if over a USB port, (there may also be power save and USB sleep settings in the computer BIOS as well, don’t forget to check these as well)
• Turn off power management
o Click on the menu, go to “preferences > Power Management”
o Set “Turn off screen when inactive for” to NEVER
o Power mode, defaults to “Balanced” this may need to change this to “performance” later based on how the machines runs under load
(on my Test Machine I had to replace the default “Power management” application with the old TLP application which has far more options but requires configuring config files and a knowing information about processors and chipset etc to know which options to set)
Symptoms of power management issues
• CAT control fails after a period of time, normally only notice this when you come to change mode or frequency
• Loss of audio, if you are using WSJT-x, FLDigi or QSSTV if you suddenly lose audio it could power management issues
If you start experiencing any of the above look at power management settings, I have been running this PC for couple of weeks with no power issues
Install the Ham Radio Applications
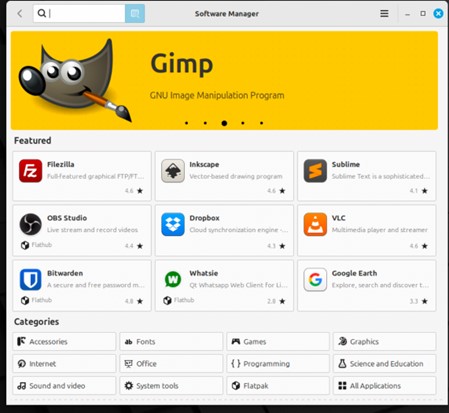
Most applications can be installed using the Built in Software Manager, which makes things very easyClick on the start / Menu button in the left corner

Then above it you will see the Software Manager button


There is a search box top left of the Software Manager
Type “flr” into the search box for the FLRig (Rig Control) application
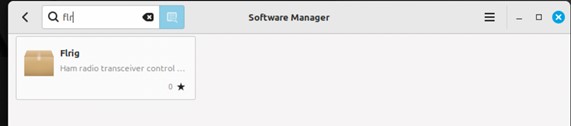
Click on the application and you will see the install option
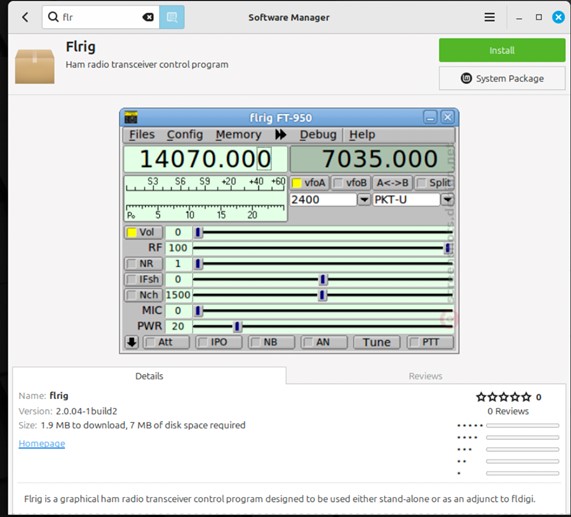
Click the “INSTALL” to install the application
If there are any additional software / dependencies you will see the list as in the image below

If you are happy, click “continue” to install the additional software / dependencies and the application will be installed automatically for you
You will likely be prompted to provide the admin password to continue
Once installed you will see the “Launch” and “Remove” options

Do the same to install FLDigi, WSJT-x, QSSTV
Connecting the Radio’s
USB connections to the radio’s should normally be plugged into USB ports at the rear of a desktop PC, historically ports at the front have been slower USB 2 ports as they only expected keyboards and mice to be plugged into them
Often the give away as to where the faster USB3 ports are is that the plastic tongue in the socket is Blue but if all ports are USB3 they may be black (USB2 ports the tongue is black)
Look at the specifications of the PC or laptop to confirm which ports you have
If you have a mix of USB 2 and 3 I tend to use USB2 ports for CAT control and USB3 for audio, as CAT is a Serial port over USB running up to about 38400 bits per second, and audio is sound up to 44KHZ so it makes sense to use the slower ports for CAT and faster ports for audio, the exception is radios, Like the Yaesu FT991a which uses a single USB connection for 2 virtual ports (CAT and Audio) which should go in a USB 3 port
One important thing around CAT Control
NOTE:- because CAT Control is a serial over USB your User has to be a member of the “DIAL OUT” group
To add your user to the dial out group run the command below
sudo adduser USERNAME dialout
So on my machine for my user peter

YOU MUST REBOOT FOR THIS GROUP MEMBERSHIP CHANGE TO TAKE EFFECT!!
So we have all the bits of the jigsaw, we just need to put them together
• Plug the USB Cable for the CAT interface into the computer
• In a command/terminal window enter dmesg
• A load of text will whizz by but it’s the last few lines you want

• The very last line you want “usb 1-4: FTDI USB Serial Device converter now attached to ttyUSB0”
• In the menu Right click the FLRig icon and select “add to desktop”
• If you run multiple radios form the one computer
o Right click the new icon on your desktop and select “Properties”
o Edit the “command” and change from “flrig” to “flrig –config-dir /home/peter/flrig.G90” (changing peter to your username)
o Click ok to save change
o Right click the new icon on your desktop and select “Rename” and chang name from “FLRig” to “FLRig – Xiegu G90”, so its clear which radio it relates to if more than one radio controlled by computer
Configuring FLRig
• Open FLRig using the new desktop icon (it will complain about lack of config)

• Close this message and click Config>setup>transceiver

• My first radio is my XieguG90, so below is the setting for that
o Select your rig from the dropdown list
o Click “Update” the select the port from the dropdown mentioned in the “dmesg” output above (mine was /dev/ttyUSB0)
o Select the Baud rate my Xiegu G90 is 19200
o Set the required “stop bit” mine is 2
o Set the RTS and DTR as required by your radio (mine are not required so unchecked)
o I then also set the “poll interval” to about 150ms as it gives a smother response on the power and S Meter graphs, then click active
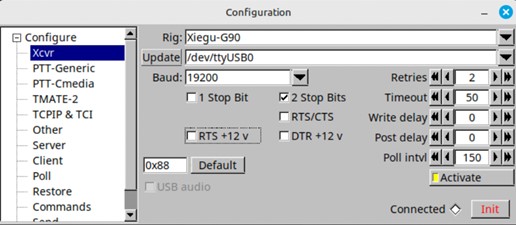
o Finally click Init, and if everything is correct then the indicator next to “connected” should go green and it should show the frequency from the radio, if not check the setting and try again until it works, (google is great for finding the settings required if you don’t know them)

o Do a couple of checks,
Click the top / bottom of a digit on the frequency and the change should be mirrored on the radio,
Click PTT it should put the radio into TX, click it again to revert to RX
Moving the volume slider should alter the volume on the radio etc
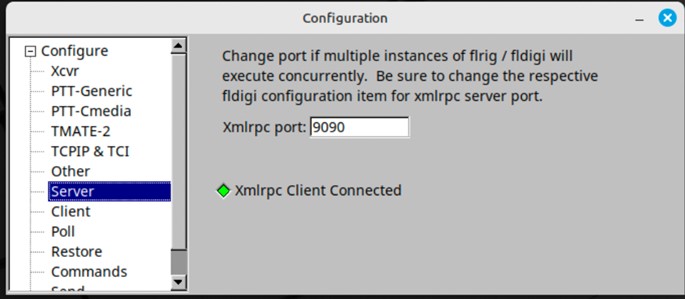
o One last thing if you have multiple radios connected to the PC. In the client tab you need to set the xmlrpc port in FLRig so applications know which radio to work with, the port needs to be above 1024 and lower than 65535, I set my G90 port to 9090 and my FT991a port to 9911 so its obvious which radio its talking to
o Close the window
o Goto File > exit to cleanly close and save the config
o Re-open FLRig using the desktop shortcut, it should reconnect to the radio without issue
Connect the Audio and configure WSJT-x
Now things should start to come to life
• Plug the USB sound device into the computer
• Run “dmesg” again to find the device
Create desktop shortcut
• In the menu Right click the WSJTx icon and select “add to desktop”
• If you run multiple radios from the one computer
o Right click the new icon on your desktop and select “Properties”
o Edit the “command” and change from “wsjtx” to “wsjtx --rig-name=XieguG90”
o Click ok to save change
o Right click the new icon on your desktop and select “Rename” and chang name from “wsjtx” to “wsjtx – Xiegu G90”, so its clear which radio it relates to if more than one radio controlled by computer
WSJT-x Configuration
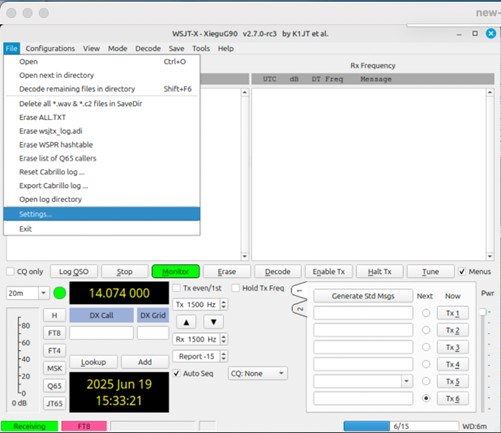
• Double click the desktop shortcut you created above to open WSJT-x
• Goto File > Settings
• On the General tab add
o Your Callsign
o Your Locator
• I also check the following boxes
o Blank line between decoding period, (puts a dashed line between each decode decode cycle)
o Display distance in miles, I prefer imperial mesurements
o Show DXCC, locator and worked before state

• Move to the radio tab and set the following
o For the Rig, select FLRig FLRig from the dropdown
o In the network server enter 127.0.0.1: the xmlrpc port you set in FLRig (so mine was set to 9090, )
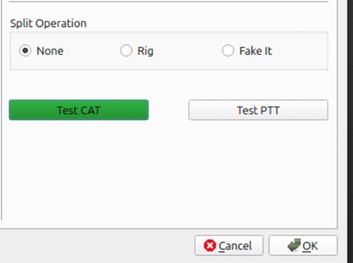
o Set PTT Method to CAT, leave the rest at default
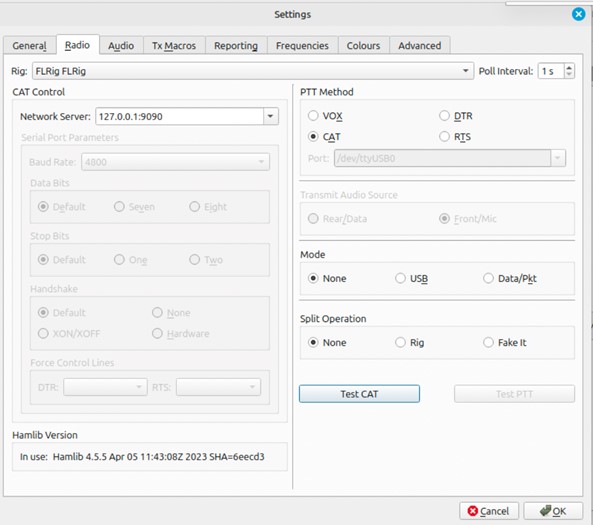
o If you try test CAT it will error at moment
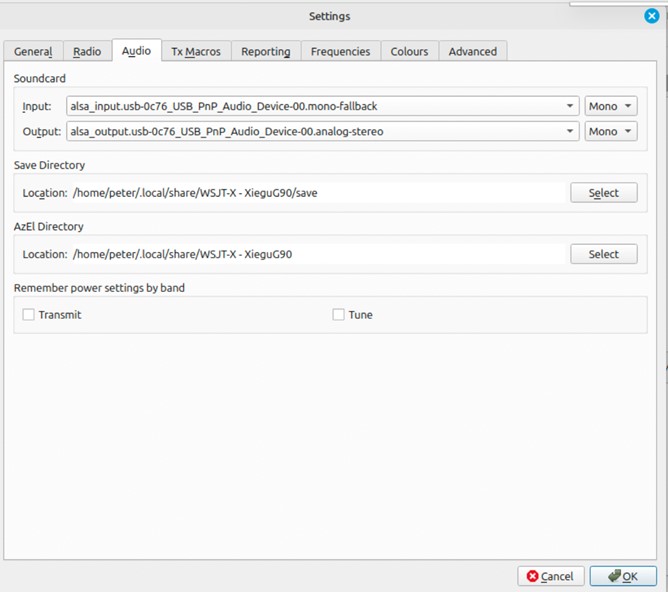
• Move to Audio Tab and set the following
o Set the output and input devices from the drop down lists, the clues will be in the dmesg screen you looked at when you plugged the sound card in
10125.378296] usbcore: registered new interface driver snd-usb-audio
[10125.383631] input: USB PnP Audio Device as /devices/pci0000:00/0000:00:14.0/usb1/1-11/1-11:1.3/0003:0C76:161F.0001/input/input12
[10125.435088] hid-generic 0003:0C76:161F.0001: input,hidraw0: USB HID v1.00 Device [USB PnP Audio Device] on usb-0000:00:14.0-11/input3
o Leave all other values at default
o Click OK to save the settings
o Click File > Exit to save the settings
o Double click the desktop icon to re-open WSJT-x
o Click File > Settings to re-open the setting dialogue
o Goto the Radio Tab and click Test CAT, if all is good it should go green (sometimes you need a reboot for some reason)
• Now goto the reporting tab and set the following options
In the Logging section
o In Op Call put you Callsign
o Select prompt me to log QSO
o Select db reports to comments
In the Network Services Section
o Select Enable PSK Reporter Spotting (this sends your decodes to the PSK Reporter website)
o Select Use TCPIP Connection (this makes spotting more reliable)

Optional based on license conditions and personal choice
In the frequency tab I add the UK 60m FT8 frequency (5.357MHz) to do this
• Go to the Frequencies tab
• Right click in the table area and click Insert
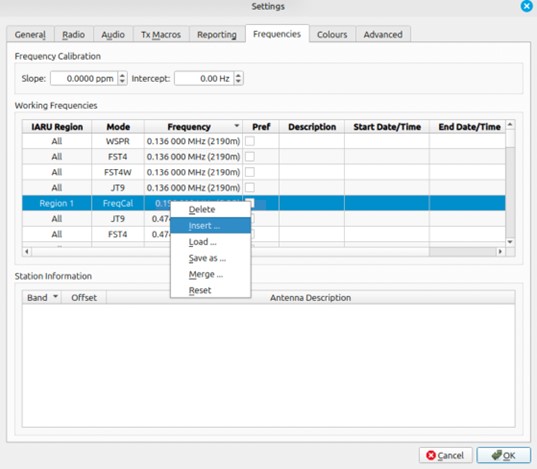
• Enter the mode and frequency you want to add (my example is the 60m FT8 frequency

• Repeat for any other frequencies you wish to add then Click OK to save the changes
• In the frequency drop down in the main display you should see your added frequency

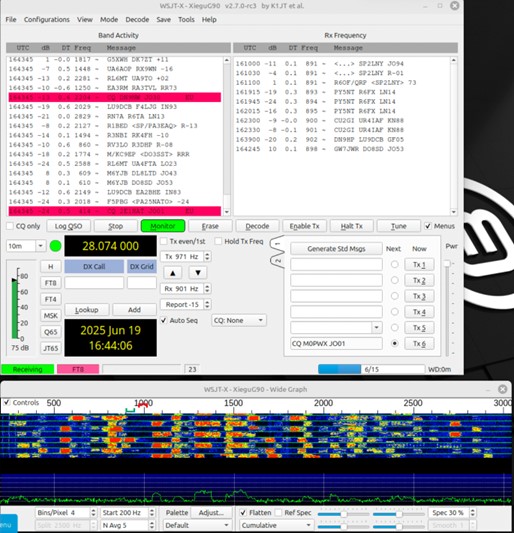
If everything is working you will see decodes starting to come in
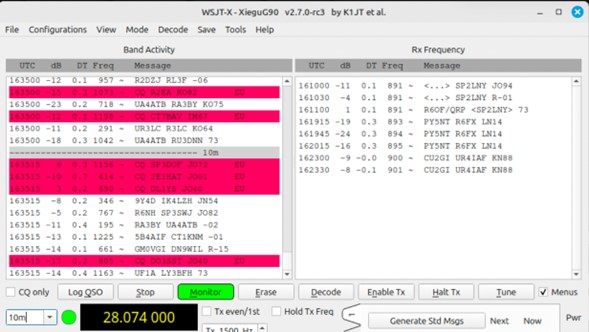
Out of the box there is some configuration required for the waterfall,
The audio band for SSB is 200 – 3000Hz the waterfall is only showing 0 – 1200Hz
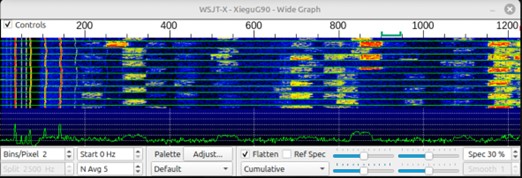
Using the selectors set the following
• Bins/Pixel = 4 (or 5)
• Start = 200HZ
• Set the width of the waterfall so you can see the full 200Hz – 3000Hz
You should then see the full audio spectrum in the waterfall and decode in the top window
Testing
If you are familiar with WSJT-x already crack on and enjoy a bit of play time if not testing is simpleFind a blank space in the waterfall point your mouse at it and press shift key + left mouse click, and the red pointer should be about you mouse pointer (red marker = TX freq, Green marker = RX freq)
Make sure you are set for a CQ call, your antenna is tuned and ready the click Enable TX, allow 2-3 full TX cycles then click Enable tx again to stop TX at the end of that Cycle (clicking Halt stops TX immediately)
My test is below, on the 3rd TX cycle I got a response so completed the QSO, and you can see I have the box to log the QSO appeared automatically, So a very successful test

Other bits and pieces
Firefox
It is easy to export password and bookmarks to files and import them back into the Firefox on the new Mint machineFileZilla
Installed from software manager, easy to configureLopora
Bit more fun Pre-reqs installed by “sudo apt install python3-pyaudio python3-pil python3-numpy python3-pil.imagetk python3-tk” Then download the zip file from www.qsl.net/pa2ohh/lllop.htm , extract to directory and just open a terminal window and run python3 LOPORA-v5g.py Tricky bit is finding the right audio deviceNotepad Next
Nice little text editor, similar to notepad++ on windows, Installed from software managerAPRS
Install the Direwolf TNC, its Installed from software manager Edit the direwolf.conf file in your home folderEdit the ADVICE (Audio Device), MYCALL (your callsign), MODEM 1200 (not 9600 for aprs), ensure KISSPORT 8001 is uncommented
The rest should be left as default
To test DireWolf tune your radio to 144.800mhz open direwolf from the start menu (make sure nothing else is open that connects to the radio's audio device), if all is working you shouldn't get any error messages about audio device if your direwolf.conf file is all corrent, you should see
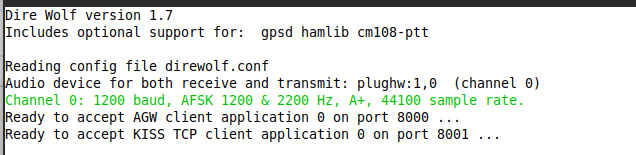
If you receive and decode APRS messages you should see them appear like below in the direwolf terminal window

If that is all correct and you see similar to the two images above then direwolf is setup and working, i currently don't TX APRS data, i only decode so i haven't configured PTT or audio out in the direwolf.config
Install YAAC (Yet Another APRS Client
YAAC requires Java so you need to the relevant Java VM
sudo apt update
sudo apt install openjdk-8-jdk
sudo apt install openjdk-11-jdk
then you need unzip and wget as prereq's, on my system they were already installed
sudo apt-get install unzip wget

Then it is the install of YAAC
mkdir yaac_folder
wget https://www.ka2ddo.org/ka2ddo/YAAC.zip
unzip YAAC.zip -d yaac_folder
cd yaac_folder
Once that installs you are ready to run YAAC
java -jar YAAC.jar
You will then get the Application open and then prompt for some basic info, to configure the TNC you will need to use the Expert config mode
Press File > Configure > Expert Mode Go to the PORTS tab and click ADD PORTS

Select KISS-OVER-TCP from the dropdown, add your callsign, and SAVE
If your radio is tuned to APRS 144.800mhz on 2m or 145.825mhz if the ISS is overhead you should see the map populate as the APRS packets are decoded in the direwolf terminal window

If you see the map with decodes like above then everything is working and you are good to go
Grid Tracker v2
Grid Tracker is a really useful program if you do digital modes like FT8/4 as I do, it connects into WSJT-x and reads the decoded signal, plots them on a map and gives you additional informationTo install you need to download the package from https://gridtracker.org/index.php/downloads/gridtracker-downloads
Download the "Debian" package, navigate to your "downloads" follder and double click the GridTracker deb package you just downloaded
Software manager will open with the the grid tracker program ready to install, click "INSTALL" and the package will be installed
Launch WSJT-x then launch grid tracker,
Out of the box Grid Tracker connected to my WSJT-x with no configuration and imediately started putting markers on the map

Some changes to make to make it more useful for me, the first change is the MAP VIEW FILTERS in the information panel

Set the DATA drop down to be LIVE, then only decodes from WSJT-x will show, and you can see the wood for the trees

Next are some settings from the option panel

I like to hunt POTA activators, so next click on the POTA icon in the info panel to put all active POTA activators on the map

Next i like to see the grey line on a map so i can see when DX opportunites may arise, click the GREYLINE icon

Finally the CALL ROSTER information panel, This provides a lot of information about the current decodes from WSJT-x
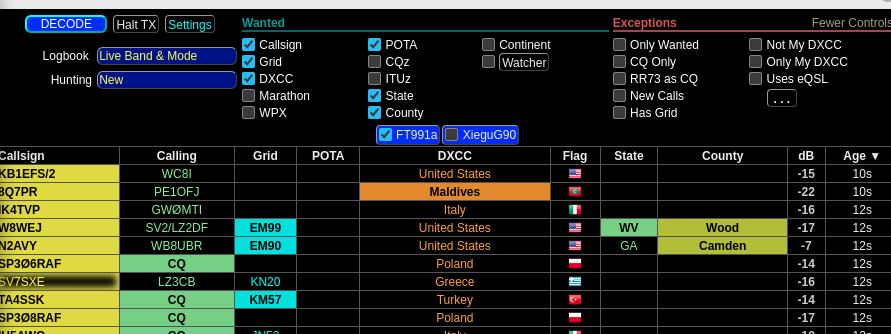
Callsigns, Grids, POTA, DXCC, STate(US), counties(US), which have a coloured background with BLACK text are new entities, this is handy for if your until awards like QRZ Worked All States or QRZ Worked All Counties (US) as it makes it easy to target wanted states or counties, likewise DXCC'x and POTA
You can also double click on a callsign in the call roster panel and WSJT-x will set that as the station to call ready for when you TX
Previous callsigns
Intermediate 2E0PWX,
Foundation M7PGW