Modification of MMDS Converters
for Radio Amateur use
The MMDS (Multipoint Microwave Distribution
System) converters are used for the distribution of video cable signals
to open areas outside of the urban centers.
They work in S band, and convert
the range of frequencies that goes from 2500 MHz to 2686 MHz to a
FI of 222 to 408 MHz, which correspond to the cable TV channels from
23 to the 55 approximately.
 These
converters, are made by different suppliers, and in general they consist
of an input filter, a low noise amplifier, a second filter, a mixer, a
local oscillator and a iIntermediate frequency amplifier. The first photo
shows a California Amplifier converter at the front and one of taiwanese
manufacturing in the back, with the original dipole replaced by a 3 turns
helix.
As you can imagine, the modification
tasks require of certain experience, and they are not easily attainable
by a beginner, in addition to require of at least a multimeter and a frequency
meter for the adjustments, you will also have to take all the necessary
precautions to avoid damage to the components, specially the GASFETs and
the small surface mounted devices.
I modified a pair of these converters,
one to convert from 2400 MHz to 144 MHz to be used in the reception of
ham radio satellites in that band, and the other to convert from 1691MHz
to 137,5 MHz to receive GOES weather images with a NOAA images receiver.
The first stage to modify is
the local oscillator, which works originally in 2278 MHz, to a frequency
that will provide the wished conversion. In the case of GOES reception,
the new frequency would be 1828,5 MHz.
 The
local oscillator is normally a PLL circuit, the VCO frequency is divided
by 256, so that the reference oscillator works at 8,898 MHz, therefore,
to take the oscillator to the new frequency we must replace the crystal
by one of 1828,5/256 = 7,14257 MHz. we must also add capacity to the VCO's
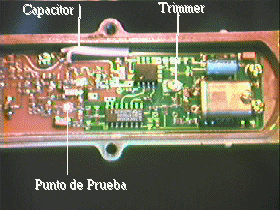
tuned circuit until the PLL is locked in the new frequency. This
can be verified when the correction voltage applied to the VCO is approximately
2 V, this voltage can be measured in the test point in the printed circuit
(see photo 2 - "punto de prueba").
The capacitor to be added to
the VCO's tuned circuit is really a piece of about 15 mm of 2 adjacent
wires from a flat cable of the ones used in computers to interconnect discs
and diskette drives (to see photo 2).
The oscillator's frequency can
be adjusted with the tunning trimmer near the crystal, this ismeasured
in the input to the phase comparator (see figure). In the same way the
frequency of the VCO can be measured, after going through the frequency
divisor, in the other input of the phase comparator, in both cases we should
read 7,142578 MHz.
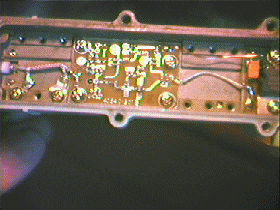
 Once
the local oscillator is modified, we must remove the two filters located
before and after the low noise amplifier, at the other side of the converter.
To do this it is necessary to remove the 6 screws that hold the filter
covers, remove the comb looking filters, and to replace them by a piece
of wire (to see photo 3).
If the converter will be used
to receive 2400 MHz, the modification is simpler, since the local oscillator
frequency will be moved a few MHz, for this reason, merely replacing the
crystal and adjusting the tunning trimmer, will ensure that the PLL is
locked to the new frequency, and the filters can be fit, adjusting them
to 2400 MHz, with the 3 "Torx"screws that hold the filter covers.
If the converters were to be
used with scanner type receivers, which can tune all the VHF and UHF range,
it is not necessary to modify the local oscillator, we must calculate the
difference between the frequency we want to receive and the 2278
MHz local oscillator's frequency to know which frequency we need to tune
in the receiver, and it is necessary only to remove the converter's filters
or to modify them for the frequency to receive.
Back
to Homepage
email: [email protected]
 These
converters, are made by different suppliers, and in general they consist
of an input filter, a low noise amplifier, a second filter, a mixer, a
local oscillator and a iIntermediate frequency amplifier. The first photo
shows a California Amplifier converter at the front and one of taiwanese
manufacturing in the back, with the original dipole replaced by a 3 turns
helix.
 The
local oscillator is normally a PLL circuit, the VCO frequency is divided
by 256, so that the reference oscillator works at 8,898 MHz, therefore,
to take the oscillator to the new frequency we must replace the crystal
by one of 1828,5/256 = 7,14257 MHz. we must also add capacity to the VCO's
tuned circuit until the PLL is locked in the new frequency. This
can be verified when the correction voltage applied to the VCO is approximately
2 V, this voltage can be measured in the test point in the printed circuit
(see photo 2 - "punto de prueba").
 Once
the local oscillator is modified, we must remove the two filters located
before and after the low noise amplifier, at the other side of the converter.
To do this it is necessary to remove the 6 screws that hold the filter
covers, remove the comb looking filters, and to replace them by a piece
of wire (to see photo 3).