Antenna Construction Tips
Split element beams:
Constructing the driven element:
The driven element of a split element beam needs to be isolated from the boom. Also, each of the two sections of the driven element needs to be isolated from each other.
One method of accomplishing this is to make use of a section of PVC pipe. On small beams such as those for the two meter band, a 10 inch section of plastic pipe works well.
You'll need to be connecting the coax cable to the beam somehow. One method is to use 2 screws (stainless steel if possible) to connect each of the wires of the line. The size of the screw is not important although the length will matter since it must be long enough to make it through the pipe and to the elements It also has to have a little room to hold the wires from the coax.
Take a moment now to see if there is any writing on the PVC pipe. You'll want to position the writing so that it will be facing the boom. Next you will mark the position where you expect to attach the wires from the feed line. To help you determine this, place the boom on the ground and the PVC pipe across it (as if it were the driven element.) The question is, looking down on the PVC, where will the wires attach? On the top or 90 degrees over on the pipe more toward the boom? Once you decide this, determine the center point of the pipe (5 inches from the end of the pipe.) Mark this spot with a marking pen. Next, measure 1/4 inches on either side of this center point. Again mark these locations.
Use a drill and drill out each of these two marks (not the center mark.) The size of the drill bit should of course match the size of the screws that you are going to use to attach the cable. Now that this is done, slide the two sections of the driven element into the PVC pipe, one from each end. Keep inserting the pieces until you see them through the drilled out hole in the pipe. Insert just far enough so that through the hole all you see is metal. This will keep the actual elements close together yet far enough apart that they are not touching each other. Verify this with an ohm meter if one is available. Finally, just screw in the two screws (through the PVC and into the metal) and the driven element is ready to be connected to the boom
Constructing the other elements:
Some beams require adjustment of the elements for matching once they are totally built. Others like the Tiny 2 and the Tiny 2 plus 1 , do not have any such requirements since they are designed to have a good match to start. When this is the case, it's nice to use a single piece of tubing for the elements instead of having multiple pieces that slide inside each other. Not only do these multiple sections complicate the building process, but it also requires additional hardware to attach the additional tubing. With single diameter tubing, you measure it, cut it, and you are done. When choosing the element diameter for your beam, be sure to think about the element ends. Are you going to want to put end caps on them? If so, do you have access to an ample supply (2 for each element?) End caps give the antenna a professional look, but some diameter caps are hard to find locally. Most hardware stores seem to carry the one inch furniture caps, so keep this in mind when designing your antenna. The element diameter does affect the resonant frequency of the antenna, so be sure to model your antenna with the correct diameter for the elements.
Attaching the beam elements to the boom:
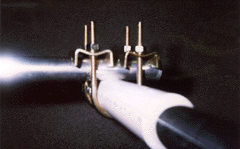
Once you've got all of the elements constructed, now you are ready to attach the elements to the boom. If you've got you're own favorite method of attaching elements, feel free to go with that. If you don't want to mess around with mounting plates and the beam is small (VHF or UHF), you might want to try this method. You'll need two U-bolt clamps for each element, the kind with the "teeth" that can dig into the elements. Take two U-bolts, place the U-bolts over the element, one on each side of the boom. Now do not put the clamp across the element, put it across the boom instead so the clamp is actually on both U-bolts. This will allow the teeth to dig into the metal of the boom. Do this for each end of the U-bolts and then screw on and tighten the nuts. After you do this, you will have to test the element to be sure you have tightened it enough so that the element can not move or even rotate in place.

Raising the antenna to its mounting position

