BEE
BASIC TROUBLESHOOTING
Having covered the three basic circuit configurations it's now time to look at how we would go
about troubleshooting them.
First use your own GOD given test equipment, eyes,ears,nose and touch.
Before you can solve a problem you must first define it.
power the equipment up:
If it blows a fuse:
disconnect the power: check that the right size fuse is installed.
if too small a fuse was installed you may have found the problem, install the proper fuse and try again.
(be ready to disconnect the power quickly, just to be safe.)
If the proper fuse blows: do not connect power again until you find and repair the,
"SHORT CIRCUIT"
open the case:
Look for scorched areas on the circuit board or charred components, is there the smell of something hot?
Replacing a charred component is not the solution necessarily, it is often just an indicator,
The question that must first be answered is why is it charred?
Did too much current flow through it or was it just defected?
Did another ckt. open or short causing excess "I" flow?
You'll need other test equipment to answer that question.
ACTIVE COMPONENTS: transistors,diodes,voltage regulators, electrolytic capacitors
fail far more often than inactive components like resistors, fixed capacitors or inductors.
Mechanical failure is more common then component failure.(switches)
LOOK,LISTEN,SMELL,FEEL
The fuse didn't blow, applying power had no effect.
"FIND THE OPEN CIRCUIT"
Why is it open?
Did you check the fuse?
Did you check the power cord and plug?
How about the switch?
Partial operation?
Does all but one function operate?
Do several functions work and several others not?
(what do they have in common? a single voltage not used by the operating functions maybe?)
Verify that all the control knobs and buttons function properly?
(a none functioning control may lead you to the problem circuit)
MOST FAILURES are caused by a single component.
Using sight,sounds,smells and touch will often get you down to a single circuit.
When you have multiple indications narrow it down by asking what ckt. or component
do they have in common.( that are not shared by the properly operating circuits)
INSURE THAT YOU KNOW WHAT NORMAL OPERATION IS.
If you don't know how it should operate, how can you know when it doesn't do what it should?
Many nonexistent problems have been trouble shot.
A transceiver will not operate AM on 160meters if AM is not one of it's modes.
A 10 meter amplifier will not develop much output power on 6 meters.
The VSWR reading on an antenna that is not hooked to the transmitter can be very high.
Much of Successful troubleshooting is just plain alertness and common sense.
The safest method of troubleshooting is with resistance checks with the circuit
power removed.
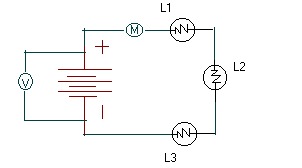
Series Circuit
Taking readings with a Multimeter
A reading needs a reference, without a reference the reading is meaningless.
Normally the ground or negative polarity point in a circuit is used as the reference.(again, be cautious
because this is not always the case.)
If the circuit above had malfunctioned our first check would be across the battery. This would:
1. verify that the volt meter we are using is setup correctly
2. insure that the battery has the correct voltage and is not dead
3. insure that we have found the correct reference point for the negative lead
Our next check could be between L1 and L2:
If L1 is open, we would see no voltage here, than the next check would be between L1 and the battery
to make sure that L1 has voltage applied to it from the battery. If we find the correct voltage applied to
L1, but no voltage out of L1 than either the lamp labeled L1 or it's associated circuitry (socket) are open.
If open, remove L1 from the circuit and verify continuity across it's filament by a resistance reading. If L1
shows continuity than replace it's socket, if not replace the lamp.
If we read the battery voltage between L1 and L2 then L1 or it's associated circuitry could be shorted,
but this is the same reading we would get if there was an open L2 or L3.
Next check between L2 and L3 following the same procedure used for L1,L2 check above.
If the battery voltage is found here, remove L3 and check continuity. If not remove and check L2.
We could also have checked the voltage across each lamp. A good lamp would show no voltage
developed across it since no current can flow in an open ckt.. Since there is no current flow and
the power is still applied the source voltage will appear across a lamp with an open filament.
While it is possible that a wiring connection has opened or that a lamp filament shorted(applying
15 volts each across the two remaining lamps and causing one or both to burn open) This is
highly unlikely. The most probable cause is that one of the active components (L1,L2,L3) has
opened.
Resistance checks could have been used to determine the condition of L1,L2,L3.
As you can see this simple problem could have been solved using one of several different methods.
No one method is more correct than any of the others, except maybe the resistance checks which
would not expose you to working on a live ckt..
( The only people that don't make mistakes are people that don't do anything.)
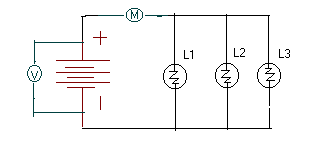
Parallel Circuit
If a lamp in the circuit above has opened it would be quiet obvious.
(unless you could not see the lamps.)
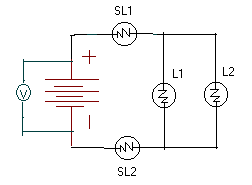
Combination Circuit