Author's note (January 2006): The economics of mobile PCs have shifted greatly over the past several years, and it no longer makes any sense whatsoever to consider the use of 110V inverters, ATX hardware, or homebrew power-control circuitry in your mobile PC project. This article should be considered of historical interest only.
If you're working on a new mobile PC platform, there's a great one-stop shopping site at www.mini-box.com, a subsidiary of Ituner Networks. I've used their products in several recent projects and would have nothing but good things to say about them even if they hadn't been generous with samples and advice over the past few years. :-) Go there and check out their mobile-capable products instead. -- jm
Abstract: Once you've decided to construct your own PC-based mobile audio installation, your very first call as a basement engineer will be how to supply the PC with power from your car's electrical system. Because you must not only come up with a way to run your computer from what amounts to a very treacherous power source, but also decide how you will arrange for the PC to be powered on and off, the twin issues of power supply and control will impact almost every aspect of your system's design.... even your choice of the PC hardware itself.
This article assumes you'll be using a standard ATX-compatible PC motherboard as your MP3 playback platform. Given today's hardware prices, this is by far your cheapest option. There are other possibilities, of course, but they all come with their own compromises:
- A portable or laptop PC
- A subminiature embedded PC board or portable handheld PCPros:
Cons:
- Compact and lightweight -- won't require much trunk space compared to a conventional PC.
- Off-the-shelf 12V power supply available for many models -- no inverters or exotic power supplies needed.
- Built-in keyboard and monitor, and perhaps networking as well, for easy maintenance.
- Most older, cheaper laptops can't handle 44 kHz 16-bit stereo sound. Potentially much more expensive to get the features you need.
- Sure, your laptop might already have a 12V power option -- but how will you turn it on and off from the driver's seat?
- Laptop hard drives are only now beginning to catch up with desktop drives in capacity, and (again) only in the very newest, priciest models.
- Excessive heat/cold may damage LCD displays.
- Probably a greater theft risk than a conventional PC.
- Sound drivers may be a problem for users of non-standard operating systems, or proprietary or obsolete laptops.
Pros:
Cons:
- Like the laptop option, these devices demand a fraction of the space and power needed by an ATX PC.
- Some models offer built-in peripherals similar to laptops.
- May be less expensive than a laptop, although still far pricier than commodity PCs.
- Usually expensive compared to full-size PC motherboards.
- Few well-known US-based vendors (e.g., there are no PC/104 devices for sale at CompUSA).
- Not usually designed with high-quality sound in mind -- may require expensive peripherals.
- Again, power-control issues still have to be solved, even for models that can run from 12V.
- Large external hard drive required -- may involve complex installation/mounting issues.
It should be obvious from the above that I consider the "cons" of portable/miniature PCs to outweigh their "pros" as mobile MP3 platforms, in light of the design flexibility and economy offered by standard desktop PC hardware. For this reason, the remainder of this article will deal entirely with the latter option. Needless to say, though, a lot of cool new hardware has hit the market in the year or so since I designed my system, so you should take the time to investigate as many options as possible before committing to the ATX approach.
Automotive systems must be designed to strict electrical standards. Your car's starter motor, along with many of its accessories, are high-current loads that are inductive in nature. Cranking and accessory operation can induce large spikes that can upset or destroy any sensitive equipment left unprotected. Newer cars with lots of engine control and diagnostic hardware are much better-behaved than older cars in EMI/RFI terms, but it still makes sense to anticipate the worst in your power-supply design. For most of us, that means using an off-the-shelf power supply solution, rather than rolling our own from scratch. Either an inexpensive 300-watt inverter or commercial 12-volt ATX supply should address these concerns.
It's possible to turn your mobile PC on and off manually with a conventional power switch, but that's not what you want. Your stereo doesn't work this way -- it comes on when you turn the key, and shuts off when you kill the ignition. You want your computer to do the same. Unfortunately, unlike the older AT-style PC motherboards, many newer ATX-style boards don't turn on automatically upon application of power. (Check your CMOS setup options -- some BIOS versions do support this.) An ATX power switch can't be simply hard-wired to the "on" position; the motherboard requires a momentary-contact pulse to turn the system on, so some additional circuitry is likely to be necessary.
Almost without exception, the first car CD players on the market had a very annoying drawback compared to the cassette-tape players they were hoping to replace. Every time you started your car, your CD would restart play from the beginning of the disc, because the manufacturers were either too cheap or too lazy to make their CD players resume playback from the point where it was interrupted. Unless you're happy with an MP3 player that lacks the functionality of a disco-era 8-track deck, you'll have to provide a way for your PC to continue operating long enough after ignition shutoff to save its track and position status to disk or NVRAM.
Unless your PC can continue operating normally during engine cranking when the available battery voltage falls to 5 volts or less, you may have to arrange for your MP3 player to power up after starting the car, rather than when the key is turned to the "accessory" position. Many power-supply options, like the 300W inverter I used, won't restart themselves reliably (or at all) following a brownout. These devices must be powered all the way down before they'll restart.
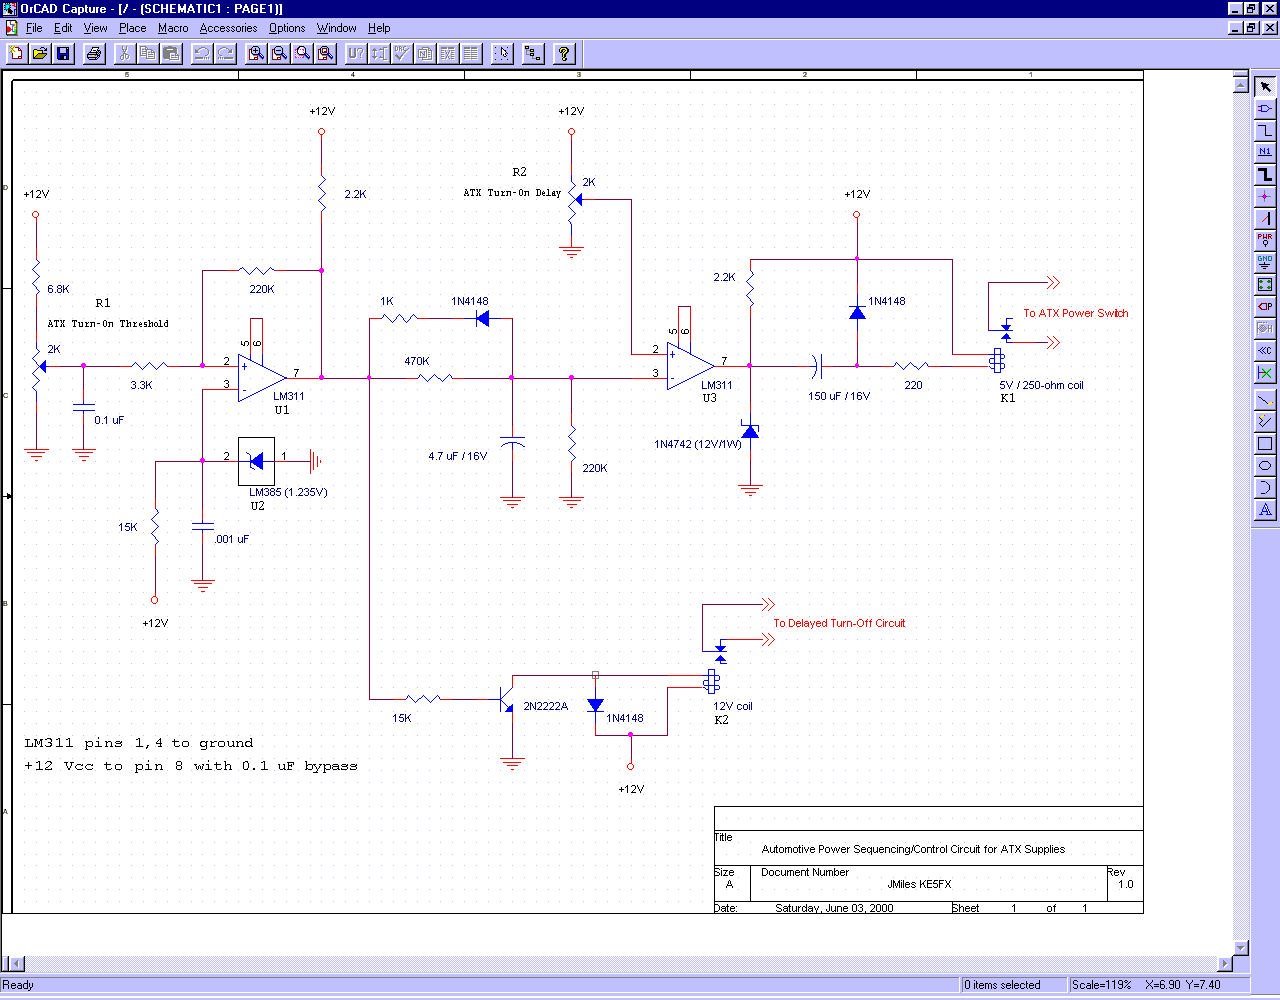
Operation is straightforward for the most part. Voltage reference U2 delivers a constant 1.235V to one input of the first comparator, while U1's other input watches the car's battery voltage level through the adjustable voltage divider at R1. (Because this circuit must remain powered up during the PC's shutdown cycle, all of the points marked "+12V" in this circuit should be connected to the point marked "+12V To Power Control Circuit" in the delayed turn-off circuit, described below).
The 220K resistor between pins 2 and 7 of U1 adds a significant amount of hysteresis to the comparator's operation. Once the circuit has sensed that the alternator is deliving its rated voltage, it's important that subsequent minor voltage sags due to vehicle accessory operation (including the PC powering itself up!) aren't incorrectly interpreted as a brownout condition. For example, when R1 is adjusted to trigger the circuit at 13.1 volts, the level at which the circuit will shut itself down is approximately 11.3 volts.
U1's output drives relay K2 through a 2N2222 transistor to trigger the inverter shutdown circuit immediately in the event of a brownout. K2 handles scenarios such as the car's engine dying shortly after startup, followed by subsequent restart attempts that cause the battery voltage to fall below U1's hysteresis threshold and deprive the inverter of the voltage it needs to continue running. Equally important, K2 ensures that the inverter never receives power in the first place until the car's alternator is running.
When U1 turns on, its output is also sent to U3's inverting input through an RC integrator comprising a 470K resistor and 4.7 uF capacitor. This causes a slowly-rising voltage ramp to appear at pin 3 of the second comparator. Eventually, this voltage will exceed the level established by adjustment R2, causing U3 to turn on and dump the charge in the 150 uF capacitor into relay K1. (K1, unlike the other 12-volt relays in the circuit, should be a small 5-volt reed relay such as RadioShack's 275-232 part.) The wires from the PC's power switch are connected to K1's normally-open contacts.
The 1N4148 diode connected across the integrator's resistor is there to dump the 4.7 uF capacitor's charge quickly in the event of a restart condition, effectively resetting the ATX power-on timer. Without this diode, the PC could fail to start itself up following a brief power loss condition.
Prior to installation, R1 should be adjusted using a variable power supply so that relay K2 turns on as soon as the available voltage, measured at the inverter, reaches about 13.1 volts. (If you don't have access to a high-current variable power supply, you can peform this adjustment in the car by turning the engine on and setting R1 just past the point where the circuit activates. Start with the wiper near the ground end of R1 and adjust upward.) R2 should be adjusted to allow for a 2-3 second delay between ignition and turn-on. This helps ensure that both the engine and the inverter are up and running smoothly before switching the PC on.
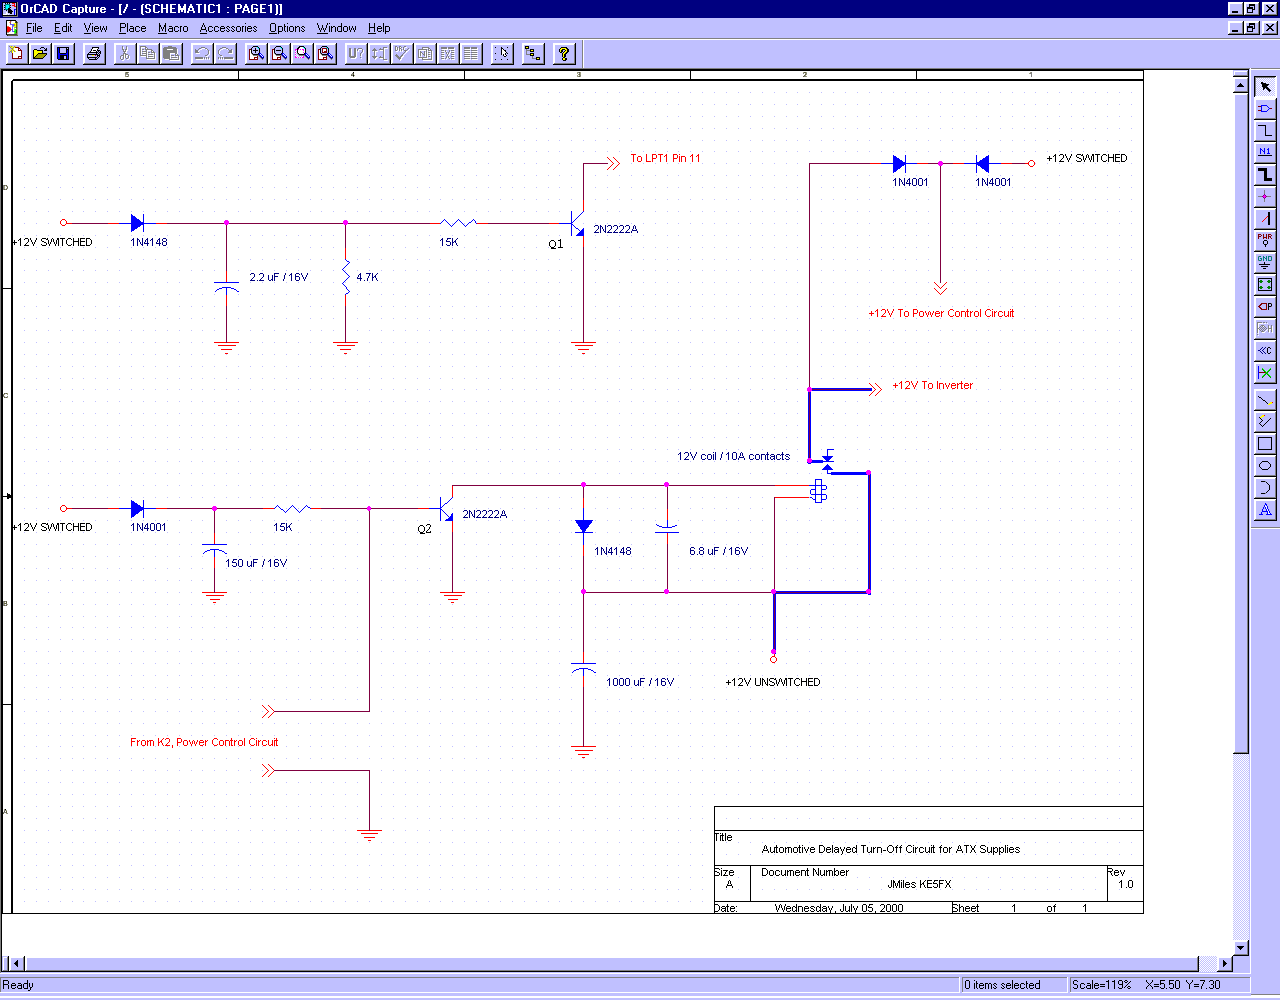
This portion of the system is triggered by the voltage level at a point in the car's electrical system that is energized when the ignition switch is in the "accessory" or "on" position. In principle, when switched 12-volt power appears across the 150 uF capacitor in Q2's base circuit, the capacitor charges immediately and Q2 turns on, activating the heavy-duty relay (RadioShack 275-0218 or similar) that supplies power to the inverter. However, the inverter cannot turn on until K2, whose normally-closed contacts are connected between Q2's base and ground, is activated by the availability of at least 13.1 volts from the car's electrical system.
Upon ignition shutdown, the 150 uF capacitor will take several seconds to discharge through the 15K resistor in Q2's base circuit. Consequently, Q2 and its associated relay will keep the PC powered on long enough for the MP3 player to save its state to the hard disk. At the same time that the capacitor begins to discharge, the circuit associated with Q1 will allow pin 11 of the PC's parallel (LPT1) port to go high, signalling the player software that the car has been turned off. The RC integrator in Q1's base circuit is designed to discharge much more quickly than the one associated with Q2, acting as a noise filter rather than a time delay.
It's very important that a high-current relay be used to drive the inverter, and that heavy-duty wiring (at least 12-gauge preferred) is used to connect the relay contacts to the inverter and line marked +12V UNSWITCHED in the schematic. Ideally, the inverter power will come from a direct connection fused at the battery with a 10A or 15A inline fuse. The inverter and PC will draw several amperes from this line with a significant spike at startup, making it a bad idea to tap into your car's electrical system anywhere besides the battery itself. Engine-control computers are not cheap, so play it safe!
No significant electrical load is drawn from the +12V SWITCHED line, so it may be connected to the system at any convenient point through a 1A fused line. In general, though, automotive power wiring is a good thing to leave to the professionals. Any good autosound shop will be happy to install the necessary switched and unswitched power wiring for your PC.
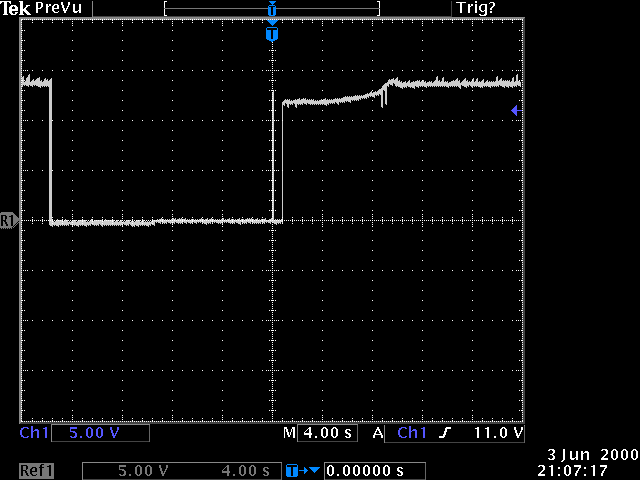
Shown here is the nominal 13.8-volt level at the +12V SWITCHED power connection as it falls abruptly to 0V at ignition shutdown. Approximately 15 seconds later, the car is restarted. Visible at the exact vertical center line is the initial battery voltage as the ignition switch passes through its "accessory" position. The voltage quickly falls back to zero as the car's electrical system disconnects accessory power during cranking, returning less than a second later with alternator voltage rising slowly back to 13.8 over the next 8 seconds.
The two small downward spikes represent the transient caused by the PC startup process as U3's relay powers up the ATX supply. In this case, the sequencer circuit actually starts up twice, since the first transient caused the sampled voltage to fall below U1's hysteresis point. A slight increase in R1's voltage threshold corrected this situation, eliminating all traces of "chatter." Heavier power wiring would probably have accomplished the same goal.
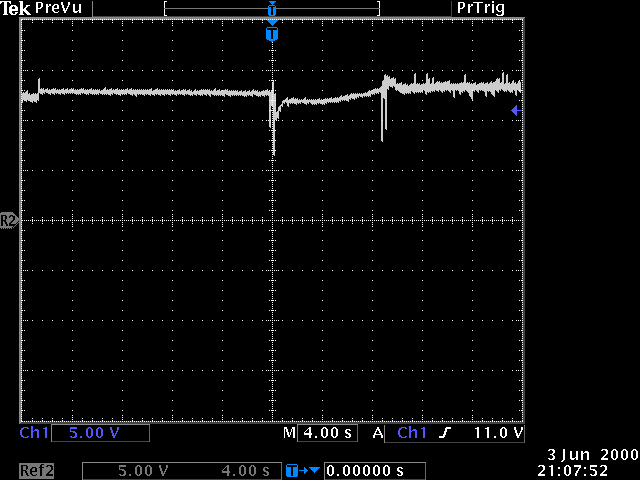
This waveform shows the voltage available at the point marked +12V UNSWITCHED in the delayed turn-off circuit, from PC shutdown (visible as small spike followed by increased battery voltage at left) to restart (twin downward spikes at same position as in figure 1 above).
Of particular interest here is the ugly spike/brownout condition associated with engine cranking, visible once again near the exact center of the screen. The Corvette's power distribution system shields its accessories on the switched +12V line from this burst of noise, but the PC's inverter is exposed to the entire effect through its direct battery connection. The available voltage can be seen falling as low as 6.5V during cranking, even with a brand-new battery in the middle of summer! Few so-called "car PC power supply" designs that lack their own power sequencing circuitry will supply clean, uninterrupted voltage to the motherboard under such conditions, especially as the battery ages and cranking voltage is reduced even further.
Again, the large spikes associated with PC power activation suggest that the power wiring from the battery is not quite heavy enough in this installation. The comparable spikes in the +12V SWITCHED line are of much smaller magnitude, suggesting that the voltage drop is occurring in the +12 UNSWITCHED line rather than the battery itself.
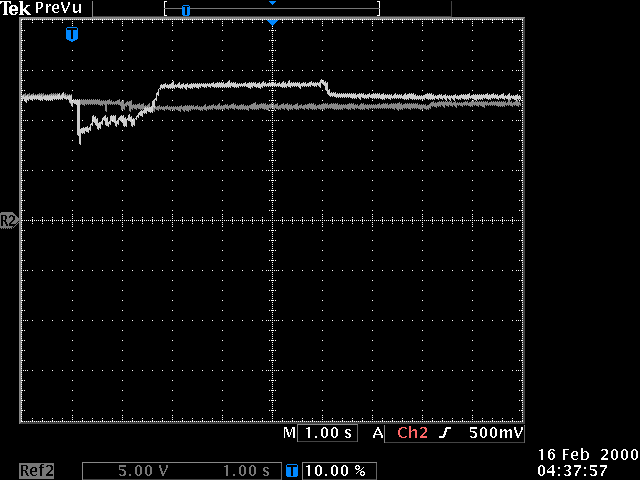
Here's a view of the unswitched 12V line under various conditions in a car with a very different electrical system than that of the Corvette in the preceding two shots. (Note that the time scale is one second per horizontal division here, rather than four seconds per division in figures 1 and 2. The vertical scale is 5V/division in all cases.) The PC was disconnected for this shot to demonstrate the ups and downs presented by the car's electrical system on its own.
Looking at the brighter of the two traces, the engine cranking transients are visible beginning at the trigger point at one second from the left edge of the screen, lasting about a second and a half. At 7.5V minimum, the brownout is less severe -- not surprising considering the difference between the amount of energy needed to crank the Porsche's 3.0L four-cylinder engine versus the 5.7L V8 in the Corvette!
Unlike the Corvette, the Porsche delivers 13.8V immediately after startup. Three seconds later, the key is turned off, and the voltage falls back to the ~12.5V level typical of a lead-acid car battery. Four seconds after that, the trace ends at the right edge of the screen.
The second, darker trace began when the button to raise the car's power convertible top was pressed. The engine was still off. This is a high-current accessory load, so the battery voltage sags fairly quickly to around 11.5V, recovering slightly as the top comes up and its electrical load is reduced.