
If you need a new pi image download one from pi-star
Use this tool to write the new image to the sd card
Use the Belena Etcher
or
Raspberry pi imager
Now for the setup
The biggest challenge is to get
the device to connect to your home WiFi network
This new MMDVM pi-zero comes with a LAN port no fooling around with WiFi
Information / credentials you will need to configure your hotspot
Call Sign
DMR user ID
Pick a hotspot frequency, or use 438.800, most are limited to low power 420 to 440. Don't use a repeater or busy simplex frequency
Your GPS grid Lat and Long, Use Google Maps

Town or city
Your country
Your hotspot URL either your QRZ page or personal web page(ham radio related)
APRS Host server (NOAM) for north America
Time zone
DMR Master server and password (BrandMeister or TGIF or other)
Home WiFi SSID and password, or if equipped use the CAT-5 cable and plug into your routers available LAN port

Below is a screen shot of the initial configuration page where you select the DMR modes and your OLED screen type if you're going to use it, Jumbo pi-zero normally use OLED 3
Then hit apply changes and go to the next section. (Note: after entering your data you must hit "Apply Changes" for each section before moving to the next)
Each time you hit apply changes the hotspot will reboot this can take some time so you'll need some patience, especially with pi-zeros

Next you will add your DMR credentials, your call, your DMR ID, frequency, location, your QRZ page url, https://www.qrz.com/db/your call here
Your radio modem type, mark your hotspot private for just you or public if you want to share it (Note: after changing this you will need to hit apply changes)

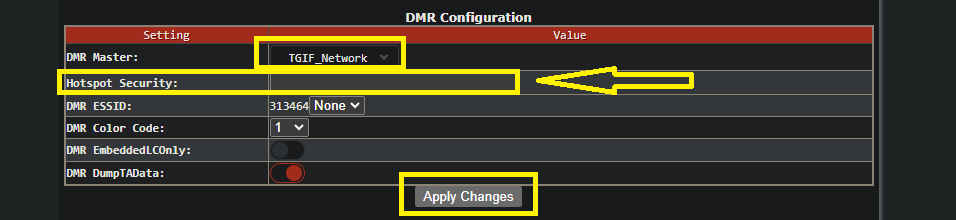
Next you will configure your DMR master sever, BM hotspot password
(Note: If you're only going to use one DMR network just pick one from the drop menu
If you want to have more than one you will need to select "DMR Gateway" the first one then hit apply changes to continue to configure using DMR Gateway)

For only one DMR network
Here you will enable GPS for DAPRS and depending on how your device is connected it is strongly recommended you disable the "Auto AP"
the reason for this is it will always be there as an open unsecured AP into your home WiFi

How that you have the hotspot setup the way you like it and its working good MAKE A BACK UP of your current configuration
to restore upload the file you saved and you'll be right back where you left off when it was configured correctly and working good
http://pi-star.local/admin/config_backup.php

That's it, use the ip address of the device or http://pi-star.local/admin/ to log into the hotspot from here on out.
Here is what your pi-star hotspot dashboard should look like

Green indicates successful configuration
Yellow indicates one or more passwords are wrong


This new MMDVM pi-zero comes with a LAN port no fooling around with WiFi
Information / credentials you will need to configure your hotspot
Call Sign
DMR user ID
Pick a hotspot frequency, or use 438.800, most are limited to low power 420 to 440. Don't use a repeater or busy simplex frequency
Your GPS grid Lat and Long, Use Google Maps
Town or city
Your country
Your hotspot URL either your QRZ page or personal web page(ham radio related)
APRS Host server (NOAM) for north America
Time zone
DMR Master server and password (BrandMeister or TGIF or other)
Home WiFi SSID and password, or if equipped use the CAT-5 cable and plug into your routers available LAN port
Step
one
power on the device
and let it sit for a few mins, after the initial
boot the hotspot will search for any stored networks if there are none
it will broadcast its own AP access point, the SSID will be "pi-star"
using your computer disconnect from your home WiFi and search for "pi-star" log into that AP, if you're asked for log in credentials use the default all pi-star devices use pi-star and raspberry.
Another way to find the device is to use this ip address http://192.168.50.1 the dashboard is web based using your web browser.
If you still can't get the hotspot to connect to your WiFi there is an alternative, use a Micro-B-Ethernet-Raspberry compatible, this will avoid all the headache trying to find the WiFi and passwords, just plug it into your home routers available Ethernet port. Use a nice long CAT-5 cable to keep the device away from the WiFi and noisy electronics.
(Note: pi-star devices do not like to be constantly power cycled (especially if you have a lower quality SD card) its important to find a place to put it away from your radios and other RFI and leave it alone)
depending on the quality of the micro sd card they can become corrupted and the device will fail.
Another thing to note is after you have set your WiFi credentials it may take a while for the device to connect, if it doesn't connect try unplugging it wait a sec then plug it back in and try again.
Once you've established a good connection to the device log out of the AP and reconnect to your home network and search for the device using an ip scanner
or type http://pi-star.local/admin/configure.php into the url bar and press enter. Depending on your router you may need to give the hotspot its own IP address with DHCP Reservation
This will allow the hotspot to be on the same IP address after power outages or reboots. Note if you use pi-star.local you will never need to know the IP and can log in regardless of the routers IP assignment
Now that you're logged into the device the first thing to do is configure it for your use by adding all the various parameters i.e. your DMR credentials, your location, pick a frequency ect.
Below is a screen shot of the initial configuration page where you select the DMR modes and your OLED screen type if you're going to use it, Jumbo pi-zero normally use OLED 3
Then hit apply changes and go to the next section. (Note: after entering your data you must hit "Apply Changes" for each section before moving to the next)
Each time you hit apply changes the hotspot will reboot this can take some time so you'll need some patience, especially with pi-zeros
Next you will add your DMR credentials, your call, your DMR ID, frequency, location, your QRZ page url, https://www.qrz.com/db/your call here
Your radio modem type, mark your hotspot private for just you or public if you want to share it (Note: after changing this you will need to hit apply changes)
Next you will configure your DMR master sever, BM hotspot password
(Note: If you're only going to use one DMR network just pick one from the drop menu
If you want to have more than one you will need to select "DMR Gateway" the first one then hit apply changes to continue to configure using DMR Gateway)
For only one DMR network
Here you will enable GPS for DAPRS and depending on how your device is connected it is strongly recommended you disable the "Auto AP"
the reason for this is it will always be there as an open unsecured AP into your home WiFi
How that you have the hotspot setup the way you like it and its working good MAKE A BACK UP of your current configuration
to restore upload the file you saved and you'll be right back where you left off when it was configured correctly and working good
http://pi-star.local/admin/config_backup.php
That's it, use the ip address of the device or http://pi-star.local/admin/ to log into the hotspot from here on out.
Here is what your pi-star hotspot dashboard should look like
Green indicates successful configuration
Yellow indicates one or more passwords are wrong