PROgramit - Software
Configuration
Select Settings/Hardware Configuration from the menu bar.
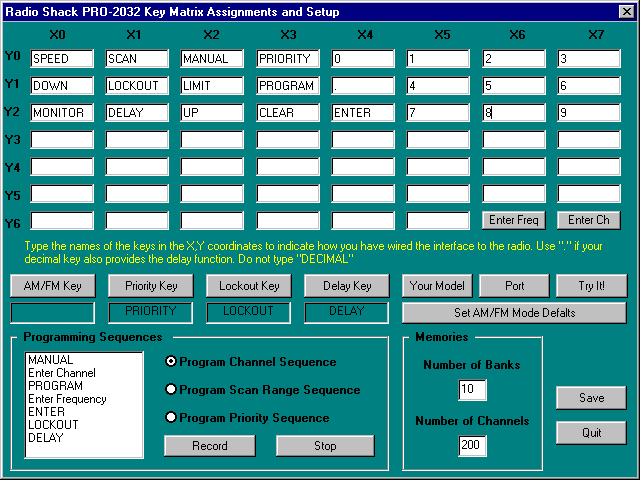
You will be presented with the screen shown in Figure 7.

Figure 7 - You can configure the SW to
work with almost any scanner using the configuration screen.
Follow these simple steps:
-
The 54 text entry boxes represent switches in the CMOS switch.
You need to tell the SW what key on the scanner you have connected that
switch to in your implementation of the project. For example, I have connected
the CMOS switch at X4,Y1 to the LIMIT switch in my scanner.
-
If your radio has a button that lets you program a priority
channel, press the "Select Priority" button. Then choose the key from the
matrix that represents your radio's "Priority" key.
-
If your radio has a button that lets you lockout a programmed
channel, press the "Select Lockout" button. Then choose the key from the
matrix that represents your radio's "Lockout" key.
-
If your radio has a button that lets you delay a programmed
channel, press the "Select Delay" button. Then choose the key from the
matrix that represents your radio's "Delay" key.
-
If your radio has a button that lets you select AM/FM/WFM
reception modes, press the "AM/FM" button. Then choose the key from the
matrix that represents your radio's "AM/FM/WFM" key. In radios that have
this button, the mode is programmed to a default value based on the frequency
that you are trying to program. The default values for various frequency
ranges can be found in your owner's manual. You will have to teach the
PROgramit SW what these default values are. When you press the Set AM/FM
Mode Defaults button, you will be presented with the dialog box shown in
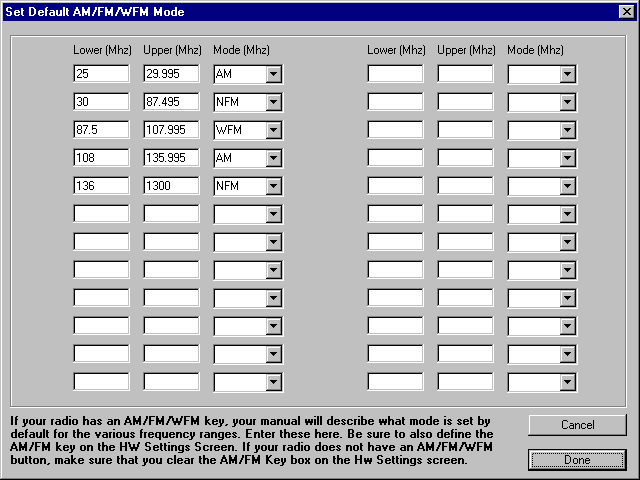
Figure 8.

Figure 8 - You will need to tell the software
what the default modulation mode is for a given range of frequencies in
your scanner model
Enter the range limits and the corresponding AM/FM/WFM
modes for your scanner and press done. The values are stored in a file
called ModeDefs.cfg in the install directory. If your scanner does not
have an AM/FM/WFM button, be sure to clear the AM/FM text box on the settings
screen by clicking on an unlabeled X,Y text box.
-
Enter the total number of channels supported by your radio
in the "Number of Channels" text box.
-
Enter the total number of banks supported by your radio in
the "Number of Banks" text box.
-
Press the "Your Model" button and enter a character string
to identify your model scanner. This will be used on the caption bars of
some menus.
-
Press the "Port" button and select which port you have connected
to the interface. Also set the Delay Factor to an integer number between
3000 and 20000. The delay factor determines how long the interface will
"hold down" the buttons on your scanner. You should try to use the smallest
number that works reliably with your computer and radio combination.
-
Next, the software needs to know the key sequences required
by your radio to program a new frequency into a particular channel. Press
the "Program Channel Sequence" option button and then "Record" to begin.
For the PRO-2032 wired according to the schematic in this article, I press
"Manual, The Enter Ch Button, Program, The Enter Freq Button, Enter, Lockout,
Delay". Press Stop when complete.
-
To teach the software the key sequences required by your
radio to program a new search range, press the "Program Scan Range Sequence"
option button and then "Record" to begin. For the PRO-2032, I then enter
"Program, Limit, The Enter Freq Button, Enter, Limit, The Enter Freq Button,
Enter, ScanUp". Press Stop when complete.
-
To teach the software the key sequences required by your
radio to program a new Priority Channel, press the "Program Priority Sequence"
option button and then "Record" to begin. For the PRO-2032, I then enter
"Program, The Enter Freq Button, Priority". Press Stop when complete.
-
Finally, fill in the number of banks and the total number
of channels that your scanner provides. That's it! The software knows how
to wiggle the buttons on your scanner and you are ready to run the Computer
Control Software.
-
Press the "Save" button and then press "Try It". Now, when
you select the boxes in the matrix, the radio should respond as if you
were pressing the same keys on the radio's keypad. If the radio does not
respond, and you have carefully checked your wiring and installation, you
may need to increase the "Delay Factor" until the radio responds reliably.
Press "Stop" and then "Quit" and you are ready to try
the software's simple drag-and-drop interface.
BACK


