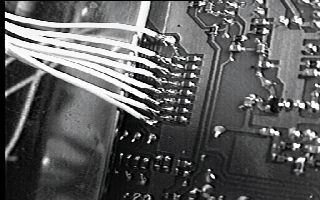
In the PRO-2032, eight wires connect X0 - X7 from the switch to the pins of connector CN6 on the wiring side of the scanner's PCB (Figure 5). Three more wires from the CMOS switch (Y0-Y2) connect to jumpers (Y80,Y83 & Y84) behind the display on the component side of the circuit board (Figure 6).

Click here for connections to other popular Radio Shack scanners. These are even more straightforward than those for the PRO2032. I will post instructions for additional models on the PROgramit WEB page. If yours is not shown, it does not mean that your scanner is not supported. You will simply need to identify the connections to the rows and columns of the keypad in your scanner from a schematic or by inspection of the scanner's PCB. It is not critical which "X" lead from the interface goes to which column or which Y lead goes to which row. The SW can be configured for the specific connections that you make.