PaddlePlug
Sometimes when you go portable or mobile, you don't want to
lug around the
big-heavy based-gold-plated-Wonder-Paddles from the shack. They are just too
big and heavy for some applications, not to mention too valuable to knock
around in a knapsack.
When running mobile for instance, I'll take along the Plexiglas base
single-lever paddle, and rest it under my right leg, with the paddle
sticking out to the right like a turtle's head. Somehow keying sideways like
this came natural to me.
Other versions of the St. Louis Key make a nice lightweight and
inexpensive
keyer, but all still require a cord and plug. In some instances, the CW jack
is right out there on the front of the rig, or keyer, and a paddle-in-a-plug
will go right in. The weight of the rig itself stabilizes the keying
operation.

Shown here in pictorial form are the steps for making such a key inside a 3
circuit 1/4" Swichcraft phone plug.
Photo 1 shows the finished PaddlePlug, being inserted into a TO keyer.
Screws protruding from the sides are not contacts, but end-stops, to remove
any mushiness in the key. In practice these would be replaced with Allen
screws which are flush when inserted.
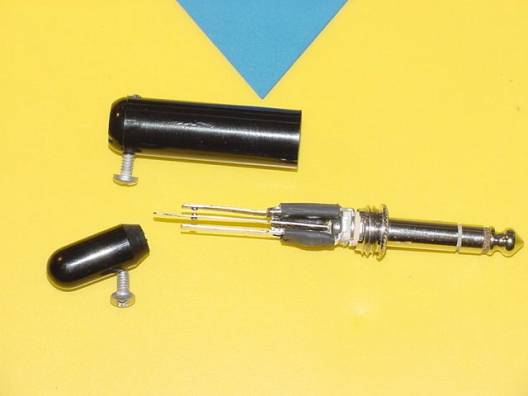
Photo 2 is an exploded view of how the insides are crafted. In my case I
like the single lever paddles, but no reason you can't use the same idea to
make an Iambic version.
Springy levers are salvaged from Telephone Type Switches or relays. On the
ends of each are silver contacts. In this case the long lever in the middle
has a contact on both sides. It is longer than the other two, and sticks out
through the front of the shell, long enough to hold the knob. Solder the
long, 2 contact lever to the grounded terminal of the plug.
Side contacts are soldered to the tip and ring terminals of the plug, being
clipped off to the correct length first so the silver points line up. Don't
fret over which side is dots and which side is dashes. Or if you are right
handed or left handed. Just spin the PaddlePlug around when you plug it in.
Attaching the knob is either by melting it onto the lever after gently
heating it with a soldering iron, or a screw can be tapped into the knob
itself. Insulate the various terminals with shrink tubing or tape as the
keyer paddle is assembled.
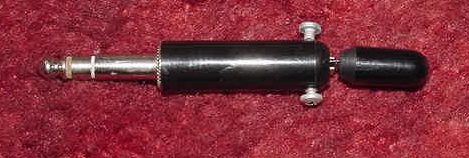
Photo 3 is the assembled unit, and demonstrates the 3
circuits on the end of
the plug.
Happy Homebrewing
Geo>K0FF
Further construction info and parts sources at
email me at
Copyright 2003 GEOelectronics