|
Page last updated: 11/08/2014 |
config.txt
While booting up, the Raspberry Pi reads some configuration parameters from the SD card. These parameters are stored in a file named config.txt and located in the /boot partition at /boot/config.txt. The configuration file can be edited from a Mac, from a Linux PC, from a Windows PC, or from within the Raspberry Pi itself. Depending on the partitioning scheme of your SD card, the /boot partition may not be visible to Windows PCs. In this case, you will need use either a Mac, a Linux PC or the Raspberry Pi to edit the configuration file.
Overclocking the Raspberry Pi
First - a quote from the RPi foundation with regards overclocking:
"Since launch, we’ve supported overclocking and overvolting your Raspberry Pi by editing config.txt. Overvolting provided more overclocking headroom, but voided your warranty because we were concerned it would decrease the lifetime of the SoC; we set a sticky bit inside BCM2835 to allow us to spot boards which have been overvolted.
We’ve been doing a lot of work to understand the impact of voltage and temperature on lifetime, and are now able to offer a “turbo mode”, which dynamically enables overclock and overvolt under the control of a cpufreq driver, without affecting your warranty. We are happy that the combination of only applying turbo when busy, and limiting turbo when the BCM2835′s internal temperature reaches 85°C, means there will be no measurable reduction in the lifetime of your Raspberry Pi.
You can now choose from one of five overclock presets in raspi-config, the highest of which runs the ARM at 1GHz. The level of stable overclock you can achieve will depend on your specific Pi and on the quality of your power supply; we suggest that Quake 3 is a good stress test for checking if a particular level is completely stable. If you choose too high an overclock, your Pi may fail to boot, in which case holding down the shift key during boot up will disable the overclock for that boot, allowing you to select a lower level.
What does this mean? Comparing the new image with 1GHz turbo enabled, against the previous image at 700MHz, nbench reports 52% faster on integer, 64% faster on floating point and 55% faster on memory."
Now to the job at hand - overclocking the RPi
As superuser whilst logged in as
pi@raspberrypi edit /boot/config.txt
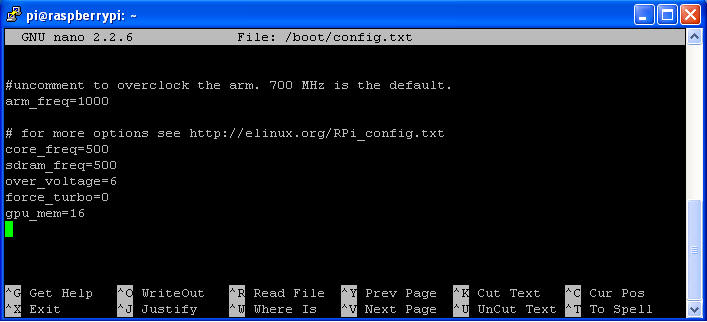
sudo nano /boot/config.txt and amend
the file as shown below, changes are highlighted...
# uncomment if you get no picture on HDMI for a default "safe"
mode
#hdmi_safe=1
# uncomment this if your display has a black border of unused pixels visible
# and your display can output without overscan
#disable_overscan=1
# uncomment the following to adjust overscan. Use positive numbers if console
# goes off screen, and negative if there is too much border
#overscan_left=16
#overscan_right=16
#overscan_top=16
#overscan_bottom=16
# uncomment to force a console size. By default it will be display's size minus
# overscan.
#framebuffer_width=1280
#framebuffer_height=720
# uncomment if hdmi display is not detected and composite is being output
#hdmi_force_hotplug=1
# uncomment to force a specific HDMI mode (this will force VGA)
#hdmi_group=1
#hdmi_mode=1
# uncomment to force a HDMI mode rather than DVI. This can make audio work in
# DMT (computer monitor) modes
#hdmi_drive=2
# uncomment to increase signal to HDMI, if you have interference, blanking, or
# no display
#config_hdmi_boost=4
# uncomment for composite PAL
#sdtv_mode=2
#uncomment to overclock the arm. 700 MHz is the default.
arm_freq=1000
# for more options see http://elinux.org/RPi_config.txt
core_freq=500
sdram_freq=500
over_voltage=6
force_turbo=0
gpu_mem=16