| |
|
|
| |
EasyPal
Download |
|
| |
|
|
| |
Digisites
Ver 651 Download |
|
| |
|
|
| |
EasyPal can be used in two
modes Standard Mode or
Hybrid |
|
| |
I will start off with the
Standard mode first |
|
|
|
|
| |
Setting up for
Standard Mode |
|
| |
|
|
| |
 |
|
| |
|
|
| |
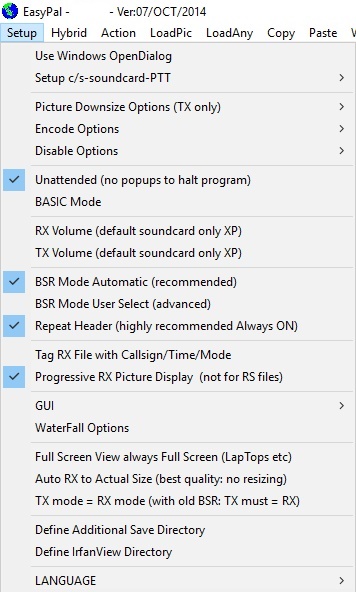
In the Set up Tab click set up c/s soundcard-PTT
The click on call sign and add your call sign in caps
Then click on soundcard and enter your sound card info its normally
USB CODEC
Then click on Use Commport (PTT rts/dtr) and enter your com Port
|
|
| |
|
|
| |
 |
|
| |
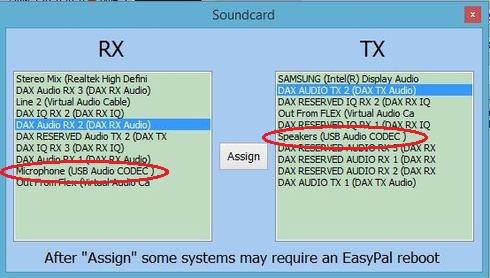
Sound card settings |
|
| |
|
|
| |
How to add text to the bottom of your TX Pictures
Click on the Action tab come down to Add TX Text
|
|
| |
|
|
| |
Change Colour of the
waterfall
Click on Setup Tab
Come down to Waterfall Options
In the box click on Colour
We find the best is green third box down third box left
|
|
| |
|
|
| |
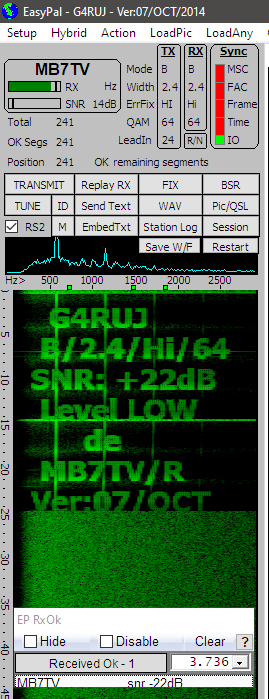
You are nearly there
Before you send a Picture
You can test your system by doing an Interrogate
Click the Rptr tab
Then click Interrogate Repeater
Your radio should go into TX for about 20 sec
You then should get back a report as below
You may have to adjust you sound card output so you get max dB reading
|
|
| |
|
|
| |
 |
Encoder Options
No Tick in box 117 Segments
RS1 134 Segments
RS2 156 Segments
RS3 187 Segments
RS4 233 Segments
|
|
BSR
The really clever thing about Easypal is that if any part or
parts of the transmission are received incorrectly due to
interference, fading or any distortion the station that has
errors in the received file can send a
Bad Segment Request (BSR) and then the corrupted and missing
parts can be replaced
|
|
|
| |
|
|
| |
How to send a Picture in standard mode
Click on the Hybrid tab and make sure that you have not got a tick in
the hybrid box
Then click the LoadPic tab and find a picture and select
Once you show the picture on the screen
Check that in the top left hand box you have the QAM to 64 for VHF / UHF
or 4 QAM for HF
Put a tick in the RS2 Box
Then press Transmit
Your radio should go into TX
In the box on the top left it will show a count down to you TX
|
|
| |
|
|
| |
 |
|
| |
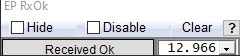
Setting up EP RxOk Box
This box can be moved into the lower part of your waterfall
It will give you your signal report of any other station that has EP Tx
installed
First install Digi-Sites version 6.4
Download
And select Download DigiSites640.exe
Once you have done that goto your C:/ Drive and you should have a folder
called EasyPal Add-ons this will have 5 folder inside
That it all done
|
|
| |
Setting Up for Hybrid
Mode |
|
| |
|
|
| |
Download qsl.net:
qsl.net (see below)
Download Digi-sites version 6.40
Digi-sites
|
|
| |
|
|
| |
To use EasyPal in Hybrid
mode
You
need to send the following information to:
[email protected]
Your
Call Sign
Your
own e-mail address
Your
loc Square
Your
Location
Your Lat & Long
Your URL:
www.qsl.net/your
callsign
Plus a password (which you
will use later)
Make a password and use it on all SSTV sites
Remember this password as you will need it to set up
This will create an e-mail forwarding address
plus it will create a website address
https://www.qsl.net/yourcallsign
You will be given a username and password
so you use FTP software to upload your HTML web page
and other files
If you sign up for a website account you will
automatically receive an e-mail forwarding address
If you really do not want an e-mail forwarding address
you can use the self help system to disable it.
|
|
| |
|
|
| |
When you receive your password you will need to enter it into the
EasyPal program as shown below
|
|
| |
|
|
| |
 |
|
| |
|
|
| |
|
|
| |
Setting Up Digi-Sites
Click on the Digi-Sites Icon on your desktop
Click on Setup on the top right hand side
Click on Edit site
Tab down to your call sign
Then change the bottom tag to: QRZCQ.com
Save changes
|
|
| |
|
|
| |
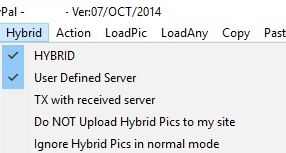
Hybrid Tab
Click on the Hybrid Tag
Click User Defined Server
Fill in Web Address:
ftp.qsl.net
User Name: Your Call Sign
Password: Your Password
Then click Use
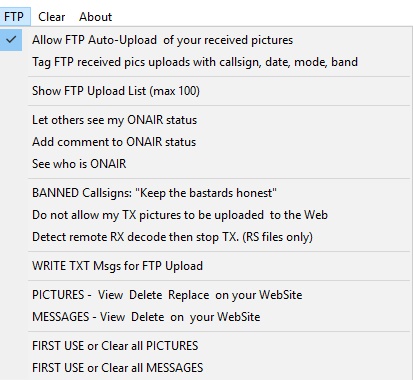
Then click on the FTP tag
Click Allow FTP Auto-Upload of your received pictures
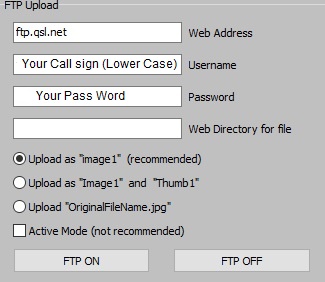
Fill in:
Web Address: ftp.qsl.net
Username: Your Call Sign
Password: Your Password
Tick: Upload as "image 1"
|
|
| |
|
|
| |
|
|
| |
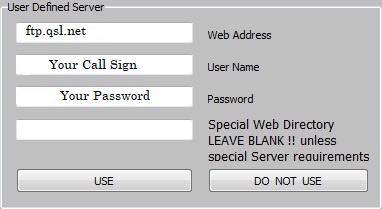
Click on
the Hybrid tab at the top of the page then click on
User Defined Server
|
|
| |
Then
enter as below using the web address as
ftp.qsl.net
Your
call sign in lower case
Your password as received from QSL
|
|
| |
|
|
| |
If you
have any problems you can log into the
https://admin.qsl.net/index.php?r=site/page&view=help website click
and login to check you details are correct, you can also change your
password here
|
|
| |
|
|
| |
 |
|
| |
|
|
| |
Once you have done that click
on the FTP tag at the top of the page
|
|
| |
 |
|
| |
|
|
| |
 |
|
| |
|
|
| |
To send pictures in Hybrid
mode
Click on Hybrid in the task bar
The boxes HYBRID and User defined Server should be ticked
|
|
| |
|
|
| |
|
|
| |
 |
|
| |
View of control
Panel |
|
| |
|
|
| |
Set Mode to: B
Set QAM to 64 for UHF / and 4 QAM for HF
Put a tick in the RS2 box
|
|
| |
|
|
| |
|
|
| |
|
|
| |
|
|
| |
Change Colour of the
waterfall
Click on Setup Tab
Come down to Waterfall Options
In the box click on Colour
We find the best is green third box down third box left
|
|
| |
|
|
| |
How to add pictures inside
Picture
Go into TX and add your picture you want to send
Then click PIC/QSL
Click Add image
Go to View
Click on the image you want to add to your TX image
Then click >>TX
The picture will then be inside your TX Image
Then click Merge for TX
Then you are ready to transmit
|
|
| |
|
|
| |
How to
add the last image you received to your next TX Image
Right click on the last image you received and copy
Go back to TX with you new image you want to send
Click on Pic/QSL
Click on ADD Image, a black box will appear in your TX image
Then click on Paste at the top of the page
Once the image in in the box click Merge
You are ready to Transmit
|
|
| |
|
|
| |
How to add Text to your image
Click in Pic/QSL
Add text in the box below
To change the text font or colour
Scroll your mouse over the text and right click
You can change the size of the text by expanding the box and you can
move it around your image
When you are happy with the size and position of the text
Click the merge for TX box
|
|
| |
|
|
| |
How to send start text at the start of your picture and
end at the end
of your picture
Click on the WFTxttag on the task bar.
Type in (your call sign TX)
Press Save
In the save Wav File Box
Enter Name (your call sign TX)
Then Click on the WAV box above the waterfall
In the box it should come up with (your call sign TX)
Click on to high light and then click (Set as "begin.wav"
Press EXIT
Repeat this to enter your end of TX
and press (Set as "end.wav")
|
|
| |
|
|
| |
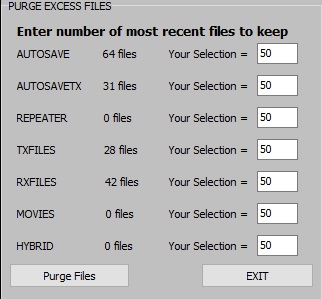
Purge
Excess Files
Click on Action tag at the top of the page
Click on Purge Excess Files
I set mine to 50 in each column this will help to
make the program run a bit faster
(see picture below)
|
|
| |
|
|
| |
|
|
| |
|
|
| |
| EasyPal SSTV Frequencies |
| Frequency |
Mode |
Type |
Time |
Program |
Information |
| 3.7360MHz |
LSB |
SSTV |
24Hrs |
EasyPal |
General |
| 3.7330MHz |
LSB |
SSTV |
24Hrs |
EasyPal |
General |
| 7.0580MHz |
LSB |
SSTV |
24Hrs |
EasyPal |
General |
| 432.525MHz |
FM |
SSTV |
24Hrs |
EasyPal |
MB7TV |
| |
|
|
|
|
|
|
|
| |
|
|
|
MB7TV Repeater Frequency 432.525MHz |
|
| |
|
|
| |
|
|
| |
|
|
| |
|
|