RASPBERRY PI
VOLTAGE REGULATORS
![]()
|
|
|
|


The above circuit is applicable to the raspberry pi b + and the original raspberry pi only ( d5 is still there on the raspberry pi 2 b / rpi 3 )
|
|
|


U14 was on the first raspberry pi and the raspberry pi model b + it was not used on the pi b/ pi b 2 and the rpi 3
the above is just for reference and might give you an insight into what’s gone wrong if you are confronted with a dead raspberry pi ( don't forget to look at the fuses before getting too involved )
Thou the chances of repairing it for most people are slim you need to have experience of working with smd
If the fuses are ok (and u14 & q3 check out - ok dependent on your model) you can investigate the voltages going into and out of u3 - see below
|
|
|


There are three voltages needed for the raspberry pi to run correctly - the main 5 volts which is then split down to 3.3 volts and 1.8 volts by the u3 chip - if your raspberry pi seems dead and the fuses check out ok maybe u3 has 'blown' you could measure for all of the three voltages required for the raspberry pi to function correctly on the appropriate pins
u3 is present on all but the raspberry pi b - the most likely cause of this chip failing is because the raspberry has had more than 5 volts applied to it ( power supply regulator failure or the raspberry pi having a 9 or 12 volt supply connected to it in error )
![]()
ADDING A FAN TO YOUR RASPBERRY
PI
![]()
|
|
|
|
|
|

![]()
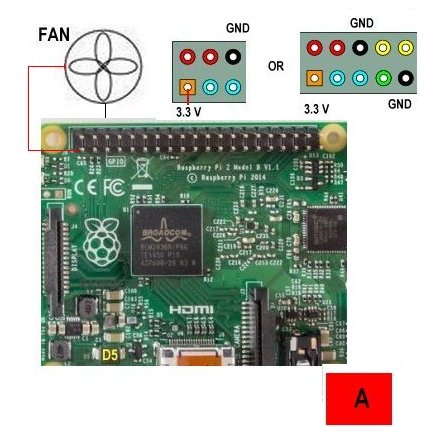
It's worthwhile adding a fan to your raspberry pi and
power it from the raspberry pi rpio pins using diagram 'b'
if it’s to noisy ( because it's rotating very fast ) use diagram 'a' ( the fan will run slower due to being powered now from 3.3 volts and give less airflow )
You can modify your raspberry pi case by cutting a hole
out of the top of the raspberry pi plastic case and carefully glue the fan
over the hole
One of my rpi 3 ran at 60 c but with a fan it dropped the temperature to 37 c.
You could off course use a 12 volt fan and power it from its own 12 volt power supply - you do not have to power it directly from the raspberry pi
|
|
YOU CAN USE A FAN SIMILAR TO THE ONE SHOWN ON THE LEFT - IT SHOULD BE CAPABLE OF OPERATING FROM 5 VOLTS WITH A CURRENT OF 80mA TO 120mA SOME COME WITH THE HEADER CONNECTORS - |
|


![]()
USING A REALLY BIG FAN
|
I used the above arrangement with a raspberry pi4 and it idled somewhere between 28c and 33c depending on the room temperature, the temperature has never exceeded 45c when i used the 'official' raspberry pi4 case with a fan mounted on the top the temperature of the pi4 idled at about 40c
|
If you suspect your raspberry pi
is over heating ( to the extent its throttling back
) |

![]()
DOES
THE FAN NEED TO ROTATE CONTINUOUSLY?
Well maybe not, if you are happy to let your raspberry pi run at temperatures up to 60c before a fan kicks in, then that can be implemented quite easily
if you have a 'pwm' fan i.e a fan with three wires ( +ve /-ve and a control wire ) it is dead simple
select 'preferences / raspberry pi configuration / performance options and enable the fan option and select the temperature you want the fan to kick in at then selct the gpio pin you are using to control the fan with ( the above mentioned 3rd wire ) and then connect the fan to the appropriate gpio pins
if you want to use a fan with just two wires coming from it ( +ve /-ve ) you will need to build the simple circuit shown below ( the gpio pin would not be able to power the fan directly ) please make sure you include the diode in your circuit - it will stop a back emf from destroying the transistor ( the fan coil has inductance )

![]()