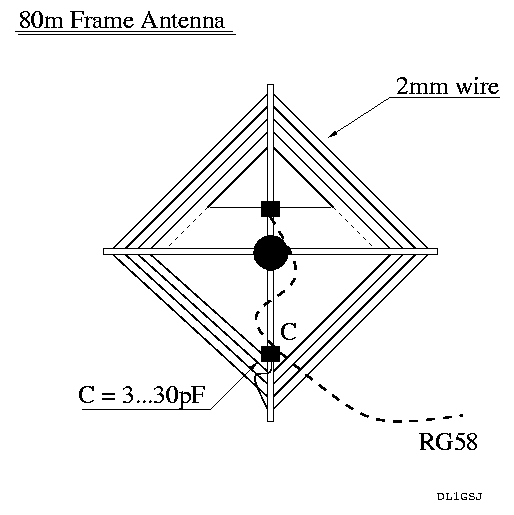
80m Frame Antenna
This frame antenna was intended to be as easy as possible to build,
mount
and dismount. It was thought to travel around in my luggage on flights.
It is built of 90cm long poles and a block in the centre. The cross
will
be held together by the tension of the wire. Therefore the wire should
be fixed on every single guide. Small cable ties will do a great job.
What you need:
-
3.6m round PVC installation tubing
(22.9mm dia for stability)
- approx. 20m wire (2mm dia)
-
solid PVC block
-
42 cable ties
-
nylon thread (to fix the coupling loop)
-
capacitor 3..30pF (plate spacing > 2mm)
alternatively I built a tube capacitor (*)
Building the frame
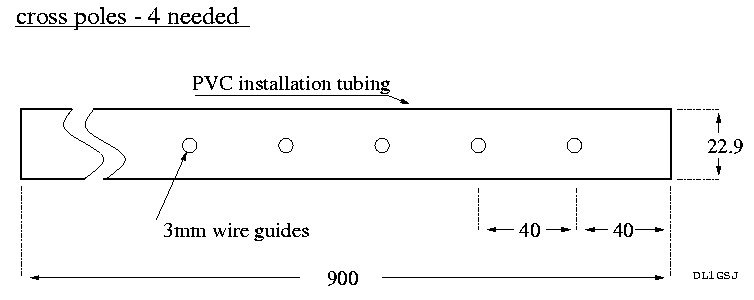
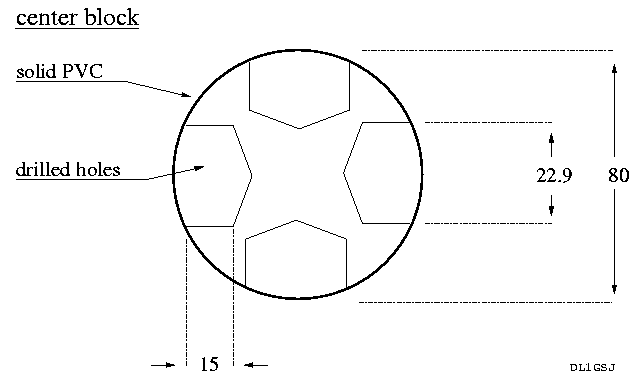
Cut the tubing into 900mm long pipes and drill 5 wire guides 3mm dia
through
it (see drawing). Machine the centre block as
shown
in the
sketch. You will have now a good chance
to see if the mechanical part was done appropriately. Wire pulling... I
used 2mm coated wire (give 2.8mm diameter). Hint: start somewhere in
the
middle.
The coupling loop
The coupling loop is something that strongly depends on the
environment.
You should experiment on that a bit on your own. A crossneadle
SWR-meter
really helps ;-)
Capacitor
Be careful with the mounting of the var cap and it's handling. Voltages
really get high over there. It is easy to get a neon bulb glowing at
10W
RF injected at resonance. A BBQ motor could be a great help for tuning
the device... For QRP use, the frame might be placed in the shack
(hotel
room), ensure enough insulation !!! There really is danger to life.
(*) An aluminum pipe, a threaded rod and a plastic distance washer
will give a HV proove and fine tuneable capacitor. Disadvantage: not
remotely
tuneable. Again: Never touch any portion of the cap whilst applying RF
to the antenna!
Properties
The natural resonance (open loop w/o capacitor) is around 4.6MHz. The
var
cap will bring that to a range of 3 to 4MHz. The measured bandwidth at
SWR 1.1:1 is about 10kHz.
The antenna can easily be dismounted and transported in a small bag.
It will take you a while (at the beginning) to disentangle the wire.
With
some practice you will find it easy to remount the frame within 5
minutes.
All distances are kept by the cable ties, all you need is to stick the
poles in the centre block, in the correct order.
Tripod
Two 2m pieces of 40mm x 40mm PVC cable channel make a wonderfull
tripod.
Cut one into two one meter long pieces, cut out appropriate edges in
the
middle of those (keeping the backbone untouched!) and build a cross -
this
will be the "foot". The "mast" will be made of the second cable
channel.
Use 4 steel angles to mount the mast to the foot. Cable channel has the
advantage of wholes in the backbone, easy way to adjust the height of
your
frame to what you need/have inside/outside your shack. Besides that
it's
not known to have any severe influence on coils or capacitors... ;-)
Caution!
I will not sign responsible for any damage produced with this design!
There
are risks, and you are warned. Be intelligent!
Drawings
Frame antenna outline
Pole detail sketch
Center block design
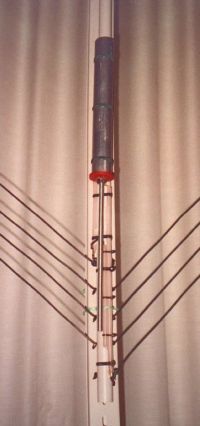
Photographs
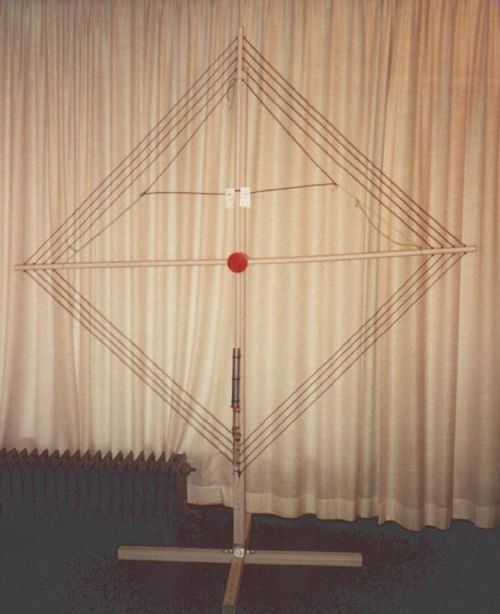
The whole frame mounted on it's tripod
Detail view of the capacitor section. RG213 inner wires with insulation
are visible, they are used to tune the range. Also on the picture the
cable
ties keeping the wire in the proper position.