
3. Transmit functions
The introduction in chap. 2.0 is also applicable for the transmit functions.
3.1 Clipper
Aim of the clipper is, to limit the voicesignal to a maximum amplitude, so that the transmitter is not overloaded by voice-peaks and the average output is increased. The algorithm used by JUDSP3 to clip the voice-peaks gives only minor distortions even at very high clip levels. Also a mode for optimal tuning the PA and an automatic over signal (AOS) is implemented.
All functions only work with the PTT pressed!
AF is delayed for 30ms after pressing the PTT, thus avoiding that any relay must switch under load.
This is the display when selecting the clipper:
"Function" can be one of the following: OFF, Clip, Clip+AOS, Tune
ž ž ž , Tune."Level" is the clip level in dB
|
Status: |
OFF = |
function is OFF (no AF output to transceiver) |
|
|
ON = |
any other function and PTT is pressed |
|
|
blank = |
any other function and PTT is not pressed |
Input level: see chap. 3.1.2
To change function or clip level select the appropriate menu with the "Setting"-keys and change the values with the "direction"-keys.
The REC-key stores the settings permanently. 
3.1.1 Functions
OFF
Function OFF switches the clipper off, that is:
- no AF at the "MIC Out" connecotr (= no AF to the transceiver)
- Microphone input is active, the "Mic gain" control and the input level bargraph are working
- PTT works
This function is useful for checking Mic gain and clip level without transmitting a signal.
CLIP
This is the normal mode of the clipper. The microphone signal ist limited to a constant level. This gives an increased average output and prevents any overdrive of the transmitter. "Mic gain" must be adjusted in such a way, that maximum input level on the LCD-bargraph is just reached in the voice peaks. If "Mic Out" is adjusted as described in chap. 1.4.4, then the drive level to the transmitter is now optimal.
CLIP+AOS
AOS = automatic over signal. The same as CLIP with an aditional short (0.2 sec) "beep" when you release the PTT.
TUNE
As long as the PTT is pressed the transmitter is modulated with a continuous tone, which has the same amplitude as the clipped voice signal. This can be used to optimal tuning of the transmitter.
TUNE
Ÿ Ÿ ŸSame as tune, but the signal ist not continuous but a keyed signal (50% on, 50% off). With this signal PA can betuned more acurately because the thermal load is reduced and the keyed signal is more comparable to a voice signal than the continuous signal.
Prerequesit for optimal results: the peak input level was adjusted with MIC to full scale, that is, the
just reaches the right boarder of the LCD or even diappears for short peaks.The level, at which clipping is active, is called clip level. It is always specified relative to the maximum possible level. Cliplevel 18 means, that 18dB below the maximum level clipping comes into action. This is shown in the input level bargraph by "-" which are displayed instead of the bars. The portion of the signal, which is cut away by the clipper, is displayed as "-" instead of dark bars. As the bargraph displays exactly 3dB per unit, a 18dB clip level begins 6 units below maximal level.

After clipping the signal is amplified, so that is has exactly the same peak level as the tune signals (Tune, Tune
Ÿ Ÿ Ÿ ).To change the clip level, select the menu with SET. The clip level can then be changed with the "direction"-keys.
3.2 Voice Recorder
The voice recorder allows you to store voice-messages via microphone or from a receiver up to 55 sec [110 sec] and to playback once or in an endless loop.
Usage:
- CQ-calls
- voice-beacon for tests
- SSB Meteor Scatter QSOs
- playback of the received signal from your QSO-partner.
The input of the voice recorder is the microphone or "Speaker In" resp. "Line in". Output is always "Mic Out" and the Loudspeaker, to monitor the signal.

During PLAY the PTT-contol may be switched off. With a VOX controlled transceiver you can then listen during the speach-pauses (for long CQ-callls ...).
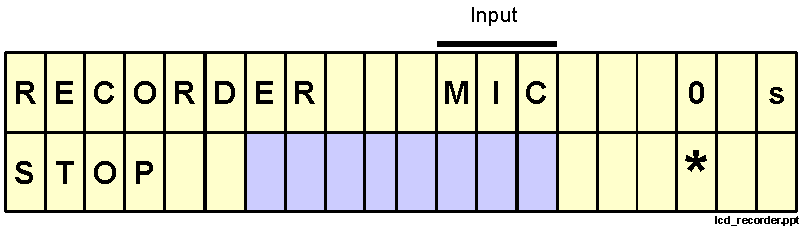
3.2.1 Recording
The voice recorder has one memory which can record 55 sec [110 sec]. Every recording deletes the previos recording.
Before recording check the input level by talking into the microphone and watching the input level bargraph. Adjust input level with MIC. The recording starts with pressing REC (=record). During recording the remaining memory-seconds are displayed. STOP terminates the recording.
If you want to transmit during recording, you must press the PTT during recording.
3.2.2 Playback
Pressing the > key starts playback. Playback always beginns at the beginninf of the stored message. If during playback > is pressed, playback continues from the beginning.
At the end of the message the playback continues at once from the beginning. During playback the PTT is switched to transmit by software and the remaining seconds are displayed.
Playback is terminated by pressing STOP.
3.2.3 Input
With the "Setting"-keys you can switch from normal mode (with input level display) to the menu for changing the input. With the direction keys you can select RX (= input from receiver via "Speaker In" or "Line In") or MIC (=microphone).
3.2.4 Example for SSB Meteor Scatter
For SSB Meteor Scatter the same text must be repeated again and again. The voice recorder is therefore a usefull tool:
3.3 CW-Meteor Scatter
As the keying-circuits in the popular transceivers are not able to support the speed needed for high speed meteor scatter, JUDSP3 has an AF tone generator which can be keyed with up to 10,000 lpm. The keyed AF is fed to the transceiver via "Mic Out" or "Line Out" (see appendix A1.5) to the transceiver and transmitted as an SSB-signal with SSB bandwidth.
The output level can be adjusted with "MS Out" to complie with the transceiver.
Attention: the setting of "MS Out" and "Mic Out" influence each other, so both controls must be adjusted several times.
With switch 1 and 2 at the rear panel you can choose a on/off keying or computer keying.
Switch 1
é , switch 2 ê : computer keyingThe frequency can be adjusted with "MS frequency". Recommendation: 1100 Hz (see chap. 2.5.4)