 |
||||
 |
||||
| binutils-2.12.tar.gz | http://sources.redhat.com/binutils |
| gcc-2.95.2.tar.gz | http://gcc.gnu.org |
| newlib-1.10.0.tar.gz | http://sources.redhat.com/newlib |
| gdb-5.2.tar.gz | http://sources.redhat.com/gdb |
The binutils package includes the GNU assembler and linker, and the gcc package contains the GNU C/C++ compiler. Newlib is the C runtime library we will use to supply functions like printf(), and the gdb package contains the GNU debugger.
Setting up the build environment
The first thing to do is set up a directory structure in which to build and install the tools. Then, set up some environment variables that will save typing later, as well as make sure that the arguments used during the configuration process are consistent throughout--- a source of common errors. Figure 2 describes the commands, just type them in as they appear there (omit the leading '$', which represents the Cygwin or unix command prompt).
| $ mkdir /src/binutils |
| $ mkdir /src/gcc |
| $ mkdir /src/newlib |
| $ mkdir /src/gdb |
| $ gunzip < /src/binutils-2.12.tar.gz | tar xvf - |
| $ gunzip < /src/gcc-2.95.2.tar.gz | tar xvf - |
| $ gunzip < /src/newlib-1.10.0.tar.gz | tar xvf - |
| $ gunzip < /src/gdb-5.2.tar.gz | tar xvf - |
| $ mount -f -b d:/cygwin/tmp /tmp |
| $ export MAKE_MODE=UNIX |
| $ mkdir /tmp/build/binutils |
| $ mkdir /tmp/build/gcc |
| $ mkdir /tmp/build/newlib |
| $ mkdir /tmp/build/gdb |
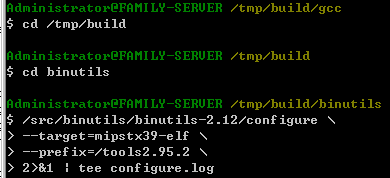
First of all, we have to build up binutils ...
Since gcc calls archiver, linker, and assembler.
All of GNU compliant tools are initially configured by "configure script" and it aytomatically creates a Makefile optimised for the host environment. There are two essential configure options, --target and --prefix.
- --target
- --prefix
--target specifies CPUs for output codes and --prefix tells make where the binaries, man files, headers, and libraries will be installed. The abbrebiation of Toshiba TX39 processor is "mipstx39-elf" ; GNU family currently supports many platforms). I assigned /tools2.95.2 to --prefix and executable files will be installed in /tools2.95.2/bin/.
NOTICE: There are several abbreviation for the TX39 CPU, but they have different ABI types, so make sure what kind of ABI do you need. Here we use a "mipstx39-elf" target. (Also there is a "mips-tx39-elf" target).
NOTICE: You should perform builds in a directory out of the source tree. In this case, you can create multiple binaries (H8/300H, x86, MIPS, ARM, and so on) using single source directory.
-
Run the configure script included with the binutils package, to set up the source code to build for the MIPS target.
-
Invoke the make program to actually compile the and install binutils. The output from make is captured and stored in the file make.log.
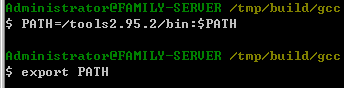
When this process finishes, you will see a number of programs in $/tools2.95.2/bin.
The assembler is mipstx39-elf-as,and the linker is mipstx39-elf-ld. mipstx39-elf-objcopy is a utility that can translate files to different formats (from ELF to S Record, for example), and mipstx39-elf-objdump is a utility that can dissect the components of a file, to show you things like symbol addresses and a disassembly of the file's object code. We'll discuss these utilities later.
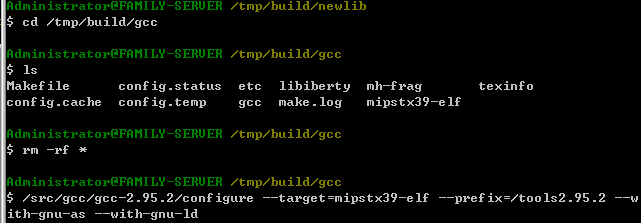
Building a bootstrap cross compiler
Now that we have an assembler and linker, we can build and install the GNU C/C++ compiler. The first step in the procedure yields a bootstrap compiler that can only be used to build runtime libraries and header files; we will use this compiler to build the mipstx39-elf version of the newlib C runtime library. Once that's complete, we will rebuild the compiler completely, including internal libraries that need target-specific header files from newlib in order to be compiled properly.
The commands to make the boostrap compiler are shown in Figure 4. Do them now.

NOTICE: Here we used some GNU options while configuring. The "--with-gnu-as" and "--with-gnu-ld" option indicate the HOST compiler to use the NATIVE gcc assembler and linker while compiling. Otherwise, the HOST compiler will use the cross-assembler and cross-linker that we just generated to compile the cross-gcc. It will suppose that you are doing native compiling under a MIPS HOST.
There are two additional configure options you should consult.
- --with-newlib
- --with-headers
glibc is too huge and complex for small systems, so we have to choice another compact C library. newlib is one of the most hard-tested library, and gcc can be adopted for it by --with-newlib option. In this case, you have to specify --with-headers option. gcc itself creates libgcc.a and libiberty.a libraries, and standard include files are required for their compilation. Standard headers files for newlib are collected in its source tree (newlib/libc/include/).
NOTICE: --with-headers option is very important one for cross-making. Do not forget it!
Default Makefile produces codes for C++, JAVA, Fortran77, and Chill in addtion to ANSI C. Since almost of us do not need these optional languages, let's ignore them by using --enable-languages option (C is essential and we can not exclude it). (--Oops, I forgot this in this compilation!)
As described above, we should ignore "-g" option (CFLAGS="-O2") and limit supporting languages to C and C++ (LANGUAGES="c c++"). Be careful, please specify LANGUAGES option in both of "make" and "make install".

Building the newlib C runtime library
The procedure, shown in Figure 5, should seem pretty familiar by now.

| make all install |
Some hints, if you didn't export the target binary files path correctly, the following setting is necessary.
| make all install \ |
| >CC_FOR_TARGET=/tools2.95.2/bin/mipstx39-elf-gcc \ |
| >AS_FOR_TARGET=/tools2.95.2/bin/mipstx39-elf-as \ |
| >LD_FOR_TARGET=/tools2.95.2/bin/mipstx39-elf-ld \ |
| >AR_FOR_TARGET=/tools2.95.2/bin/mipstx39-elf-ar \ |
| >RANLIB_FOR_TARGET=/tools2.95.2/bin/mipstx39-elf-ranlib |
Building a complete cross compiler
Now that we have MIPS header files and libraries from newlib, we can build a complete cross compiler setup for C/C++ development. The steps are shown in Figure 6.
Building the debugger
Are we there yet? Almost. The last step in the setup process is to build and install the debugger. The procedure is shown in Figure 7.

Like most GNU programs, the GNU debugger is under constant development, and sometimes is released with minor issues that affect one or two of its many supported targets. When such problems are resolved, a patchfile is usually released that contains just the differences between the updated version and the original version; this lets you get the improvement by downloading just a few bytes of data, instead of downloading the whole package again.
The patchfile is plaintext; you can easily read it with a text editor to see the changes it contains. In fact, that's exactly what the patch program does.
If you run out of disk space
All told, you will need about 500MB of free disk space in order to build a complete GNU cross development environment. But you don't that much all at once: if space is tight, you can delete the files left at the end of each step in the procedure before you move on to the next step. For example, once you finish building the cross assembler and linker, you can delete the contents of the /tmp/build/binutils directory.
The installed tool set requires less than 100MB of disk space.