Software based digital Television
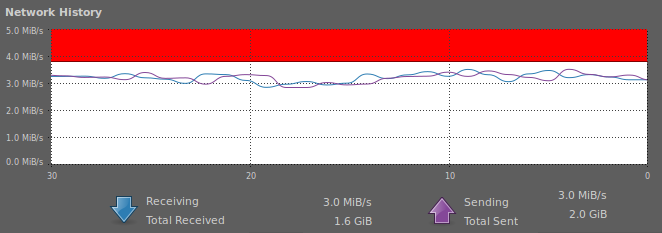
This is a screen shot showing the amount of data moving in and out of the multiplexer on the network. The red block at top shows where the data will be chip by the modulator, there for my maximum data through put is set by the modulator settings.
Experimentation:
I have stacked up to six SD and one HD channel using h264 compression. With this many channels I kept using more then maximum data bandwidth I had. so I decided to drop the HD channel and found six channels of standard-definition was good number to experiment with. The problem I came across was that I needed more head room on the modulator side, my peak data rates were getting up to 32M bit/s. This is why I move to same setting that Freeview and Sky are using (22.5M Sym/s 3/4FEC). My setup looks something like this:
CH 1 looped play-list files in Mpeg2 format
CH 2 looped play-list files in Mpeg2 format
CH 3 Mpeg2 encoder card encoding video from my VCR
CH 4 Satellite feed from Satellite receiver card
CH 5 Satellite feed from Satellite receiver card
CH 6 Off air UHF receiver Mpeg2 encoder
|
PPID 102 VPID 100 APID 101
PPID 202 VPID 200 APID 201
PPID 302 VPID 300 APID 301
PPID 402 VPID 400 APID 401
PPID 502 VPID 500 APID 501
PPID 602 VPID 600 APID 601
|
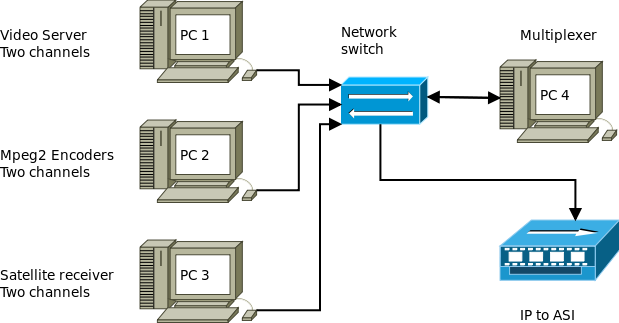
To get these six channels to work as a multiplex TS stream, I used four computers on my LAN network to do this. When I was at technology convention 2009 I talk about how to use play-list files for ATV, this is what I did for Channels 1, 2 and also for the HD channel with promo clips. My Server feed channels, 1 and 2. Another computer had the Satellite receiver card installed for this feed. These Computers all feed their channels to six different ports on the one IP address. On this IP address my laptop was located and acted as the Multiplexer and recodes the PIDs (Packet Identification headers), this is basically what a Multiplexer does. This multiplex stream is then feed to another IP address where the IP to ASI box is located.
One of things of interest I came across is the flexibility of the DVB transport stream. As long as the receiver is capable of decoding the form of compression used, there is wide rang of formats that can be used within the DVB standard. I tested; Mpg2, h264, ac3, AAC, to decode the sound stream I connected up my Satellite receiver via digital audio out to my home theater system.
Second of many advantages working in software there is no loss in video quality from the stored Mpeg2 file to what is display on the receiver. Another is I can change the configuration by simply clicking on shell script file. Been defined in software gives me the freedom to reconfigure large number of settings without to many problems, such as:
Mpeg2 Encoder card
Size, 352 x 288 or 720 x 576
Bit-rate, 1 to 12M b/s
Frame rate
Video input, Tuner, Video or S-video
Coding format, VBR or CBR
and so on
|
Satellite receiver card
Frequency, 950 to 2150 MHz
LNB volts, 14 or 18
Symbol rate
FEC, 1/2, 2/3, 3/4, 5/6 or 7/8
PIDs
and so on
|
IP and port
Set, IP address and port
Packet format, UDP or RTP
Stream format, TS or PS
|
Multiplex
Number of channels
Channel names
PID information
|
Internet Streaming:
Hardware:
Cable Television (MATV/CATV) systems can be based on coaxial, Fiber and Unshielded Twisted Pair (UTP). The coaxial takes the form of 75 ohm coax as RG-6, RG-11. Fiber cabling could be used in the form of analog or digital transmission and the UTP is in the form Cat-5 or Cat-6 cables. I have been involved with cable TV systems, installs and have a good understanding of what types of equipment that is available.
By taking this approach I started looking around on the Internet to find cable TV equipment, I new what I was looking for and what I needed it for. I soon found wide range cable TV head end equipment and price range to match. I soon narrowed my search down to three companies based in China and one of them had just what I was looking for an IP to ASI box. This IP converter receives and removes the DVB data from the UDP packets and converts to 188/204 ASI out at 270M b/s. The ASI standard pads out the usable data with null packets to bringing it up to this bit-rate.
For the modulator I planed to use my Radyne DVB-3030's and soon found this modulator uses a non standard ASI input. So I contacted my suppler in China and imported a cable TV L-band modulator when I connected it up I got ASI lock without any problems. Then it was a simple case of setting the frequency, Symbol rate and the FEC.
Computers used were Pentium 4 2 GHz core speed with 1GB of RAM. The video server has 500 GB hard drive installed with 25 GB set aside for the operating system and other 475 GB formated as XFS file system. These are not new computers, most were rebuild from second hand hardware. Make sure that your Ethernet card has minimum speed of 100M b/s. You can setup encoders and a multiplexer on one computer to do this been in software the layout is very flexible. All that is required is PIDs (Packet Identification) setup within the Mpeg TS settings. To keep it simple I set my PID's starting at steam 1 at 100, steam 2 at 200. steam 3 at 300 and so on.
On the receiver side I tested a number of Satellite receivers to compare there performance. I soon found what was useful to have for scanning in Satellite transponders is not the case for ATV applications. Only found two types of set-top boxes that were any good these were the Phoenix and the Strong. Both of these manufacturers allow you to add PID's manually. Others would let you edit PID's but not add new ones in or there was no manual functions available at all. What is needed is a quick way of adding new settings on the fly, simply because you never get ATVers to use one common transmission standard.
Encoder:
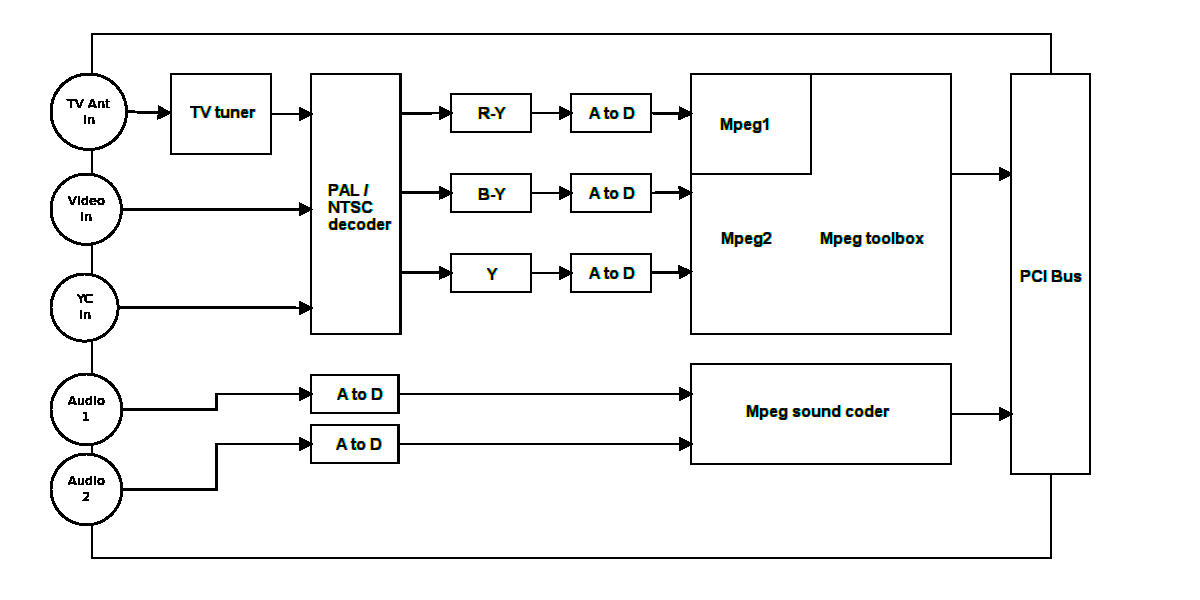
Here is a block diagram of my Mpeg encoder card, it's does not matter how you end up with a mpeg stream as long conforms to the Mpeg standard and the decoder will display a picture. The Mpeg data could come any source such as; Precoded file, DVD, DVB or Mpeg encoder. But is important to think about how you feed analog video in to your mpeg encoder on the understanding that video is a compressed format to began with. This is why with these WinTV cards I always feed Y/C in (S-video) to minimize the amount of frequency roll off. Another thing to remember that Mpeg compression is movement based, always try and avoid feeding in noisy signals! Other wise you will end up with nothing more then coluored blocks.
The WinTV PVR-150 has a Conexant Mpeg2 chip (CX23416) with on board SDRAM (M12L64322A) on this this plug in card making up a ready to go encoder for DATV.
Both input PCI cards are made by Hauppauge and available under name of WinTV
The WinTV PVR-150 has a Conexant Mpeg2 chip (CX23416) with on board SDRAM (M12L64322A) on this this plug in card making up a ready to go encoder for DATV.
Both input PCI cards are made by Hauppauge and available under name of WinTV
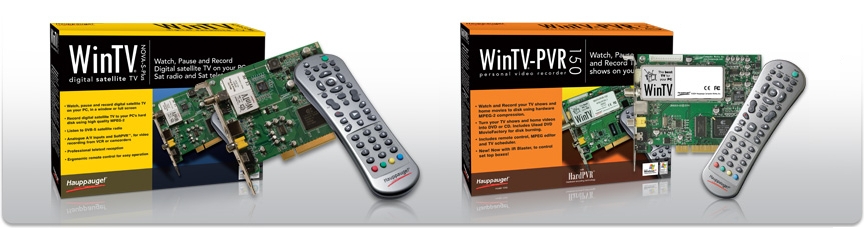
The card on the left is the satellite receiver called the Nova-S plus, on the right is the Mpeg encoder this is the PVR-150.
With these experiments have proven the importances of getting levels right. Once you have encoded the analog signals there are no easy way of changing them. This is why I have an audio level meter in line at all times, checking that I'm not overdriving the sound inputs of the encoder and on the video side I can switch in a video waveform monitor as required. If you have a digital receiver at a repeater site this will also need set these levels.
Video 1 volt P-P into 75 ohms
Y 1 volt P-P into 75 ohms
C 0.3 of a volt P-P into 75 ohms
Audio no more then (0.78 of a volt) or 0dB into 600 ohms
Y 1 volt P-P into 75 ohms
C 0.3 of a volt P-P into 75 ohms
Audio no more then (0.78 of a volt) or 0dB into 600 ohms
There has been many times I have come across streams on the BATC website where the sound is overdriving or at a very low level, the same rules apply.
HD PVR (1212)
I now have updated my DATV software and added in a form with sliders and push buttons to set these settings:
Video input, Component, S-video and Composite
Audio input, RCA back, RCA front and SPDIF
Bit rate modes, VBR and CBR
Sound formats, AAC and AC3
Other adjustments are,
Video bit rates, Video peak bit rates for VBR encoding, Brightness, Contrast, Hue Saturation and Sharpness.
Also you will need to enter the video device name and the super root user pass word to change any of these setting. This will need to be done every time you power up this HD PVR set top box.
Testing encoding formats, I test out these video resolutions:
576i at 50Hz, 720p at 50Hz 1080i at 50Hz no problems, it was only when I tested 1080p at 50Hz I found the HD PVR would not encode at this resolution. The other thing is the Component analog video timing need to right, if this is out it will fade in to a black screen. Another thing I found was the R-Y and B-Y levels need to be well balance other wise you may need to adjust the Hue to compensate if not.
Data rates for HD (1080i), I found the range of 8 to 12 Mb/s work well, anything under 8 you start to see problems when there was a lot of movements happening. As you have already workout, using QPSK modulation you will need to use up a wider bandwidth then what you would for SD (576i).
The video bandwidth test were done comparing the direct HDMI with the decoded HD video on my satellite receiver, using a 1080i testcard. I found there was small amount of high frequency video response roll off present. This is understandable taking into a count this is analog video I was working with. My receive set up has no analog video path between it and my HD TV set, (I am using a HDMI cable at this point).
Video testing was done at 576i direct from my hard drive for one test and the other was done with analog S-video or using Component. The software encoding was done using the x264 encoder through VLC. The video quality using the x264 encoder was very good but needed a lot of CPU power to run. The down side to using this encoder was poor rate control which cores me no end of problems with other multiplex channels and besides my QPSK modulator has a fixed data rate.
Comparing the HD PVR to the software encoder I notices a drop in video quality again I put this down to the S-video input been used, where the Component was a lot better. Like with the older Mpeg2 standard to get best performance you need to use digital in like HDMI or analog Component in, standard Composite will look poor at the display end. But unlike the x264 encoder the rate control was a lot better, making it easy to feed in to a multiplexer configuration.
On the sound encoding side, standard analog audio works fine. But if want to run 5.1 surround sound you need to use the optical SPDIF input and the AC3 encoding format to do this.
This stand alone HD encode has Component, SPDIF and analog audio out on the back panel that's activated when any of the video inputs are used. I use this Component out to monitor the my incoming Audio/Video as a direct comparison to what is was coming back from RF on my satellite receiver.
Software used:
Ubuntu Studio 10.04
VLC
dvblast
libdvbpsi
WinFF (FFMPEG GUI)
Ubuntu remote desktop
TMPGEnc Editor
TMPGE Plus 2.5
|
Operating system
Video streamer
Streaming application for DVB cards
DVB TS Multiplexer
File converter
For remote access
Mpeg file editor running under WINE
Mpeg rendering tool running under WINE
|
A good place to start would be to install Ubuntu Studio 10.04 or higher on a spare computer and give your self a month or so find your way around this OS. To install software is simple case of going into the Ubuntu software center and selecting the required software to be installed.
A basic understanding of local area networks;
This should be part of the Ham exam we all need to have an understanding of LAN Networks these days. To stream video around a network it must be over UTP not Wifi so a wired network is required. It's also important to have all devices set to a static IP address on your internal network. DHCP will course all kinds of problems if you don't limit it's IP range or disable this function.
This is not a simple process at all to get working there many points where things can go wrong and sometimes do. I had number of email asking me how this all works, you need to have some understanding on LAN networks IP address, Linux and how DVB transport streams works. It is low cost but it's not a case of installing a program and it all goes. This maybe where we are in a few years time as programmers improve the software that is used.
Bash shell script files:
Setting up shell script files will take a lot of your time to get right, there is a good amount of information at; http://wiki.videolan.org/ on how to do this. I'm in the process of putting together a PDF file showing how these shell script file are layout and configured.
Working on new graphical user interface for DATV
I have been working on a new graphical user interface (GUI) to make configuration easer for my Software based DATV project. I been working with visual basic for Linux in the form of Gambas. By using this program it will let you select from four input types, file, v4l, PVR and a digital receiver. There are two output types local playback and UDP in a form of DVB transport steam sent via Ethernet. I am working on two levels of Mpeg encoding. One is using a standard PVR-150 cards with it's on board hardware chip for low CPU loading. The other is in software encoding mode where by you get better quality encoding but at cost of using up more CPU load. I have also add in a function to interface with DVB receiver cards such as the WinTV Nova S and the HVR 3000.
This project I have been working on for last three weeks and should have most of this software working by next month. My plan is to make a low cost DATV set up using standard WinTV cards on a basic computer setup. I now have a basic program that will work and lets me stream digital video to a DVB S modulator. There are a few bugs and this software still is not a 100% stable as yet but it's a start. At this stage I have not added in any DV 1394 fire wire, but I can do so if there is a requirement for this function later date.
To make use of this GUI application you will need to have the following programs to be installed:
Ubuntu Linux OS, Ffmpeg, VLC, Gambas plugins, With DVB drivers and the PVR drivers installed.
The full program with a number of forms that you can switch between. One include automated play out function to switch in and out different inputs and to play out video files at set times. Another has video file editor that calculates the play out time for each media file and provides a total for all files added. I am also improving an inbuilt media player to show what files are currently cued up for automatic play out. The next step will be the multiplexer, to keep the code to minimum I decided to set the multiplexer up with four only inputs.
Picture below show shows the main setup screen

The Text-view box is what is created as a script, this then piped through to VLC to generate the required stream to send out.
As you can see it's not that hard to workout how it all works, I have tried to the layout easy to follow.
With the addition of a four input multiplexer, I have been testing this set up on 23 cm. this multiplexer you can set up Audio, video and program PIDs for each channel within the mux. On the input side you can use any three of these devices IP in, PVR encoding or DVB receive. This can set up on the same computer or another one on the network.
With a software project like this there is so many possible and functions that could added in over time. That's where the enjoyment comes from trying out different ideas over time. Like a lot of todays technology the power is in the soft where. This is where change will have the biggest impact on Ham radio as we move on into the future.
If anyone is interested in testing out this software, I can send you a copy to try out. I'm still improving things so it is still very much a work in progress.
Background:
This technology has been around for about 25 years now, the first time I remember coming across software base decoding and encoding was with my ZX Spectrum computer. This software could demodulate Morse code and display the text on the video screen. There also was ZX SSTV program that operated in and out of the audio ports.
The next big step came with 386/486 IBM type computers where by you could run DOS programs like; EZSSTV and Jvfax. These programs were able work with standard SSTV mode the were already been used. All that was needed demodulate and modulate these modes was Ham-com interface that was driven from the comport.
By the mid 1990s sound card programs came available such as PSK31 and soon after a number of newer programs were about for SSTV and other modes.
Introduction:
The same old problems that we all have run into is cost of Digital Video Broadcasting (DVB) equipment. This where I started thinking of alternative ways of putting together a DATV transmitter. I had installed a satellite turner card on one of my computers a few years ago and was able to stream out the multiplex onto my LAN network. This lets me view any free to air channels on any of my computers in the house. If can do it this why can't I do this in reverse, using a Mpeg2 encoder card and stream to a QPSK modulator. This project uses standard PC technology, unlike hardware based DVB equipment that uses high speed logic array chips to do much the same job.
Software description:
It is defined in software as far as the Mpeg2 encoders and the multiplexer. These stages are set by software using Ubuntu Studio 10.04 this is a form of Linux used as the Operating System (OS), using shell script files. The code used is based on C programing language and lets me plug into various software modules. To assemble data packets as a DVB transport stream made up of 188 bytes , that can be sent to/or from any device on the network. Such as Xbox Media center or any number of computers. This is where I took advantage of the User Datagram Protocol (UDP), this protocol is ideal for sending DVB packets. As the name suggests the user sets the packet framing and any handshaking that maybe required. All that the UDP does is set up the IP address to send to and the port-mapping. in this form the UDP will be able to run over network within the LAN IP structure. To recover this data I use an Internet Protocol (IP) to Asynchronous Serial Interface (ASI) converter. This converts to an ASI signal to feed into a L-band (950 to 2150 MHz) Quadrature Phase-Shift Keying (QPSK) modulator. By taking this approach I have kept the cost down to a minimum, where by most of the parts were source from Trademe a local form of Ebay. Such as, Mpeg2 encoder cards, the Satellite tuner cards and a computer to run the required software.
DATV user interface application
Background:
Last year in my software based digital television article I talked about how to use software and personal computers to generate a DVB transport stream. The feedback I got back from it was an impression of limited understanding of how this all works. This is a refection of Ham radio in general. We have fallen behind in computing and software based technologies.
Introduction:
In Auckland, New Zealand there has been a big move away from any form of Microsoft based operating systems. Most Hams are now using the Ubuntu desktop platform. This has opened up modes like ATV to new possibilities with a home computer whereby changes have come about due to the availability of open source software.
I have been working on a new software graphical user interface (GUI) to make configuration easier for my software based DATV project. I have been working with visual basic for Linux in the form of Gambas. This software program allows the selection of four input types: file(video files), v4l(web-cam), PVR (hardware encoders) and HVR (digital DVB) receivers. There are two output types for local playback and Ethernet (UDP) in a form of DVB transport steam. I am working with two types of Mpeg encoding. One uses a standard PVR-150 card with its on board hardware chip for low CPU loading. The other is in a software encoding mode where better quality encoding is achieved but at a cost of more CPU load. I have also added a function that interfaces with DVB receiver cards such as the WinTV Nova S and the HVR 3000.
I started this project because I wanted to find a simple way to make use of a PC and installed media cards to stream in/out on a local area network. It provides an interface that's easy to follow set up a digital TV IP stream. A layer one (hardware layer) Ethernet IP to ASI media converter box is still needed to interconnect with a standard DVB modulator.

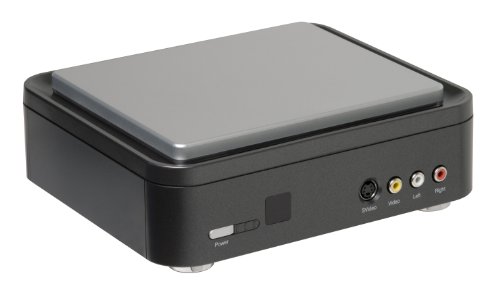
DATV software running on my laptop with an USB WinTV HVR-1900 Mpeg2 encode
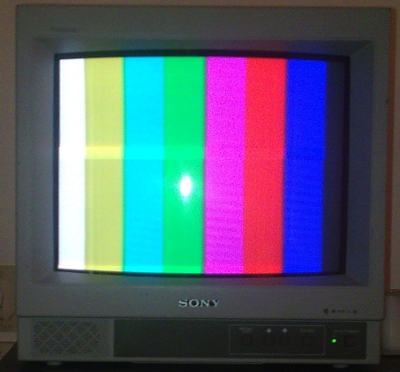
Video display of colour bars as received off air on 23cm. Using a standard free to air digital satellite receiver.
Software description:
The full program has a number of forms (layouts) which can be switched. Another is the multiplexer. To keep code to a minimum I set the multiplexer up with four inputs. My DATV software plugs into these applications in the background VLC, FFmpeg, Mplayer and through to libdvbpsi to generate the DVB transport stream.
The full program has a number of forms (layouts) which can be switched. Another is the multiplexer. To keep code to a minimum I set the multiplexer up with four inputs. My DATV software plugs into these applications in the background VLC, FFmpeg, Mplayer and through to libdvbpsi to generate the DVB transport stream.
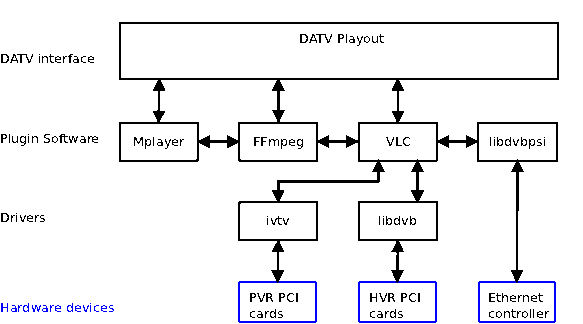
In the diagram above shows the software interconnection, that works the same way as in hardware electronics circuits where the top layer is the DATV play out software. Moving down, are where the applications like Mplayer and VLC are located. The bottom layer is where the hardware drivers are located interfacing the hardware cards to the software layer.
Here is an image of what will be seen when the DATV application is opened.
Supported hardware:
Drivers: ivtv-utils and libdvb-dev.
Hauppauge products:
WinTV PVR150, PVR250, PVR350, PVR500
These PCI cards have hardware Mpeg2 encoders but the PVR350 has both an encoder and decoder on board. The PVR500 has dual hardware Mpeg2 encoders good for setting up a two channel multiplex. The PVR350 is the most useful one in this family.
WinTV HVR1900/1950: This unit is a USB connected hardware Mpeg2 encoder. It works well with laptop computers.
Receiver cards WinTV HVR3000/4000: The 3000 has a dual mode receiver DVB-T/S and the 4000 has DVB-T/S/S2. Another good card is the Nova-S plus. This card is just a simple QPSK receiver (DVB-S).
There are a number of other cards that may also work as well but I have not been able to test them.
How to use this Software
Input devices: Start on the left hand side where the input device is selected. There are four options: playback from video files, video for Linux (web-cam), PVR device and RX HVR device both from the list above.
Video: Mpeg1 and 2 with PVR cards plus h.264 with software encode with file and v4l inputs.
Sound: Mp2 with PVR input, all four with software encoding (Mp1,Mp2,AAC and AC3).
Bit-rates: Sound is fixed at 224kb/s with PVR cards, variable 32-320kb/s with software encoding.
Scale: Picture size based on D1 (720 x 576 for PAL and 720 x 480 for NTSC) standard-definition for the scale of one.
Threads: This sets the number of cores within the CPU. Example: Intel i7 is set for 8. An older computer like a P4 is set to one.
Mpeg video: The key interval is the number of frames between any two I frames. B frames stand for bi-directional frames. A good setting is about two, more B frames for higher compression, but poorer quality for a large amount of movement. For high movement video content I recommend short key intervals and B frames set to 0 or 1.
Bit rate tolerance is the amount of change between the average bit rate and peak bit rate. The Rate Control button keeps the video data change at a fixed rate.
ME and SubME are used with software encoding for h.264. SubME sets the quality level where 1 is poor and 9 is high. It also affects CPU load depending on level set.
Mpeg sound: AGC Automatic gain control set level based on input levels. When this is switched off it can be set with the slider controller.
Sample rate is set up to 48k or to a lower rate of 44.1k. The Mono/Stereo button sets the sound stream for two or one channel modes.
DVB RX: Enter the frequency in MHz for all modes (PVR and HVR cards). For DVB-S enter the IF frequency. 14/18 volts sets the LNB volts for switching.
Transcoder: This function converts a received H.264 digital input stream to a standard Mpeg2 output or sets the output to a constant bit rate (CBR).
UHF bandwidth sets the UHF channel setting from 6 to 8 MHz. The Symbol rate is used in DVB-S mode only. FEC and Program works for all digital formats.
V4l & devices: At startup this software auto detects installed hardware devices. All PCR input cards or USB devices are shown as /dev/video followed by a number. DVB Adapters will be displayed as a single number.
File streaming: This sets the path to a folder where the video files are played from. The left and right arrows skip to and from playing files. Loop and Random affects the way these files are played.
Streaming IP and port: This sets the IP address and port where the computer local area network or media converter is located.
Text view area: Save configuration information to a shell script file this can run VLC as a stand alone program.
Local playback and steaming: The local playback button displays the stream to send out. The stream button will stream out to a selected IP address. Both functions automatically do an update to text display area.
Exit and save: This saves the information within the text area as a shell script file that can be set to run VLC without using the DATV interface software.
Viewer layout:
This part of the software views an IP transport stream and receives the incoming video. This is done by setting up an input port and pushing the play button. This highlights the pause and stop buttons.

This is an image of what you will see when you open the viewer
The video out function works with a PVR350 Mpeg2 encoder/decoder card only with Mpeg2 streams! It operates more like a sound card and is a very useful tool to have in your computer because it makes testing so much easier. For example, it can do a video loop back test and feed any standard-definition transport stream back to the displayed analog video. It can also play back most video files as well by entering the path. I'm currently thinking about adding other functions to display things like statistical information at a future date.
Setting up the Multiplexer:
This application adds streams and remaps PIDs within the transport stream.
Setting up the Multiplexer:
This application adds streams and remaps PIDs within the transport stream.
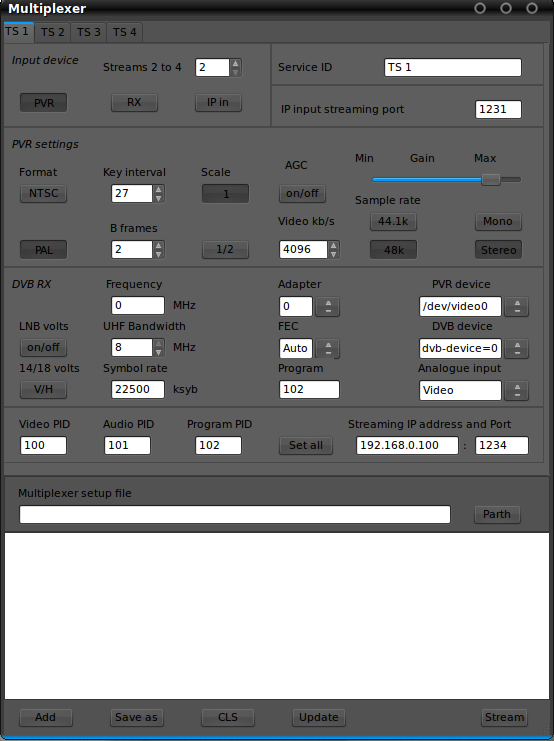
The layout is very similar to the main display but up to four input streams can be set. These can be PVR, HVR and input IP stream. There is no software encoding function with the multiplexer. This is done on another network computer and fed in as an IP stream.
Streams 2 to 4: Sets the number of streams to be multiplexed.
Input device: Sets one of three possible inputs.
IP input streaming port: Same as the viewer. It sets which stream is multiplexed.
PVR and DVB RX settings: Same as the main layout. Set up PIDs for each stream. There are three that can be set if required for each stream multiplexed. These are program, video and audio.
The other important setting is the IP address and port where this multiplex is been sent. To use the stream function from the multiplexer, first set the file path for the vlm file that contains the required multiplex information. The text window data can be also be saved as a vlm file that can be read back.
Automated play out:
This function can switch different inputs. For example: file, v4l, PVR or a DVB receiver. This is done at different preset times that are read from the desktop clock. There are eight items per 24 hour day with designated time slots. When an item is in the process of been played out it has a green indicator with a progress bar showing the percentage of time left.
Reset: Sets all progress bars to 0%
Live: Live test mode
Stop: All play outs stop
(A function may be removed because of ongoing problems with bugs in the video file editor that calculates the play out time for each media file and provides a total for all files that have been added. This is supposed to work with the timer to fit media files in fixed time slots for play out.)
Internet streaming:
It's possible to incorporate an internet streaming system to connect to a streaming sever. However, there's no support for Adobe streaming servers under Linux at this time. If an open source internet streaming format is used, a transcode function could be added into the DATV software to provide ATV repeater linking. This could work to tanscode from h.264 back to Mpeg2 and then multiplex it into a local digital ATV repeater setup.
How to stream via the Internet:
This is done by using the advanced IP settings. First, work out the outside IP address and the IP address to be sent to. There are websites to display your Internet IP address. (www.speedtest.net or www.att.com/speedtest. Next, open UDP port 1234 through your firewall, to and from a local computer within your local area network. When this is done at both ends, you can send a DVB TS unicast via the Internet. Then it becomes a simple case of re-multiplexing your mux for transmission into a local DATV repeater.
With this approach I can change my operating set up by a simple click of the mouse. It's all done at the transport steam level with no analogue switching. So, eventually I can set up files with a stream setting for any DATV repeater in the world as long as there is an Internet port and IP address to connect to.
Hardware configurations:

Converting from IP to ASI is done through a layer one IP to ASI media converter. This unit has an Ethernet input on one side with a BNC ASI output on the other.
If you are using SR-Systems boards, this can be done with the ASI converter board fed into their multiplexer or modulator. This board connects via the 34 pin ribbon cable onto their circuit boards.
Working with digital television cable modulators is a simple case of plugging into the ASI socket. Then set the size of the pipe (data throughput) with QPSK (DVB-S) FEC and symbol rate.
Summary:
A software project like this has many possibilities and functions to be added over time. Like a lot of today's technology, the power is in the software. This will have the biggest impact to Ham radio as we move on into the future.
I will send a copy to try if anyone is interested in testing this software. I'm still improving things so it is still a work in progress.