Follow the D-A Converter, Filter and EFC Schematic as you read this description.
The VNGBOX micro needs to produce a very accurate, high resolution and very noise-free DC control voltage
to steer the reference oscillator phase accurately. Any noise on this signal will result in noise on the reference; any
non-linearity, especially any unexpected steps in the digital to analog conversion, will result in stability problems.
The circuit is able to generate a very accurate and linear 12-bit DC voltage from 0V to 5V (4096 steps of about 1mV).
The micro operates two parallel 6-bit PWM converters, which operate synchronously. Each converter uses six bits of the 12-bit
control word. The most significant bits are output on signal EFC6, and the least significant on EFC0. Since the most
significant bits have 64 times the significance of the least significant bits, the two signals need to be combined
with this gain ratio. A PWM D-A converter usually operates with a low-pass filter, and this design is no different,
except the two converters sum together and share a single filter capacitor. Input EFC6 has a 5k resistance (two 10k
resistors R14 and R15 in parallel), while input EFC0 has 320k (two 640k resistors, R16 and R17). The weighting of the sum at C7
gives a very linear control voltage with very little ripple.
The advantage of using two six-bit converters instead of one 12-bit converter, is that the PWM ripple frequency
(clock frequency divided by two to the power of the number of bits) is much higher, making the ripple much easier to
remove in the low pass filter. The PWM operates at 2kHz, so the ripple frequency is 31.25Hz instead of 0.44Hz.
Most oscillators (V-OCXO or V-TCXO) have a voltage control range of 0 - 5V or 0 - 12V. These can be controlled directly
by connecting the VCO control input directly to R18/C7, which forms a further 0.1Hz low pass filter. Just omit R20 and R19.
The low pass filter is intended to remove power supply noise and PWM ripple. The very long time-constant filters necessary for
GPS locking operate in software, which considerably simplifies the filter requirements. It turns out that the positive
part of the range of the HP 10811A is quite linear, and works well over this range with direct connection, provided the mechanical
adjustment can be offset slightly.
If the control range
of 0 - 5V is not sufficient, or if the VCO input loads the circuit, you may need to add a buffer amplifier here. Use the
quiet and stable oscillator supply for any amplifier you add here, as the noise from the micro supply will not be well
rejected. If the control range is excessive (you need only about �5Hz at most), connect a resistor to ground on the junction
of C7 and R14/R15/R16/R17.
Some oscillators (including the HP 10811A) use a bipolar control voltage, with a range of -5V to +5V. This unit will not provide
the full range without an amplifier. You can use just the positive half of the range by offsetting the mechanical
adjustment slightly, but it may be more convenient to use the arrangement shown, with 10-turn pot R20 and R19. If you plan to take
the output negative, move the bottom of C7 to the -5V supply, which must be very noise-free. With the arrangement shown, the
HP 10811A has more than enough control range, but lacks gain. Best results are achieved with the VNGBOX using
positive-only control, as mentioned above.
Adjustment without Trim Pot
With the unit set in mode 4 (command C00), adjust the oscillator internal mechanical adjustment for exactly 10MHz,
or as close as you can get (REFMON4 sub-graph phase plot has minimum slope).
Adjustment without Trim Pot
Set the unit set in mode 4 (command C00), adjust the 10-turn pot to mid-range (-2.5V), which should put the junction of R18/C7
at close to 0V. Adjust the oscillator internal mechanical adjustment for close to 10MHz, then trim out the rest of the slope
with R20.
The schematic shows the HP 10811A oscillator. Other oscillators will have different connections, and different oscillator and oven power
supply requirements. If you have a good OCXO which has no means of electrical control, contact the author for advice - some
can be adapted very easily - the NDK NSA family of OCXOs and old 5MHz Transit satellite oscillators can be readily and simply adapted
(if you have the courage) - and they have impressive performance. Being old and well aged-in, they often have very low ageing rates and
quite low noise. Unfortunately most are 5MHz or lower.
Oscillator Hints
- Even though they are enclosed in an oven, and use accurately set operating temperatures, OCXOs can still exhibit some sensitivity to
ambient temperature variations, and especially to draughts. This is because the oven thermal control circuits operate quite slowly,
and will not always fully correct fast changes. In addition, unless the crystal in your oven is the most expensive double-cut
SC type, and is correctly trimmed to temperature, there can be some rate-of-change frequency effects with temperature change (dT�/dt).
Therefore, it's a very good idea to lag the oscillator, or even just mount the oven in a cardboard box - just sufficient to prevent
breezes from affecting the performance.
- TCXOs are even worse in this respect, because the dT�/dt effects on the crystal are not compensated, and the devices
have low thermal mass. It is essential to keep the
rate of change of temperature as low as possible, so mount the TCXO is a polystyrene box.
- If you are really ambitious, you can try tweaking the OCXO oven temperature very slightly in order to find the exact turn-over
point of the crystal. Some enthusuiasts have been able to turn mediocre oscillators into very good performers in this way.
A good way to test whether you have the right spot is with a heat lamp - 10 seconds exposure and look for a blip in the EFC
voltage over the next minute or so. Below the correct temperature, the blip may be one direction, and above it the other,
but make the temperature changes VERY small.
- Watch for daily variations in EFC feedback which might suggest that the oven is insufficiently protected from ambient temperature changes.
Double-oven types are best in this respect, but a good box lined with polyester fluff (as used in speaker boxes or padded jackets)
can make a big difference. Good lagging also reduces the oven power supply requirements.
- The performance of the oscillator will depend on the accuracy and stability of the power supplies - especially the oscillator
supply. Use an LM723 regulator to be sure of a low noise supply. Some ovens do not have good supply voltage rejection and will
give much better performance with a regulated oven supply.
- Do not use the oven supply as the oscillator supply! If at all possible,
keep the supplies completely separate, otherwise you will find the high oven currents modulating your oscillator supply.
If possible, isolate the oven supply from ground (there's no ground connection in the HP 10811A, for example).
Even small ripple currents from power supplies can cause hum, so take care with the oscillator and EFC ground connections,
and place the final EFC filter capacitor right at the oscillator EFC terminals. Use a capacitor with low ESR.
- If you add an amplifier, level shifter or buffer between the PWM D-A and the VCO/EFC input to the oscillator, you must use very
clean power supplies, preferably the oscillator supply, for the amplifiers. If you need a wider voltage range, it might make
more sense to use two digital level converters (e.g. a MAX220 RS232 driver) before the PWM D-A - in other words buffering the
EFC0 and EFC6 signals. The sense of the signals will be reversed, but you'll have �5V control range. Remember to return the
electrolytic capacitors to the -5V supply!
- Buffer the 10MHz connection between oscillator and micro. There are loading changes at the micro clock port which can cause 1Hz modulation
which is difficult to remove. The micro can also be unreliable if the CMOS levels and risetime requirements are not met. It is
possible to achieve phase noise well below -50dBc at 1Hz with this design.
- If you use the 10MHz output for other purposes, make sure you add a separate buffer for the output, and another for the micro.
Otherwise you'll have unacceptable phase shifts in the oscillator output and lose stability in the control loop. When adding a load, watch the results
on the PC REFMON4 software to monitor these effects. High speed digital opto-couplers are a good idea.
- Above all, be patient! It can take weeks to get the best performance out of an oscillator. Experiment, measure and save the results,
and experiment again. Try different combinations of hardware voltage gain and Integration term. With care you should be able to keep
a good V-OCXO within 500ns of the same phase for weeks on end, and within 1ns over 10 seconds, although you won't see that on
the PC software! Watch the EFC feedback trend to see if you are nearing the edge of the
control range, or need to increase or decrease the hardware gain. Long term changes here represent ageing in the crystal.
The Navman Jupiter-T and Motorola Oncore GPS modules have a simple 10-pin 2.54mm pitch connector. Use a short ribbon cable and
another header to connect to the VNGBOX. See the schematic below, but remember - these connections apply ONLY to the
two GPS modules mentioned.

If you plan to use the GPS Display, you won't absolutely need the battery B1, since the start-up commands are sent by the display
processor. However, if you don't use the GPS Display, or you have a different GPS module, you'd be wise to include
the battery, in order to be able to set it up correctly. You'd hate to have to set it up with a PC every time the power failed.
D2 and R13 help prevent the battery from discharging. You could use two NiMh cells in place of the Lithuim cell specified.
The other advantage of using the battery is that the GPS is able to maintain the time, ephemeris and almanac when power has failed,
and so returns to a good fix very quickly. Without the battery it could take 10 minutes or more.
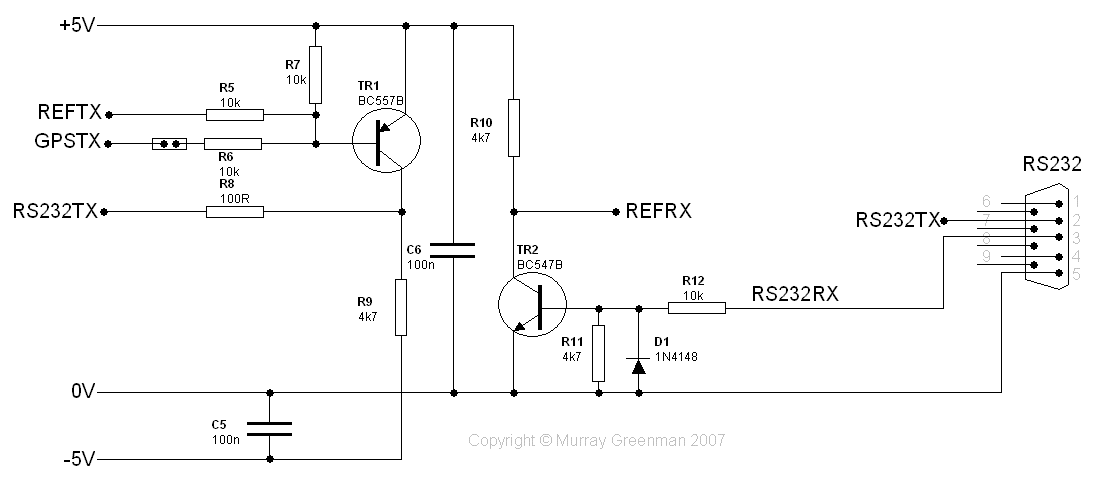
In order to set up the GPS unit with a PC, you'll need to connect a further set of RS232 circuits to the GPSRX and GPSTX
connections in order to communicate with it. Copy the design in the
RS232 Schematic, replacing REFTX with GPSTX and REFRX with GPSRX. Use a separate DB9F RS232 connector.
Use the appropriate software for your GPS unit. Motorola's WINONCORE works well
with the Navman Jupiter-T and Motorola Oncore GPS modules - once you know how! Set the GPS to transmit the @@Ea sentence every second.
Most other units operate in NMEA mode, and VISUAL GPS software works well. You can monitor the GPS behaviour at this extra RS232
port without disturbing the VNGBOX performance, and if you can't get
the timing correct in order to multiplex the signals, this extra RS232 connection is the only practical way to monitor the GPS unit.
Copyright � Murray Greenman 1997-2009.
All rights reserved. Contact the author before using any of this material.