Rotator Controller
Rotator Controller - Construction
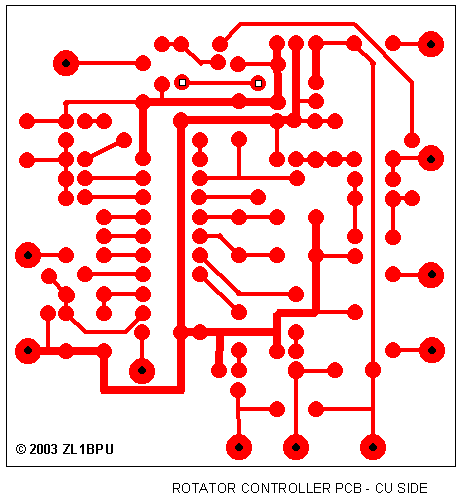
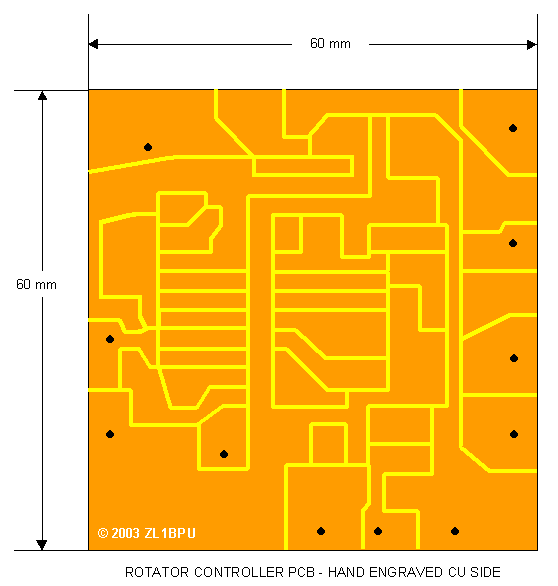
The controller is built on a small single-sided copper laminate board, and can be etched or
routed/milled/engraved.
The basic board is 60mm x 60mm. NO CIRCUIT BOARDS ARE AVAILABLE FROM THE DESIGNER.
No CAD files for manufacture are available, but the design is otherwise well documented. The table
below lists the schematic, top and bottom PCB views, component placement guide and a suggested routing
or milling guide for a hand made PCB. The board does not include the relays. They can be hand wired and
mounted on the bottom of the controller box with double-sided tape, or as the author did, assembled on
an extension to the basic board (at the bottom of the drawings in each case). The relays were omitted since
just about every possible relay has a different footprint!
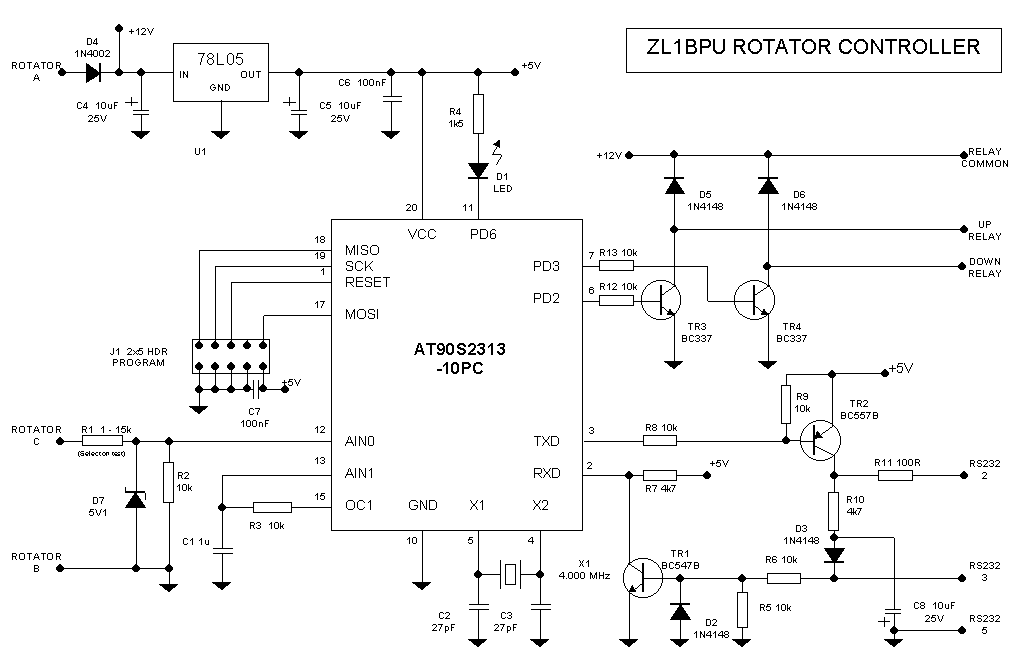
Parts List
CCT REF        PART                DESCRIPTION
C1             1u0 25V             Mylar film capacitor
C2 C3          27p 50V             Ceramic plate capacitor, NPO
C4 C5 C8       10u 25V             Al electrolytic, radial lead
C6 C7          100n 50V            Ceramic monolythic
-              10n 50V             Ceramic (fit across R2 in case of RF instability)
D1             LED RED             High brightness 3mm LED (optional)
D2 D3 D5 D6    1N4148              Diode, silicon signal
D4             1N4002              Diode 1A 200V power
D7             BZX85C5V1           Zener diode 5.1V 400mW
J1             2x5 HDR             Two row 2.54mm pitch header, 2 x 5 pins
J2             DB9F                RS232 connector, female, with cover (not shown on schematic)
K1 K2          12V CO              12V 1W 1PCO relay 10A 120V AC contacts (not shown on schematic)
R1             1k0 - 4k7 5% 0.25W  Select on test to give about reading of 0xB4 when rotator fully clockwise
                                   The best answer is to use a 1k resistor and a 10k trim pot (not on the PCB)
R2 R3 R5 R6    10k 5% 0.25W
R4             1k5 5% 0.25W
R7 R10         4k7 5% 0.25W
R8 R9 R12 R13  10k 5% 0.25W
R11            100R 5% 0.25W
S1             DIL20 0.3 in        Socket, DIL IC
TR1            BC547B              Bipolar NPN transistor
TR2            BC557B              Bipolar PNP transistor
TR3 TR4        BC337B              Bipolar NPN transistor, 100mA
U1             78L05               Regulator, 5V 100mA
U2             AT90S2313-10PC      Micro controller, ATMEL 10 MHz DIL
X1             4.0 MHz HC-23U      Microprocessor crystal
Mechanical parts are not shown. Other miscellaneous wires, insulated links and mounting hardware
will be required to suit the installation. A 1m 3-core screened cable is suggested for the RS232
connection. The microcontroller U2 should be socketed. Four insulated mounting pillars with 3mm nylon
nuts and bolts are used to hold the board into the enclosure.
Assembly
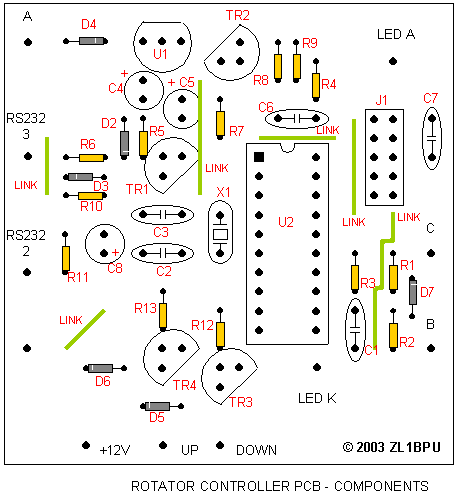
Make the PCB. (If milling or routing the board, drill the holes first to aid location). Use a scale
print of the PCBtop.gif as the drilling guide, taping it to the top of the
board in order to drill through it. Be as precise as possible with the IC drill holes, as this will
make the socket easier to fit, and make the engraving much easier.
Drill mounting holes in appropriate places to suit - the best place
is likely to be upside down between the top front-to-back metal rails inside the controller case.
Place all the passive components, and the IC socket. Using good anti-static techniques, place the
active components and insert U2 in its socket. Using a temporary 12V supply, fire up the unit without the
micro installed, and check that the chip voltages are correct - +5V on pin 20, 0V on pin 10,
and no other pin with anything less than zero or greater than +5V. Then remove power, insert the
micro, connect the programming cable, reapply power and program the controller.
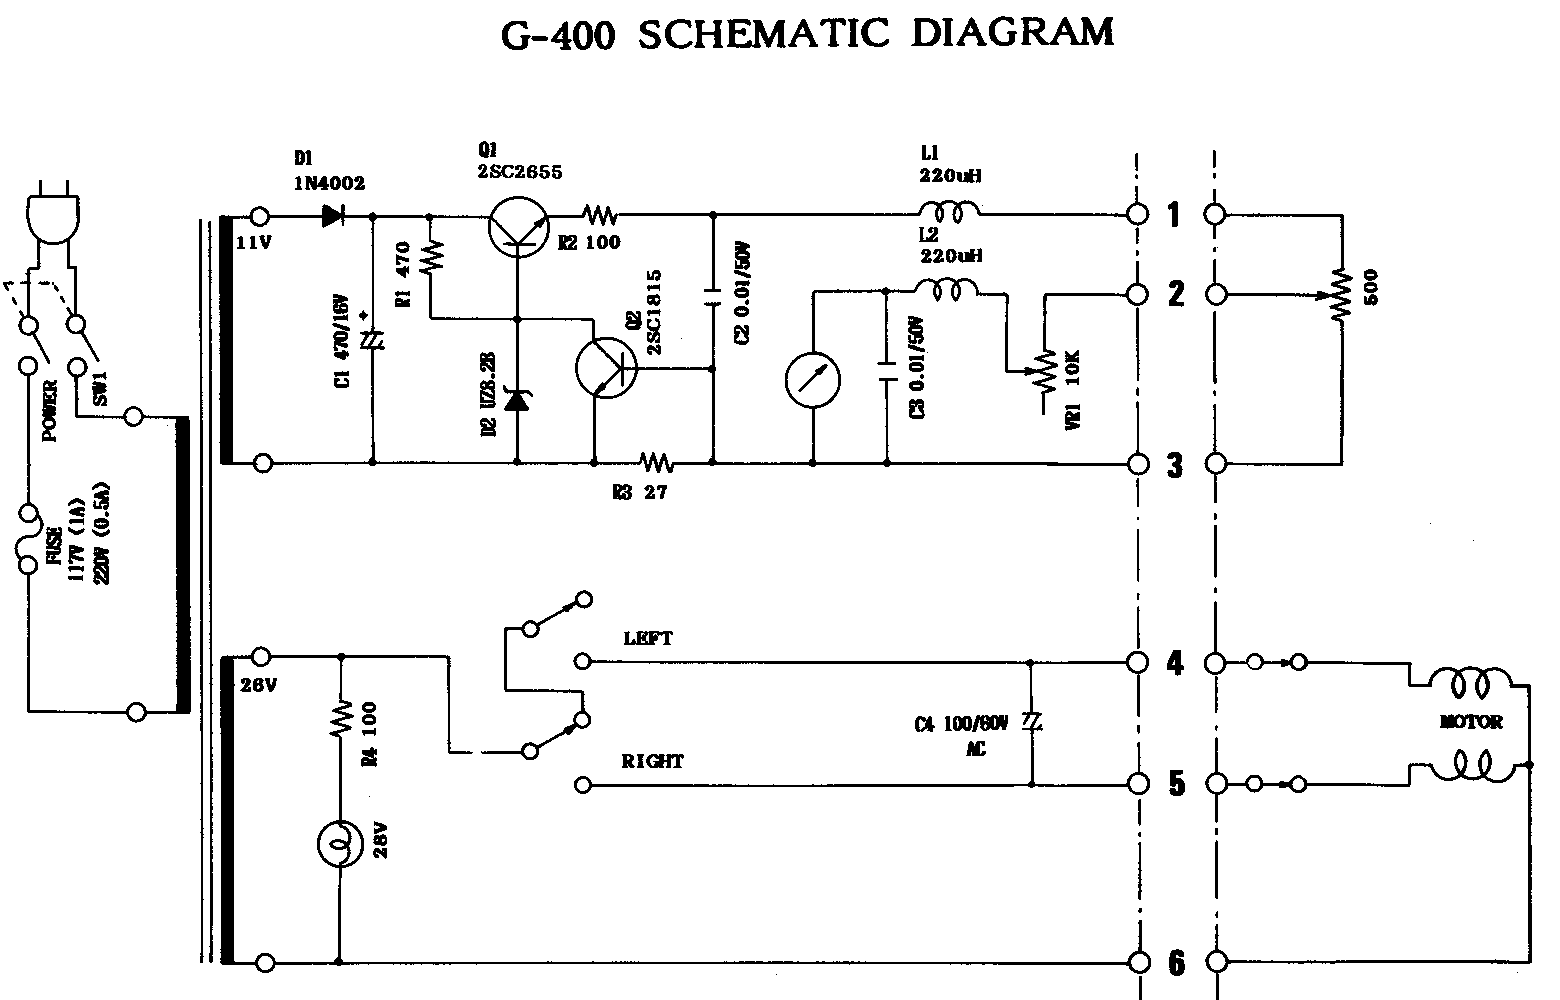
Wire up the board to the rotator box as described, and shown in the following diagrams. Points
marked "A", "B" and "C" are shown in
RED on the Annotated Schematic. These provide
power, ground, and rotator position respectively.
The relays are wired to provide interlocking, to prevent
motor and power transformer damage in case of a switch or relay fault. Pay close attention to the
wiring diagram below. You will need to lift point D from the front panel switches.
The wire becomes D, while the switch contact becomes D'.
This technique allows for manual operation (accidental or during test) and
controller operation at the same time without fear of damage due to short circuits.
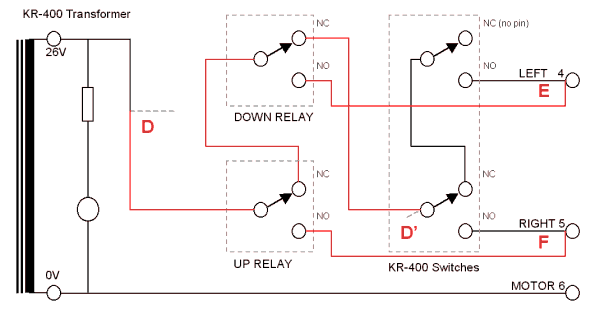
Relay and direction switch wiring
Note that the relays are wired before the original KR-400 switches. This is because the crucial final
NC (Normally Closed) interlock contact is usually missing from the KR-400 "LEFT" switch. If your controller
has this contact, you could wire the relays from this point, and the connection D - D'
will not need to be cut.
Don't be tempted by the possibilities of other wiring configurations. It is possible to wire the relays
to provide braking (shorts the motor ends together when power is removed), however not only is there then no
interlocking, but the relays have a bad habit of welding closed!
The relay coils are wired one from the "UP" connection on the PCB to the adjacent "+12V" connection,
and the other from the "DOWN" connection on the PCB to the adjacent "+12V" connection. For now it does
not matter which relay is which, although the one connected to "UP" should be the relay with contacts
connected to point F.
If you think you will need to use the controller manually, you must provide a way to disable the micro
controller. The easiest way to do this is to fit a switch between the "+12V" point and the two relays.
Mount the switch on the back panel, perhaps by relocating the trim pot bracket to another back panel screw,
and using the trim pot's hole. Wired this way, and with the switch off, the controller will continue to
report antenna heading even though it cannot correct
any "errors" introduced via the switches, or carry out commands from the PC.
Checkout and Setup
It is important that the rotator be set up to operate correctly before the controller is added. Check that
the meter goes LEFT when the LEFT switch is pressed, and check the calibration of the meter so that the
meter indication and physical azimuth of the antenna coincide.
Apply power (switch on the AC power switch to the rotator unit). Check that everything is OK, nothing gets hot, and that there is +5V DC on the output of U1. Connect a PC serial port up to the RS232 connector,
and check that numbers are coming out by running a terminal program such as Windows Terminal (or
failing anything better, Hyperterm) set to 9600-N-8-1. The controller should be stable with no relays clicking.
The current heading "$ nn" will be displayed three times soon after power up.
The next thing to do is check that the relays are wired the correct way round. This test relies on having
the switches and relays correctly interlocked, so if the panel light goes really dim during this test,
switch off the power quickly and investigate. After the power has been on for at least 10 seconds,
(and the serial comms message "$ nn" has been sent) press one of the front panel switches
in order to manually change the heading. After it has moved a few degrees, a relay will pull in and
should return the rotator heading to where it started (the switch you hold down will be ignored).
If instead the heading continues to change in the same direction until the meter hits the end of its travel,
you have the relays reversed. Simply swap over the leads to the points "UP" and "DOWN" on the PCB.
Hardware Setup
Check the range of the A-D converter. Disable the relays (switch off or disconnect the "+12V"
connection to both relays). Press the LEFT front panel switch so the antenna turns
anticlockwise. Stop at the left extreme (pointing exactly South on a North-centred
rotator). Jot down the heading reported by the micro on the computer screen. This is the OFFSET value.
It should be between
"00" and "10". The default value in the firmware is "08", so if your value is widely different,
consider recompiling the code with a different value. The value is set at the bottom of the
rotconx.inc file. Before you go to the trouble, complete the calibration procedure in order to be sure
what the correct OFFSET value should be.
Repeat using the RIGHT switch to take the meter exactly to the right extreme
(South again). The procedure from here depends on the commands you intend to use. The ORION/YAESU
setup is recommended as it is the most versatile:
- To use only the ZL1BPU commands, just ensure that the clockwise value is between "80" and "F0".
Jot down the reading. A suitable value for R1 will probably be about 4k7.
- To use the SARTEK command, the full scale reading MUST be 0x80 + the anticlockwise value.
(The default is 0x08, so set the clockwise value to 0x88).
Use a 1k resistor for R1. Fit a 10k pot between point C and the rotator pot, and this pot to give the correct value.
- To use the ORION or YAESU commands, the full scale reading MUST be 0xB4 + the anticlockwise value.
(The default is 0x08, so set the clockwise value to 0xBC).
Temporarily fit a 10k pot on wires in place of R1, and adjust to suit. Once the reading is correct, measure
the pot and later replace it with a fixed resistor (or two) as close as possible to this value.
Recheck the anticlockwise value again (it may have changed slightly) and them retrim the pot for the
correct clockwise value. Enable (or switch on) the controller again, and from the PC, issue a few "GO" commands
to check that the rotator
turns to the requested heading, and stops reliably when it reaches the heading. Try several values between the
two limits jotted down. The rotator position should approach the heading command given, and slow down to stop
close to the correct value. It may overshoot slightly, and the other relay will pull in to correct it.
(It is not easy to test some of the commercial commands by hand, but the YAESU "Mxxx<CR>" is easy to check).
The heading should be repeatable within 5�. For example, send "G99", wait for the rotator to stop,
then "G80", and note the heading on the meter when it stops. Then send "G66", and when it stops send "G80"
again, and see if the heading is different approaching from the LEFT and the RIGHT. You will note that
the value reported on the PC screen is not exactly the same as the command, for example when it
stops after the command "G80", it may report anywhere between "7E" and "82".
Using the YAESU command, check that "M000<CR>" sends the rotator exactly fully anticlockwise,
and "M359<CR>" sends it exactly clockwise. "M180<CR>" should cause it to move to the centre.
Software Setup
If you plan to use application software that will operate a rotator using the ORION, SARTEK or YAESU
command format, you will need to configure the software. Run the software and select the COM port
you plan to use. Set the COM port to 9600 bps, no parity, eight data bits, one stop bit (9600-N-8-1).
Connect the Rotator Controller to the com port.
Select the relevant protocol (ORION, SARTEK or YAESU) in the application software,
and then set the heading offset. For a South-centred
rotator this will be "0"; for the more common North-centred rotator, set the offset to "180".
Check that the rotator responds correctly by trying a few headings.
The Rotator Controller will only respond to the commands listed in the specifications table
- it is not intended for use with Azimuth/Elevation type controllers used for satellite work.
Hints
The final check should be done with the PCB connected in place and all the wiring tidy. Fit the cover to the
control box, and operate full power on all available bands. If the rotator control is stable with no
clicking relays, then all is well. If there is any tendency to misbehave, it will likely be caused by RF
on the pot feedback signal. A 10 nF capacitor across R2 should fix this. If the problem happens on VHF,
try fitting ferrite beads to leads "A", "B" and "C". A bead on "C" may suffice.
Don't be tempted to omit D7. This diode clamps transients coming down the cable that can easily damage
the micro. The Zener diode does a much better job that signal diodes to the supply rails, since it has
much greater energy absorbtion, and will not result in pumping of the supply.
If an accident occurs which shorts the motor or switches and relays, a possible outcome is welding of
the contacts. The effect will be that the rotator continues to turn one way or the other without being
told to, or won't turn when expected. Relays can generally be "unstuck" by giving them a sharp tap on the
top, but there is no solution for the switches other than dismantling them to free the parts. Better to
ensure that the wiring is correct first time!
If you like, you could fit a GREEN LED and a RED LED across the RIGHT and LEFT relay coils (using
1k series resistors), and embed the LEDs in the front panel, or in the top of the meter. It looks
really cool to see the LEDs go on and off as the rotator is controlled. You might also mount the
LED D1 on the panel - it glows steadily while the rotator is in motion either way, and flashes slowly if there is
an error. If you use all three LEDs, use a yellow LED in this position.
DO NOT LEAVE THE ROTATOR CONTROLLER UNATTENDED. It is probably not a good idea to leave the shack with
the rotator controller powered up, just in case the micro locks up, or a relay jams. While all care
has been taken by the designer to make the system safe and foolproof, in order to protect the expensive
rotator and power transformer, you will rest more easily if you at least switch the front-panel power
switch OFF when you leave. It is not a good idea to leave your equipment all fired up unattended anyway. The responsibility is yours - not that of the designer.
|
ELECTRICAL SAFETY!
Be aware that messing about with the controller
cover off places you at risk of a nasty shock, death or serious injury. The AC POWER switch connections are
easy to touch, as are the AC power terminals on the power transformer. Never put a finger inside the box
without removing the power plug first - switching off the POWER switch is not sufficient to render the unit
safe. An RCD or isolating transformer may not even save you.
|

BACK