SERIAL COMMUNICATIONS PROTOCOL
Each command consists of one command letter (upper or lower case) and zero to six following hexadecimal
characters. No "Enter" or other control characters follow. The correct number of characters must be used.
Unexpected characters, misunderstood commands and some impossible
values will result in the Microcontroller responding "?", and the synthesizer will continue with the
current settings. If a command is not completed, the synthesizer will remain stopped. Sending any wrong
character (such as <ENTER>) will restore operation.
It is quite possible to send impractical frequencies (even negative frequencies) and
impractical sweep step sizes. Negative frequencies (the hexadecimal values
are signed, so those from Fffffff downwards are negative) result in reversed table
stepping - no difference will be noted except that ADD offsets will be down in frequency,
sweeping will be reversed, and FSK and MFSK shifts will be negative.
The Nyquist Frequency occurs with a setting of F800000 and would generate meaningless
signals if approached.
When the device is first powered up, it issues a message identifying itself, including
the firmware version number. If using a dumb terminal,
start the terminal before the Exciter. If using the PC software, start the
Exciter first.
The A ADD, F FREQUENCY, T TX and A RX commands are used for "normal" CW mode serial port control.
With a combination of these commands, just about anything can be transmitted. The maximum sending
speed is limited by the serial communications. For example, ASK using the T and X commands can be
used up to about 100 baud; FSK using the A command up to about 30 baud. Frequency change using
the F command takes about 5ms, limiting the speed rather more. Timing of course takes place in the
controlling PC. Remember that this speed restriction is a serial communications limitation - the
actual synthesizer can change frequency virtually instantly. For example, in sweep mode the steps
take about 2us to effect.
The W WIDTH command is used for sweep generator operation. This sets sweep width (actually the number
of frequency steps). There are from 2 to 255 sweep steps. The step frequency increment is set by the K command,
with a resolution of about 0.08 Hz (1 to 65535 times the synthesizer step size).
The frequency of the first step is given by the F command, and the dwell time (time on each step)
by the A command.
An LED and digital output are set when the sweep is at the start frequency. This output is useful
for triggering an oscilloscope. Setting W00 turns off sweep mode. The T and X commands also
operate in this mode.
The beacon mode has three additional commands, BEACON, KEY and MODE. All the other commands also
operate while the beacon is running. There are several other useful commands, which apply in
all modes. These are HELP, PORT, REPORT and STORE.
To help you work out the numbers for manual control, use the really cool SPREADSHEET provided.
SCRIPT CONTROL
A much simpler command interpreter operates from a 'script" saved in the microcontroller EEPROM
memory. The script can contain data to be transmitted, mode commands, shift and speed
commands, plus frequency settings and port controls. Commands always have a first character "F", and everything else is considered to be
data. Thus you can't transmit data values "F0" to "FF".
There are six script commands:
- MODE Fn
- Set the mode to n, where n is 1 to 6. In version D5A or earlier, you can't set
Mode 0 (F0), as the command is ignored. In version D5b the Mode 0 command is
used to halt beacon mode and script processing. Normal operation is restored by
resetting the micro. This allows the Exciter beacon to be synchronised to an
external timer.
- PORT FBpp
- Set the three output ports PD2, PD3, PD4 according to least significant
three bits of pp. Other bits ignored. See the serial P command for details.
- FREQ FChhmmll
- Set the frequency to hhmmll (hexadecimal), where the number represents the required
frequency multipied by the DDS resolution. Exactly the same as the serial F command.
- SHIFT FDnn
- Set the carrier offset for FSK/MFSK to nn. See the serial comms A command for details.
Fox example a shift of 1 Hz is achieved using FD 0C. Has no effect on ASK (Mode 1).
- SPEED FEnnnn
- Keying speed 0000 to FFFF, as defined in the serial comms K command.
The baud rate is 32/nnnn, or dots of nnnn/32 second duration.
- END FF
- End of script. Next data read will be at the start of the script.
| |
The commands can appear in any order, distributed through the message. And yes, you can QSY
in the middle of a message, so dual frequency beacon operation is a definite possibility!
Indeed, just about anything you can think of is possible. Here's a script command example
which sets A08 KE M2 (shift 08, keying speed E, mode 2):
FD 08 FE 000E F2
While the commands are easy enough to understand, loading the data for the script is a little
more complex. Fortunately this is not something you need to do on a daily basis! The Exciter
does not have code-space for text to Morse or text to graphics conversion,
so the message must be hand crafted or generated by an external compiler program. Two different
techniques are used -
The ASK, FSK and DFSK modes (M=1, 2, 3) use a standard "Murphy" algorithm, where dots are
recorded as "0" and dashes as "1", from LSB upwards, with a trailing "1" added to mark the end of the character
and allow precision keying with perfect timing. For each dot or dash to be sent, a following
dot space is generated (unless it's the last bit of the character), and then the three-dot
character space is sent. This technique is used (rather than sending one dot space at the end
of the character followed by a further two for the character space) as it generates cleaner
narrow band signals in FSK mode. DFSK is even more complex, as the dot-spaces can be omitted
if the following bit (dot or dash) is different from the previous one! A table of "Murphy" Morse
characters appears further down this page.
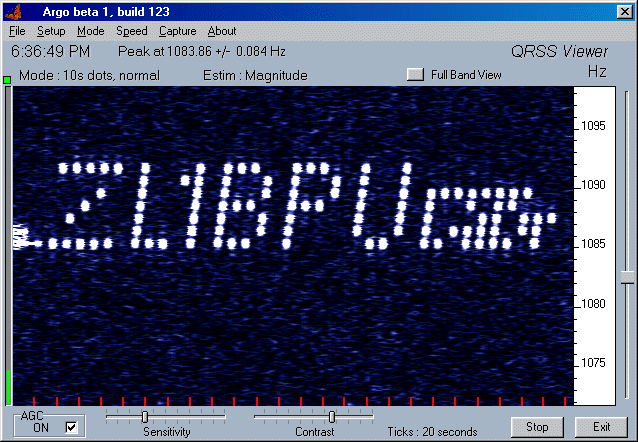
Here's an example which sends "ZL1BPU":
13 12 3E 11 16 0C
The MFSK and HELL modes works quite differently to the other modes - to allow maximum graphics flexibility, they
are fully bit-mapped. All eight data bits in each byte are scanned in exactly the same
way, with "1" meaning transmitter on, and "0" being transmitter off, but in MFSK mode the
frequency sent is stepped by the shift value for each successive bit in the byte. Thus
the first bit is exactly on the set frequency, and the others are 1 to 7 steps higher.
This technique allows visible text and simple images to be sent using Sequential Multi-tone
Hell (see the picture at the top of this page). The following example sends a smiley face:
7E 81 95 85 95 81 7E 00
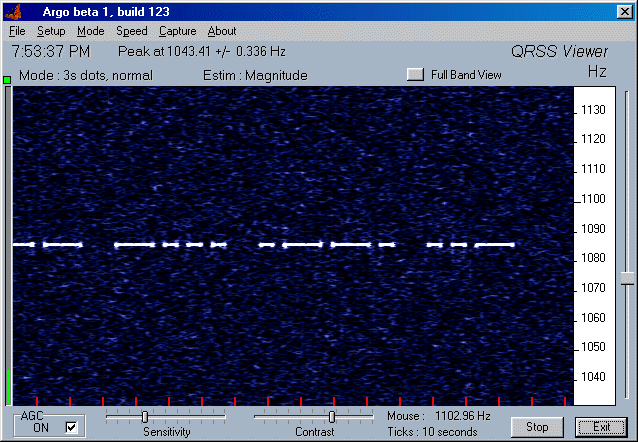
The HELL mode is similar, except a single frequency is used, and data is recovered by precise
scanning of a facsimile amplitude display, exactly like Feld-Hell. The dot time needs to
be set with some precision, and the mode is very effective at dot times of 125 ms or longer.
125ms is convenient as it allows exactly one second per column. The font can be the same as
for MT-Hell, but some tweaking may improve appearance, and text may look better with columns
repeated. In the example below, each column is sent four times, and each character takes about
eight seconds to transmit.

Weak signal Feld-Hell with 125ms dots
(Generated using the internal beacon.)
Text can also be sent efficiently in "Murray", a fun new MFSK mode I have invented and named in
honour of Donald Murray, who developed what has become the ITA2 code used for RTTY. This mode
is really simple to code - simply look up the ITA2 code for the character in an ARRL Handbook
or other code reference, and type in the values! For example, here's "ZL1BPU " in "Murray":
1F 11 12 1B 17 1F 19 16 07 04 00
Take a look at the MFSK example at the top of this page - the stuff to the right of the text
is "ZL1BPU " in "Murray" mode. Although they look really cool, the MFSK modes are much less
sensitive than ASK or FSK modes, since in general less time is spent on each dot. However
these modes are MUCH faster - perhaps three times as fast as ASK Morse.
MFSK works best at one ARGO speed slower than the other modes.
The Mode commands are very useful for transmitting messages in several different modes,
one after another. Remember to set the sending speed as necessary to suit the mode in
question (to give best ARGO readability, for example). The message in each mode needs
to be recorded separately after the mode command. Periods of key-up or key-down silence
can be transmitted using the HELL mode (Mode 5 or F5), using a very slow baud
rate for long delay periods.
To use Mode 0 (F0) correctly, utilize it only as the
last command in the message, and preferably preceed it with a zero frequency command
(FC 00 00 00). Then set the default mode to a beacon mode (anything but Mode 0),
set the default speed, frequency and keying speed, and then save them with the S
command. Then, whenever the micro is reset, either by pulling the reset pin (pin 1) low,
removing and restoring power, or sending a HELP serial command H, the beacon will
start automatically, and continue until it reaches the Mode 0 command, when it will halt.
The message should preferably be arranged so that it fills most of the time between resets.
The Mode 0 (F0) script command only works in firmware version D5b and later.
NORMAL CW MODE
In this mode (M0) the generator acts just like a VFO. It can be used as a signal source,
receiver local oscillator, or low powered transmitter. The carrier can be keyed on and off
(T and X), and the frequency set anywhere within the operating range with high precision.
The PC software supplied allows the frequency to be tuned up and down in 10Hz and 1kHz steps,
but also allows incremental tuning right down to the maximum resolution (typically 0.1 Hz).
The communications link operates in hexadecimal, so although you can control the unit quite
adequately and very precisely from a simple terminal, setting the frequency takes some thinking
about! The number you need to enter must be the frequency you require divided by the synthesizer
resolution, and then converted to hexadecimal.
For example, say you want to set the frequency to 181.000 kHz, and you are using a 10.000 MHz
reference for the Exciter microcontroller. First, the resolution will be
10000000/150994944 = 0.066227383 Hz. The lowest frequency you can set is this frequency,
and all other frequencies are in steps of this amount. So, to set to 181.000kHz, you need to
set the synthesizer to 181000/0.066227383 = 2733008.4864. You can't set fractional steps, so
you use 2733009, which is 29B3D1 hexadecimal. (A good HEX calculator is a must - I use the Win98
calculator in scientific mode.) If you set the Exciter to 29B3D1, the frequency generated will be
0.066227383 x 2733009 = 181000.0340 Hz, an error of only 0.03Hz. Of course the actual accuracy
may be worse than the resolution achievable!
The PC software provided works all this out for you, so once you've set the clock frequency in
the setup file, you simply enter the frequency you require in decimal and the program does the
rest. Many of the other commands also use hexadecimal, but since they use one or at the most
two characters, it's easy to handle these in your head.
The A ADD command, used for adding offsets, is not used much in this mode, although it is used by
programs which generate FSK or MFSK. You can use the ADD command to check what the effect of
such a shift would be on the CW carrier. The frequency range is 00 to FF, so a shift from zero
to 255 resolution steps (typically 16Hz) can be set. Obviously A00 returns the carrier to the
frequency set by the F command. Changing the frequency with the F command also removes any
previous offset. For chifts larger than FF, you'll need to use the F command.
The T command starts the transmitter. The X command stops the transmitter. If you check the
output of the A-D converter with an oscilloscope, you'll see that the output just stops dead,
leaving a DC voltage on the output, and when it starts up again, it starts from the same point.
The output is DC coupled! The amplifier output is transformer coupled, so you don't notice this
effect. Using external hardware, you can experiment with ramping the power down before using the X
command, and again ramping the power up after the T command starts the transmitter. This should
reduce the keying transients for narrow-band applications, but all control will need to be external.
In practice the transients caused by simply turning the transmitter on and off have not caused a problem.
The maximum usable frequency depends on the low pass filter used, and on the synthesizer crystal
frequency. A good guideline is to keep the output frequency below 1/30th of the crystal frequency,
or about F4C0000 hex (so 333kHz using a 10MHz crystal). Above this the signal quality becomes quite
degraded as aliasing occurs due to inadequate sampling, which the low pass filter cannot prevent.
At a value of F800000 the generator crosses over into generating "negative frequencies", which
are little use except with assymetric waveforms, MFSK transmissions or sweep mode. The FREQUENCY
command value is "signed", so using the example above for 181 kHz, you can just as easily generate
this frequency with a setting of FD64C2F as F29B3D1, but in this case the offsets set with the
ADD command move the frequency down, not up!
The user interface to the Exciter is rather like that from a packet radio TNC - you can talk to
it directly since the protocol is reasonably straightworward, and the Exciter talks back to you.
The H command will list all the possibilities, and the R command will report the current settings.
With a computer control program you don't need to think about these "KISS" mode commands as the
program manages them all for you.
SWEEP MODE
Perhaps one of the most useful features of this Exciter, this mode allows you to sweep antennas,
filters and antenna tuners for correct adjustment. When used with a Return Loss Bridge (like an
SWR meter with no meter), or an Impedance Bridge, you can plot the performance of your antenna
and feed system very simply. Setting the sweep mode functions requires care.
The sweep mode is best used with 20 discrete frequency steps (A14), and differs from
conventional sweep generators because these are discrete steps, not a smooth sweep, and also
in that the frequencies generated by the Exciter are very precise. There can be from 2 to 255
sweep steps. The sweep start frequency is
set by the F command (as you would expect), and the number of steps (2 - 255) is set
by the W WIDTH command. A setting of W00 turns off sweep mode.
The KEYING command K sets the precise step size. The range is W0001 to WFFFF,
and since the step size is the same as the synthesizer resolution,
you can step from about 0.08Hz per step to over 4kHz per step.
Note: Previous versions of this software had a fixed sweep facility with 20 steps and 5ms dwell time
per step. This mode can be replicated by setting A3E W14 and multiplying previous
frequency steps by 256, set with the Bnnnn command.
The sweeping occurs continuously, with each frequency generated for the set dwell time, typically 5ms (A3E). The TX LED is turned on
for the duration of the first step. Using an oscilloscope, trigger the sweep off the LED output
and with the sweep set to 10ms/div, the 20 steps will nicely line up across the screen. A1F
works well with a 5ms/div timebase.
You can also make the sweep generator sweep backwards, by setting a negative start frequency,
although why one would need to do this isn't obvious! It will also sweep through zero, but once
again, that's not much use. For audio sweeping, try setting the start frequency to zero
(F000000), and use a narrow sweep increment (e.g. K0498 for 100 Hz/step).
All sweep generator parameters can be adjusted while the sweep generator
is running.
BEACON MODES
The internal beacon is not as versatile as generating signals using PC control, where the
sky's the limit, but there's still plenty of capability. There are six keying modes - ASK
(M1) where the transmitter is fixed in frequency and simply keyed on and off; FSK (M2) where
the transmitter stays on, and is shifted back and forth in frequency; DFSK (M3), where dots
are sent unshifted and dashes sent as shifted dots; MFSK mode (M4), where
eight separate frequencies are generated in turn, and keyed on and off as required to
generate a bit-map; Feld-Hell mode (M5), where dots are on the same frequency,
and keyed on and off at precise times to create a bit-map; and MFSK/IFK data mode (M6),
where frequency steps or increments are transmitted, typically for JASON.
One of the most unusual features of the beacon modes is that the normal mode commands
still work while the beacon is running! Thus you can change frequency, experiment with
the FSK shift, and change keying speed, without coming out of beacon mode.
This is because of the event driven nature of the firmware. Obviously if there are
similar commands in the beacon script, any manual changes made cease to affect the output
when one of these is read.
The data for beacon mode is stored in the microcontroller EEPROM memory, and so can be
changed at will. The message can be compiled and downloaded using the microcontroller
development tools. Alternatively, you can load a new message with the B BEACON command,
which accepts more bytes of data than you will have patience to enter (around 112). The
data includes transmitted Morse data, graphics and data bits, eight per byte, and commands,
as outlined in the section on Script Control. You can change the mode, shift and keying
speed from within the message script. See the section on Script Control (above) for details of
the commands and message data storage.
The data for beacon mode has to be worked out in a very laborious manner, but since this
is not done very often is not a big chore. It probably takes 15 minutes to work out a new
message by hand. There is a computer message compiler provided, which will handle anything you can visually describe. A table of "Murphy" coded characters
for Morse generation is shown below. For MFSK (MT-Hell) and Feld-Hell, use your imagination!
| Morse Coding Table |
SP  01     !   00     "   52     #   00     $   C8     %   01     &   01     '   5E
(   2D     )   6D     *   01     +AR 2A     ,   73     -   61     .   6A     /   29
0   3F     1   3E     2   3C     3   38     4   30     5   20     6   21     7   23
8   27     9   2F     :   47     ;   35     <   00     =BT 31     >   00     ?   4C
A   06     B   11     C   15     D   09     E   02     F   14     G   08     H   10
I   04     J   1E     K   0D     L   12     M   07     N   05     O   0F     P   16
Q   1B     R   0A     S   08     T   03     U   0C     V   18     W   0E     X   19
Y   1D     Z   13     [   00     \SK 68     ]   00     ^   00     _   6C     `   00
| |
The table values are in Hexadecimal. Characters with entries "00" are not transmitted.
By changing keying speed and mode within the script it is easy to send 5 WPM Morse, 3 sec dot Morse,
3 sec dot DFSK Morse and Sequential MT-Hell all in the same message. Periods of carrier-off
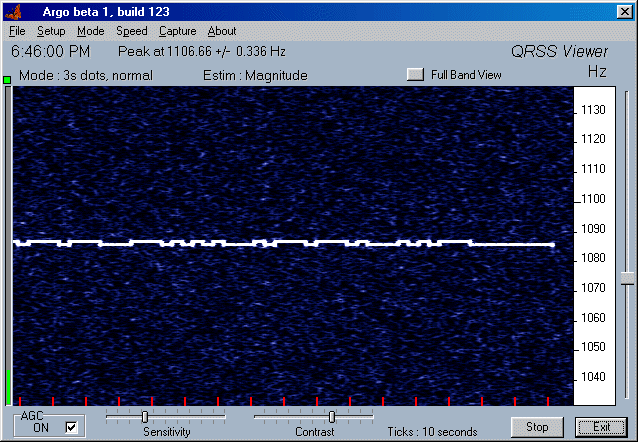
can be generated by bytes of 00 with a slow keying speed. The example below shows an FSK Morse
beacon transmission using the internal script and 3-second dots.

The Exciter transmitting FSK Morse (3 sec dots)
View FULL SIZE
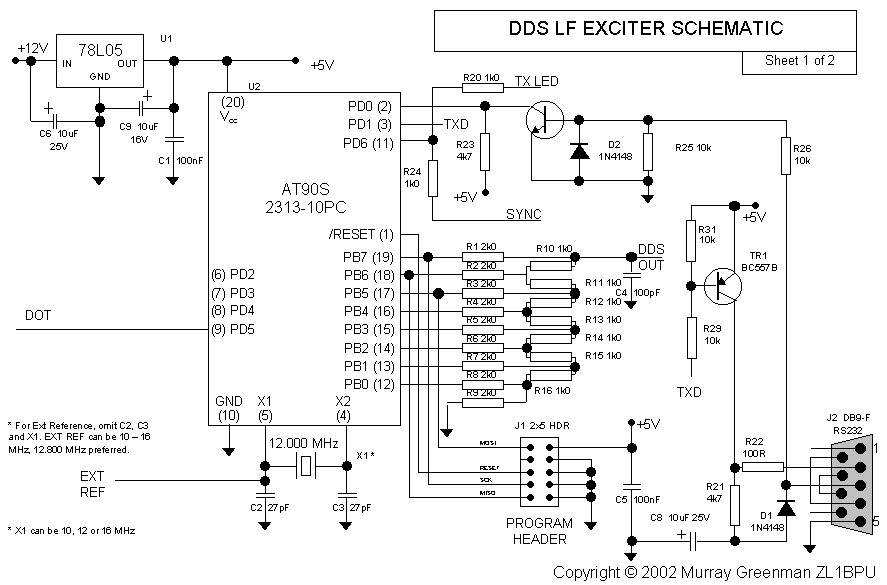
FIRMWARE DETAILS
The microcontroller code is essentially event driven. After initialization, the DDS loop operates
in the main program, looping around only six instructions continuously, providing a loop frequency
and therefore output sample rate of over 1 MHz. There are three other code threads - the serial
comms and command interpreter (including the script entry code) is in the UART interrupt, which
can enable and disable the timers and the two other
interrupts on the fly. You can imagine the potential for debugging headaches! The sweep function
operates in the T0 interrupt, which is fixed at 5ms, while the beacon modes and script
command interpreter operate in the T1 interrupt, which uses an eternal 32 Hz source, and is user
settable from 1/32 sec down to a maximum of about 2047 seconds, or about 34 minutes.
Unfortunately it is not possible to chain the internal timers to achieve long keying times
since the interrupts generated would cause glitches in the synthesizer D-A output. The DDS generator of
course stops while interrupts are processed, which can be from under 2us (sweep generator)
to many seconds (hand typed commands).
Code was written in assembler, using the free Atmel WAVRASM assembler. Code occupies all of the
program memory. 236 words are used for tables, including the 256 byte DDS lookup table. Of the
available 1024 words, all but 4 words are used! RAM is not used at all: the whole operation is
register oriented, and all but about three registers are used. The source code file is about 30k in size and contains
over 1300 lines, although it is quite heavily documented. Default settings are hard coded: user settings
are stored in EEPROM, along with RS232 comms data rate and up to about 100 bytes of user script. Code development took about
six weeks of evenings and weekends. Development time was much reduced by the similarity
in techniques to the AVR Signal Generator already designed.
The final fully working and debugged version
is about the 50th build of the fourth revision of the fifth version of the code. No processors were damaged
and no animal testing was involved during research and development of this product. No lives were lost.
Copyright � Murray Greenman 1997-2005.
All rights reserved. Contact the author before using any of this material.

