
A simple 50 MHz
microwattmeter
In January 1997 I saw the datasheet of the Analog Devices AD606, a chip that will convert a -75 dBm to +5 dBm RF input level to a corresponding DC output between 0.5 and 3.5 Volts. The chip will work up to 50 MHz. It also has a limiter output for frequency measurement purposes. I tried the AD606 using a basic application circuit as recommended in the datasheet.
At the same time I saw designs appearing which used a Microchip PIC16C84 microcontroller. It seemed that this chip was well suited to the needs of the hobbiest: simple architecture, cheap, 1024 words of eeprom program memory and easy to program and reprogram using a programmer you can build yourself.
First, I subscribed to the PICLIST This list proved to be an invaluable tool to quickly learn about most aspects of PIC microcontrollers. I first built the programmer, using the design of David Tait . David has a schematic and software for a low-cost programmer to connect to a PC parallel port. I then used his example of a first circuit to build, a simple LED-flasher.
Next, I acquired some used LCD character displays using a Hitachi HD44780 controller. How to use these things ? Again, David Tait had a simple C program to test LCD displays connected to a PC parallel port. I also read the excellent LCD overview by by Peer Ouwehand .
I then downloaded the necessary assembler (MPASM) from Microchip and used Peer's examples to test a PIC16C84 and a display. This worked well so I began thinking of constructing a serious application: a PIC controlled microwattmeter. This instrument would use the AD606, and the PIC would control an ADC to measure the AD606 output voltage and also count the AD606 limiter pulses to give an indication of the signal frequency.
First I concentrated on measuring frequency. Numerous examples to do this with a PIC are available, I used an example provided by Simone Benvenuti and Andrea Geniola , I don't remember from which site I picked up the example. In this design frequency is measured by counting pulses on RA4 during one millisecond.
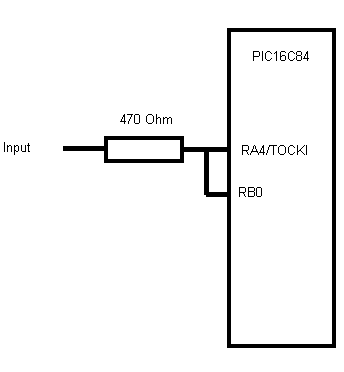
This time is determined by a delay loop. The counter is activated during this time by three-stating another pin (in this example RB0) connected to the counter pin. The counter is stopped by pulling this pin low. The measured frequency thus has a resolution of 1 kHz.
The 200 mV-tt limiter output of the AD606 had to be amplified to a level suitable for the TOCKl input. I first tried a NE592 video amplifier and a NE521 comparator, but this combination was difficult to adjust due to the frequency dependancy of the comparator and I did not get the 2-60 MHz frequency range I wanted. After much experimentation I ended up with a Philips J310 FET as buffer, a Philips NE5200 as amplifier and a Motorola MC3393 as /16 prescaler. The delay loop was modified to 16 milliseconds and I had a reliable counter to measure the AD606 limiter output at input levels of >=-70dBm to app. 100 MHz albeit in a reduced resolution of 10 kHz.
Next came the ADC. I already had a MAXIM MAX186 sample. This is a 12 bit ADC, capable of measuring an input level between 0 and 4.096 V which agreed nicely with the 0.5 - 3.5V output of the AD606. Interfacing the MAX186 to the PIC was easy, thanks to the clear instructions in the datasheet. I used only input channel # 7, so I could do with only three ADC pins:Chip-Select, Clock and Data-out.
This is the story in terms of block-diagram and detailed schematic . I now had separate versions of assembler programs to test the LCD, the counter and the ADC. The next phase was the integration of all these pieces into a usable application. This took a long time... The Microchip MPLAB simulator proved to be an invaluable tool for finding all sorts of stupid programming mistakes. One of the last additions was a switch to change the LCD readout from dBm's to ADC Voltage for calibration purposes.
I then built the microwattmeter , with everything, except the power supply, in a small tin box. Inside this box I soldered a piece of double-sided un-etched PCB. On one side I mounted the main components in a sort of dead-bug style but with the AD606, MC3393 and PIC16C84 in IC sockets. On the other side of the PCB I mounted all power-supply lines and decoupling capacitors. The tin box is attached to the front panel by way of the input and log-output BNC connectors. In this way the AD606 input circuit has the shortest possible leads. I mounted the two SDM parts (NE5200 and MAX186) in the following way: Using a fine nose-plier I bent all leads not going to ground upwards. I then placed the part on the PCB and soldered all ground pins to the ground-plane. I could then solder other parts or wires directly to the remaining bent-up pins.
After this, I calibrated the instrument with a Rohde & Schwarz SMG signal generator provided by a kind radio-amateur at a Dutch hamfest. I did the calibration at several frequencies between 2 and 50 MHz, but calculated the regression factors (i.e. the factors to calculate level in dBm from measured ADVC voltage) only at 20 MHz. At the same hamfest I was able to accurately measure the output of a MFJ-259 antenna-analyzer on a HP 433 power meter at several frequencies so I could later use the MFJ-259 to calibrate again.
The result of this calibration using the R&S signal generator showed that the log output had considerable dependancy on frequency
It occured to me that I could use the frequency of the input signal together with calibration data in the PIC's 64 byte eeprom data memory to correct for this dependancy. I recalibrated the microwattmeter with the MFJ-259 and a HP355D -120 dB attenuator at various frequencies between 2 and 50 MHz and calculated regression factors for for these frequencies. The factors were placed in the PIC's 64 byte data memory. The PIC program was modified so that, depending on the frequency measured, the correct regression factors were selected. This resulted in more frequency-independant level indication, albeit that at the precise points where another set of regression factors is selected a noticable 'bump' is introduced. The graph also shows an (obviously) increasing error at frequencies above 50 MHz.
Conclusion
The end result is a microwattmeter, usable for hamradio purposes I think. The PIC16C84 program ended up being rather large (just a few program words to spare...). I used most of the PIC's features except interrupts and the watchdog timer. I hope the comments in the program explain the details sufficiently. I am almost certain the program still contains stupidities here and the and I hope you will point out to me how it could be improved.
![]()
[ About me
| Acronyms | CW
| Data Sheets | Docs
| Download | E-mail
| HOME | Ham
projects | Hobby circuits
| Photo galery | PIC
| QTH
photos |
Sign
in my guestbook | View
my guestbook ]
© 2001 - YO5OFH, Csaba Gajdos
![[Schematics]](http://www.geocities.com/CapeCanaveral/Lab/9595/mwmsch.jpg)
![[Program flow]](http://www.geocities.com/CapeCanaveral/Lab/9595/mwmpov1.jpg)