Homo ludens nauticus
The birth of a foldable kayak
 The Eskimo probably
invented the kayak. They made it from bones or wood, and sealskin. They
perfected it so much that they could engage in long travels over the ocean
in their tiny and apparently fragile boats. Later, the kayak became known
all over the world, was often built as a home project, and in Germany and
several other countries portable, easily dismountable kayaks were commercially
manufactured. Probably the best known of them is the German "Klepper",
which was already most famous when my grandfather was a young man...
The Eskimo probably
invented the kayak. They made it from bones or wood, and sealskin. They
perfected it so much that they could engage in long travels over the ocean
in their tiny and apparently fragile boats. Later, the kayak became known
all over the world, was often built as a home project, and in Germany and
several other countries portable, easily dismountable kayaks were commercially
manufactured. Probably the best known of them is the German "Klepper",
which was already most famous when my grandfather was a young man...
I had the luck to be given the skeleton of an old Klepper when I was
about 13 years old. I repaired the wrecked structure as best I could, made
a new skin for it (I was given the original skin too, but it was so rotten
that there was no way of saving it.). I used that boat for a few years,
until I moved away from my parent's home, and couldn't take it with me
because I had no space in the room I would rent. I found a good, loving
home for it, and gave it away.
But a few years later I bought my own apartment. 70 square meters, wow!
Space enough to build a cruise ship! Soon I was engaged in designing a
new foldable kayak, correcting all those problems the original Klepper
had.
And these were not few. The Klepper was small, low profile, which meant
that any high wave would get in (no, there was no watertight deck on it).
And it had more surface above the water aft than in front, the result being
a strong tendency to turn into the wind. And it could be folded down only
in two halves, so the resulting packing size was 2 meter long, too much
to be comfortable. And due to my repair it was crooked like a banana, so
it always wanted to go in circles...
For my new kayak I made a thorough design effort, balancing volume under
water, weight distribution, surface above water, hydrodynamic shape, and
ease of assembly/disassembly. Proper attention was given to the necessary
slopes on the fore deck, in order to deflect the waves which sometimes
run over. Then the fun started: Construction.
 For
all the long pieces of the structure, I selected mañío wood.
It comes from a Chilean conifer, is very hard, reasonably elastic, form-stable
and easily workable. I wanted to start from standardized pieces of 120
cm length, and to get proper strength without having the wood breaking
from the bending, I needed an 18 x 18 mm section. But while Chile is officially
metric since vastly more than 100 years ago, the guys who sell wood still
measure width and thickness in inches, but length in meters! Don't ask
me why... And they were unable to cut it to precise size, so I ended up
buying 40 pieces of 1 x 1 inch, 1.2 meter long, plus a few pieces of 1
x 2 inch, same length. The whole packet of mañío cost me
the equivalent of US$10.
For
all the long pieces of the structure, I selected mañío wood.
It comes from a Chilean conifer, is very hard, reasonably elastic, form-stable
and easily workable. I wanted to start from standardized pieces of 120
cm length, and to get proper strength without having the wood breaking
from the bending, I needed an 18 x 18 mm section. But while Chile is officially
metric since vastly more than 100 years ago, the guys who sell wood still
measure width and thickness in inches, but length in meters! Don't ask
me why... And they were unable to cut it to precise size, so I ended up
buying 40 pieces of 1 x 1 inch, 1.2 meter long, plus a few pieces of 1
x 2 inch, same length. The whole packet of mañío cost me
the equivalent of US$10.
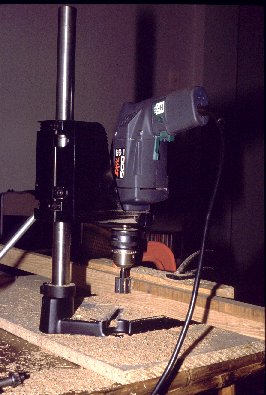
Then I set up my electric drill in its stand (see photo), mounted a
25 mm cutter, implemented a guide from wood blocks, and delighted my neighbors
by spending one and a half days producing terrible noises while milling
the wood to exact size. I was nearly deaf when the job was finally finished,
and the electric drill was spewing grease out of all its pores, but I had
my nicely polished and precisely sized standard pieces of 18 x 18 x 1200,
and 18 x 36 x 1200 mm!
For the ribs I needed a piece of 20 mm plywood. But all the stores here
sell it only by entire planks, and that was too much (and too expensive)
for me. I needed just one quarter of a plank, or even less. Out of despair,
I asked a guy at a construction site where they were using such plywood,
if he had any idea where to buy a small piece of it. After telling him
what I wanted to do, he waved me in, brought me before the boss, I had
to tell my story again, and then I got enough plywood scrap pieces to cut
the ribs for at least two kayaks. For free!!! Many thanks to those nice
guys!!!
 I cut the ribs,
then built the keel (from the 18 x 36 mm pieces). The keel's center section
is a stretching lever that is later used to stretch the boat's skin when
assembling it. This photo shows the assembled keel, with ribs 2 and 3 in
place. The eight runners, in two parts each, can also be seen. To join
the runner sections, joining pieces of 25 cm length are used. They are
glued and screwed to one section, and use a bolt/wing nut for fixing to
the other section at assembly time, plus a beheaded screw as a guide pin.
All screws and bolts are brass, and as glue I used common woodworker's
white glue.
I cut the ribs,
then built the keel (from the 18 x 36 mm pieces). The keel's center section
is a stretching lever that is later used to stretch the boat's skin when
assembling it. This photo shows the assembled keel, with ribs 2 and 3 in
place. The eight runners, in two parts each, can also be seen. To join
the runner sections, joining pieces of 25 cm length are used. They are
glued and screwed to one section, and use a bolt/wing nut for fixing to
the other section at assembly time, plus a beheaded screw as a guide pin.
All screws and bolts are brass, and as glue I used common woodworker's
white glue.
The keel center section engages in two aluminum axles inserted in the
front and aft sections, and is fixed in place by aluminum plates and wing
nuts. The same system is used to attach the three center ribs to the keel,
top and side runners. The other two ribs are just mounted with guide pins.
By the way, the boat is 360 cm long, 72 cm wide, and the ribs are spaced
evenly at 60 cm. All ribs are different, the boat is not symmetrical in
the front/aft sense.
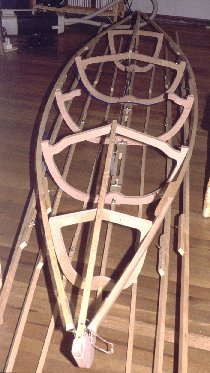
 This photo shows
the kayak in a much more advanced state. You can see some details here:
The front and aft stevens are cut from plywood too, affixed to the keel
by removable bolts and wing nuts, but permanently fixed to the top runners.
The front section is narrower and higher than the aft section, to satisfy
the weight distribution, wave deflecting and wind stability requirements.
The bottom is quite flat, the two runners close to the keel are at the
same depth as the keel. This makes the boat able to go into very shallow
water, as the deepest spot is no more than 10 cm below the water surface
(at my weight) . The keel continues at that same depth right to the two
stevens. This gives a considerable resistance against sidewards veering
during paddling, which was a problem with the original Klepper. This photo
was taken after provisionally fixing the two side runners to the front
steven. All other runner ends are still free, and six of the runners have
simply been put aside the boat for the photo.
This photo shows
the kayak in a much more advanced state. You can see some details here:
The front and aft stevens are cut from plywood too, affixed to the keel
by removable bolts and wing nuts, but permanently fixed to the top runners.
The front section is narrower and higher than the aft section, to satisfy
the weight distribution, wave deflecting and wind stability requirements.
The bottom is quite flat, the two runners close to the keel are at the
same depth as the keel. This makes the boat able to go into very shallow
water, as the deepest spot is no more than 10 cm below the water surface
(at my weight) . The keel continues at that same depth right to the two
stevens. This gives a considerable resistance against sidewards veering
during paddling, which was a problem with the original Klepper. This photo
was taken after provisionally fixing the two side runners to the front
steven. All other runner ends are still free, and six of the runners have
simply been put aside the boat for the photo.
 Now the runners
are affixed to the structure by their spacing straps, and the side runners
are provisionally fastened to both stevens. This thing is starting to look
like a boat skeleton!
Now the runners
are affixed to the structure by their spacing straps, and the side runners
are provisionally fastened to both stevens. This thing is starting to look
like a boat skeleton!
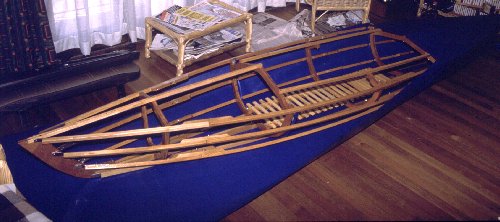
 The skeleton is basically
finished! The runners have been attached to the stevens by duraluminum
straps, properly bent into shape so that the skin will later form a clean
line from the steven to the runners. Note that the skin will not come in
contact with any rib, as this would distort the outside shape. This is
also an improvement over the old Klepper. The cockpit sides have been installed
too, and the floor and backrest are there. The floor was made from mañío
structural pieces, with soft pine covering. These covering pieces are more
closely spaced where I will sit. The backrest was cut from 4 mm plywood,
and is screwed and glued to a curved mañío back plate, which
in turn is connected to rib #4 using wooden hinges. Together with a seat
cushion, it makes the boat very comfortable.
The skeleton is basically
finished! The runners have been attached to the stevens by duraluminum
straps, properly bent into shape so that the skin will later form a clean
line from the steven to the runners. Note that the skin will not come in
contact with any rib, as this would distort the outside shape. This is
also an improvement over the old Klepper. The cockpit sides have been installed
too, and the floor and backrest are there. The floor was made from mañío
structural pieces, with soft pine covering. These covering pieces are more
closely spaced where I will sit. The backrest was cut from 4 mm plywood,
and is screwed and glued to a curved mañío back plate, which
in turn is connected to rib #4 using wooden hinges. Together with a seat
cushion, it makes the boat very comfortable.
 A hand plane
was used to break all sharp edges that would come in touch with the boat's
skin. The photo gives a good idea of the kayak's underside. Don't worry
about the wood chips and other dirt in my apartment's living room: My trusty
vacuum cleaner swallowed it all up!
A hand plane
was used to break all sharp edges that would come in touch with the boat's
skin. The photo gives a good idea of the kayak's underside. Don't worry
about the wood chips and other dirt in my apartment's living room: My trusty
vacuum cleaner swallowed it all up!
 I coated all
the pieces with three layers of clear polyurethane varnish. Great care
was used to fully seal the wood, without blocking any hinges. Water makes
wood swell, swollen wood cannot be disassembled, and a boat may sometimes
come into contact with water, right?
I coated all
the pieces with three layers of clear polyurethane varnish. Great care
was used to fully seal the wood, without blocking any hinges. Water makes
wood swell, swollen wood cannot be disassembled, and a boat may sometimes
come into contact with water, right?
A ladder laid over my homemade hi-fi loudspeakers (see the homo ludens
electronicus page) provided a convenient support structure while the about
50 pieces of the new boat dried.
 Such a boat
is no good without a skin... Here you can see the finished, varnished,
assembled structure partly wrapped in the material which would become the
boat skin. Sorry for the dark photo, the material is bright blue! This
stuff is called "Covernyl", and I believe is manufactured by Goodyear.
It is commonly used to cover cargo on trucks, trains and ships. It's a
very tough nylon fabric covered with rubbery PVC. One side is smooth, the
other is rough. The total thickness is slightly less than 1 mm. This stuff
is so tough that I can't insert a blade into it! And when cut with
strong scissors, I can't rip open the cut!
Such a boat
is no good without a skin... Here you can see the finished, varnished,
assembled structure partly wrapped in the material which would become the
boat skin. Sorry for the dark photo, the material is bright blue! This
stuff is called "Covernyl", and I believe is manufactured by Goodyear.
It is commonly used to cover cargo on trucks, trains and ships. It's a
very tough nylon fabric covered with rubbery PVC. One side is smooth, the
other is rough. The total thickness is slightly less than 1 mm. This stuff
is so tough that I can't insert a blade into it! And when cut with
strong scissors, I can't rip open the cut!
I am often asked how I sewed this material. I'm disgusted by such questions!
Have you ever thought about what sewing is? It's nothing less than making
a long row of small holes, and threading a wick through each hole!
Just what you want for a boat, right???
No needle ever touched my boat skin. It's entirely glued together. The
glue is "Instant PVC" from Härting Chemical. It's a quite unique stuff,
easy to work, fun, and very very good! You apply some of the milky white
liquid to each side to be joined, and let it dry. Completely. It dries
fast, in about 15 minutes it's more than ready. But there is no need to
go on at this time, you can let it stand for a full day if you want. No
problem. When you are ready to join the surfaces, you first heat them up.
I did this using a 250 Watt infrared lamp, but I have seen people carefully
using blowtorches for this job. When the Covernyl is hot, very soft and
easily stretchable, the glue has been activated. Join the two surfaces,
press them hard, and pray that the fit was correct. Because you will NEVER
again be able to separate them!!!
Update (2002) : Since building this boat, "Instant PVC" has
become unavailable. But fortunately the same glue is now manufactured here
in Chile by Madesa, under the name of "Mirafix". I'm pretty sure that similar
glues are available in most countries, but I have no idea what phantasy
names they may carry!
The entire underside of the boat skin is made from a single piece of
Covernyl. The upper deck is made from four separate pieces, to make best
use of the material's stock width. I cut the underside in such a way that
the assembled structure would stretch it by 2% in each dimension. This
gets it very taut and free of wrinkles. The upper deck is not stretched
lengthwise, so it stays a bit wrinkly, but this does not do any damage.
It would have meant more work to install the necessary supports to stretch
it too. The skin pieces overlap by 1 cm for gluing.
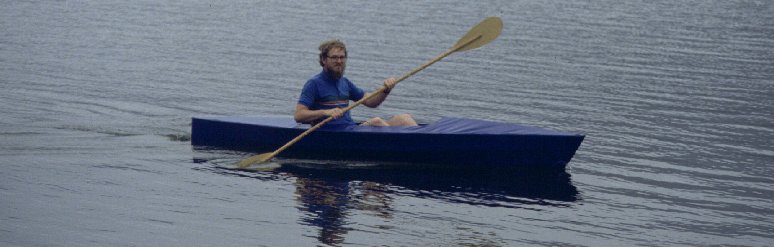
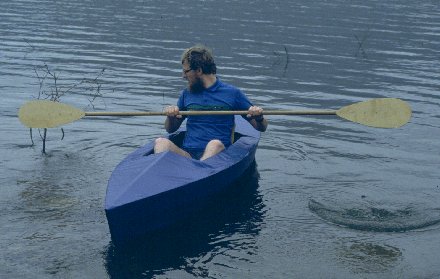 First test!!!
I'm lightly dressed, as you can see, it's easier to swim that way... :-)
But will the boat float as expected? Will it be stable, or will I land
in the water? I took the boat to an artificial lake called La Paloma, which
is the nearest body of quiet water. I assembled the boat, made my testament,
and got in, while a friend was shooting this photo. I rocked a bit. The
boat is stable! No tendency to turn over! Then I slowly paddled back through
the submerged shrubs into open waters. The boat held a straight line easily
and was very light to paddle.
First test!!!
I'm lightly dressed, as you can see, it's easier to swim that way... :-)
But will the boat float as expected? Will it be stable, or will I land
in the water? I took the boat to an artificial lake called La Paloma, which
is the nearest body of quiet water. I assembled the boat, made my testament,
and got in, while a friend was shooting this photo. I rocked a bit. The
boat is stable! No tendency to turn over! Then I slowly paddled back through
the submerged shrubs into open waters. The boat held a straight line easily
and was very light to paddle.
By the way, the paddle is made from three sections, so it fits the standard
120 cm packing length.
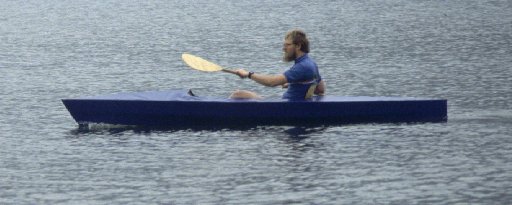 Once in open
water, I pushed the throttle forward... This boat is fast and easy to paddle!
My calculations proved to be correct. The boat moves very easily, holds
straight lines very well (almost too well: a 90 degree turn requires 15
full strokes on one side!), and does not turn over unless manned by a monkey.
A test in white water showed that the wave deflector works perfectly. I
came out dry.
Once in open
water, I pushed the throttle forward... This boat is fast and easy to paddle!
My calculations proved to be correct. The boat moves very easily, holds
straight lines very well (almost too well: a 90 degree turn requires 15
full strokes on one side!), and does not turn over unless manned by a monkey.
A test in white water showed that the wave deflector works perfectly. I
came out dry.
Speaking about dryness: The boat is absolutely watertight. There is
not the slightest creepage of water into it. I could have left the wood
unprotected...!
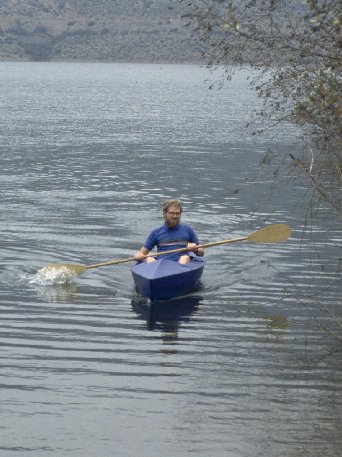 After a very
successful test, this photo shows me braking just short of the shoreline,
to avoid running into the rocks. I have since used this boat on many trips.
It's an ideal platform for photographing water birds (see homo ludens photographicus!).
It feels so safe that I often load my full reflex photography gear into
it. I have also operated my ham radio equipment from this boat (XQ2FOD
maritime mobile). It has never turned over, although some other people
have less balance than I do, and feel unstable in it. The only accident
so far was that once I broke the paddle while paddling UP a white water
river (yes, I'm crazy, so what?)... Without the paddle, the river carried
me along and smashed me into some rocks. The boat proved to be extremely
strong, as nothing was damaged! I just had to replace the paddle by one
made from slightly stronger wood.
After a very
successful test, this photo shows me braking just short of the shoreline,
to avoid running into the rocks. I have since used this boat on many trips.
It's an ideal platform for photographing water birds (see homo ludens photographicus!).
It feels so safe that I often load my full reflex photography gear into
it. I have also operated my ham radio equipment from this boat (XQ2FOD
maritime mobile). It has never turned over, although some other people
have less balance than I do, and feel unstable in it. The only accident
so far was that once I broke the paddle while paddling UP a white water
river (yes, I'm crazy, so what?)... Without the paddle, the river carried
me along and smashed me into some rocks. The boat proved to be extremely
strong, as nothing was damaged! I just had to replace the paddle by one
made from slightly stronger wood.
The disassembled boat packs into a bag that measures 120 x 35 x 25 cm.
Everything fits there: The structure, skin, seat cushion, paddle, a plastic
sheet used to cover the soil during assembly, to avoid getting dirt in,
and the float tanks. Yes, there are two float tanks, made from the same
Covernyl material. They have a volume of about 40 liters each. I inflate
them and place them into the two boat tips. In the event of boat skin rupture,
or turning over, the float tanks will keep me and the boat safely above
the surface until help arrives.
The entire package fits easily in the back of a small car (in my rather
large car it uses just a small part of the room inside), and is lightweight
enough to be carried over a few hundred meters by a single person. The
assembly takes about half an hour, requires no tools (but good memory!),
and the assembled boat can also be carried by a single person, but it's
a bit uncomfortable. I usually assemble it close to the beach, unless someone
volunteers to help me carry it.
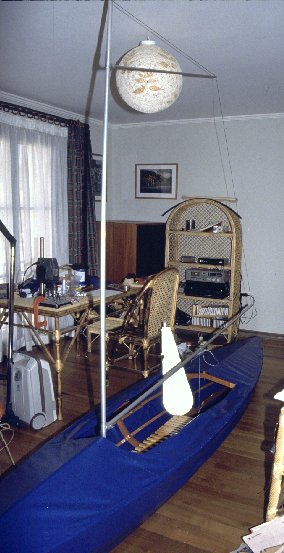 In order to
cover greater distances without any effort, I tried to add a sail to this
boat. A telescoping duraluminum mast holds a trapezoidal sail. A doubly
hinged foldback aluminum rudder was made and attached to the boat skin
(that's why I made the aft steven vertical!). The rudder can fold up if
traveling through shallow waters. It is controlled by pedals. All this
was an experiment, as I had the intention to trust the boat's reluctance
to move sidewards, to get away without adding a sword. Indeed it didn't
drift too much, but without a paddle to act as balancing pole, and with
little range to weight shift my body, it proved impossible to hold balance.
During the tests, I had to let go the sail so often that at the end I couldn't
return to the beach, and a good soul driving a motorboat had to rescue
me. I then scrapped the idea of sailing, but the equipment is stored within
easy reach, just in case I find some brilliant solution! A side float
would be such a solution, but it's too troublesome.
In order to
cover greater distances without any effort, I tried to add a sail to this
boat. A telescoping duraluminum mast holds a trapezoidal sail. A doubly
hinged foldback aluminum rudder was made and attached to the boat skin
(that's why I made the aft steven vertical!). The rudder can fold up if
traveling through shallow waters. It is controlled by pedals. All this
was an experiment, as I had the intention to trust the boat's reluctance
to move sidewards, to get away without adding a sword. Indeed it didn't
drift too much, but without a paddle to act as balancing pole, and with
little range to weight shift my body, it proved impossible to hold balance.
During the tests, I had to let go the sail so often that at the end I couldn't
return to the beach, and a good soul driving a motorboat had to rescue
me. I then scrapped the idea of sailing, but the equipment is stored within
easy reach, just in case I find some brilliant solution! A side float
would be such a solution, but it's too troublesome.
I always take the kayak on my summer trips. Sometimes I don't use it,
but it's compact enough not to take up too much space in the car. And often
I reach a place with nice water, a lake, a river, a marsh, and before long
I'm seaborne, paddling among my friends, the water birds, seeing how they
are doing, photographing them...
Please don't ask me for detailed plans of this boat. I don't have them.
I only drew the basic outline, then designed the ribs directly on the wood,
and built everything else so it would fit. No complete plans were ever
drawn.
This project kept me busy and highly entertained for most of the 1992
winter. And it was worth all the effort. I have enjoyed my kayak a lot.
Back to the homo ludens nauticus
index.