
Flyfisher's Skin on Frame (SOF) Kayak Page
"The shape of things to come, whether in biology or in boat building, lies in the past."
George Dyson, Baidakara - the Kayak
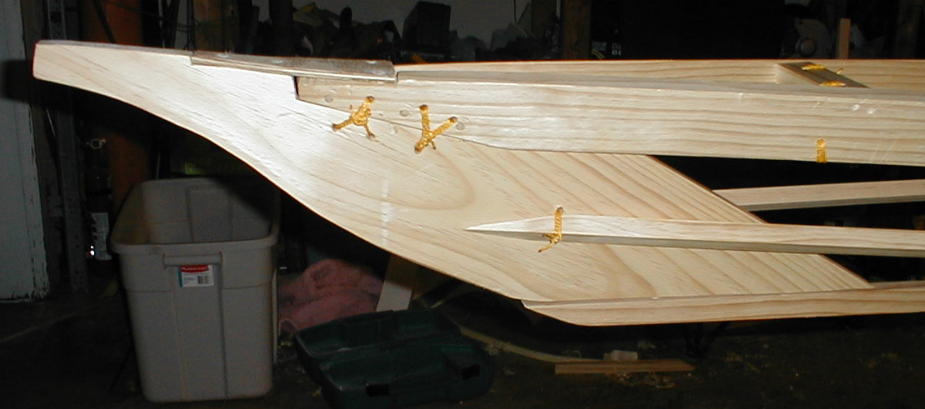
Daren's SOF - The Goal...
What fun it was to build the strip built Great Auk! It rolls well and rides well. It is well balanced in wind. The only disappointment was in being able to do a balance brace. I believe it is hard or impossible with high volume and wide beam.
Solution: build another kayak! This time a SOF using the instructions by Morris in Building Skin on Frame Boats. It is fun to build using ancient techniques. This kayak is built with no metal and with very little glue. It's only glue is for scarf joints to save me the expense of 18 foot lumber. It is held together with dowels and lashing. It is light and sturdy. It has been real fun seeing it come together. Below is a log of some of the building steps.
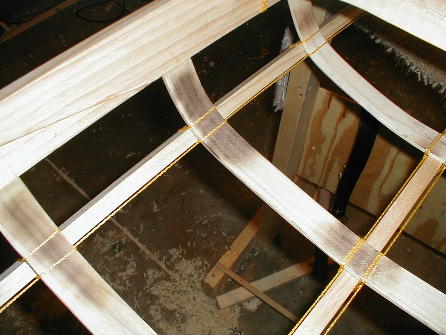
Over the long 4th of July weekend I bought some lumber and scarfed together a couple 8 foot long boards for the gunwales and keel. The frame came together very well, and with little trouble.
5 July Disaster: One of the scarfs came apart when I was sitting on a two by four above the back brace and the gunwales were suspended from a two by four about 3 feet behind the back brace and forward of the foot brace. I discovered that the boat comes apart very nicely when the lashings are cut, as I had to re-glue the scarf after planing the joint. Fortunately, the only lashings at that time were the bow and stern lashings.
6 July: I built the masik from a scrap 2x4. It seems to give enough knee relief. Should be interesting to see how the boat does with a saran wrap test.
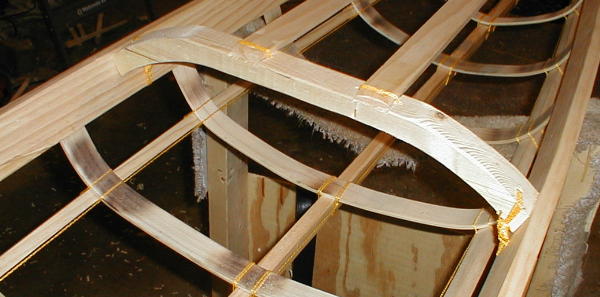
7 July: Cutting the bow and stern pieces was interesting. I had asked the builder's group for offsets for the pieces. Best advice I got was to make a cardboard cut out and try fitting it to the bow and stern. This worked very well. The picture above of Daren's SOF helped a lot with the final shaping of the stern and bow pieces.
Bow Piece ... From a 1x8 ... started as a piece of cardboard
8-9 July: Bending the ribs was a good exercise in wood bending. I used clear "poplar" from Home Depot as the rib material. I bought 1x2s, ripped them with a band saw to 1.5x5/16 or so and put them through a newly purchased thickness planer. (What a chance to buy a new major tool!) I wanted the ribs to be constant thickness to make it easier to bend them smoothly. I also did not want splinters of the bare legs in summer paddling.
I experimented with a little steamer which I welded up in a spare half hour, and with a heat gun (a la Rob Macks). Like Morris says in the book, steaming for 10 minutes gives one about 45 seconds of bending before the rib begins to cool to the point it will not bend further. I end grain split the one rib I really tried using this system on kiln dried wood.
Then I put the rib material in the pool overnight to increase it's water content. Steaming the wet wood gave about the same result, but helped in using a heat gun. Later that day, after the wood dried in the garage for 8 hours, I put the ribs back through the planer, as they had swollen just enough to make it very hard to get them into their exactly 1/4 inch mortises.
The heat gun worked great for bending the ribs. I go them all done in a few hours. I did have some darkening of the wood with the heat gun. I christened these spots "Macks Spots". They mostly come out with sanding, but some of the darkening is pretty far into the wood. Perhaps a little more patience on my part would have allowed bending without this darkening.
(note: After my experience with pine on the cockpit rim, I believe my next try will be to make the ribs of pine or cedar and use steam.)
Macks Spots
On 9 July I ordered 18 feet of "natural" 12 oz Ballistic Nylon from George Dyson. Mr. Dyson's company (Dyson, Baidarka and Co.) does not do internet business. He can be contacted by phone at 360-734 9226. From reading a little about him and his writing, this supplying of us with cloth seems like a very small part of his interests. I am sure it is more of a public service than an attempt to make money. I certainly appreciated it! I discussed the various cloth options with him and ended up deciding I wanted to be able to easily take this little boat down class I-II riffles on the Little Miami River. This helped me decide between 8 and 12 oz cloth. I wonder what we will do for cloth if he decides to stop this service? Will someone step into the gap?
My current plan will be to cover this with water based polyurethane, based on comments and reports on the Kayak Builder's BB.
Costs thus far:
Wood: Clear Pine gunwales deck framing and stringers, poplar rib material,
from Home Depot (about) $90
Cloth: 12 oz Balistic nylon - $71
Varnish: (estimate) $40
State Registration $20
Total: $220
Time: Frame and lash 8 hours
Ribs and stern/bow pieces 8 hours
Skin: 8 hours
Varnish: 3hours (over 2 days)
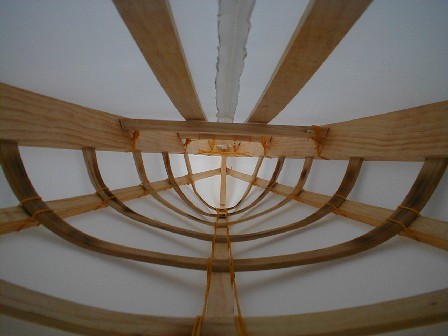
July 10: Finished the frame

Frame finshed except for Cockpit Rim
July 21: For the cockpit rim, I went back to the steamer. I made the rim of clear pine. It seemed to bend well in the steamer. It was fun to build the rim without glue. Just several laminations of bent wood held together with dowels.
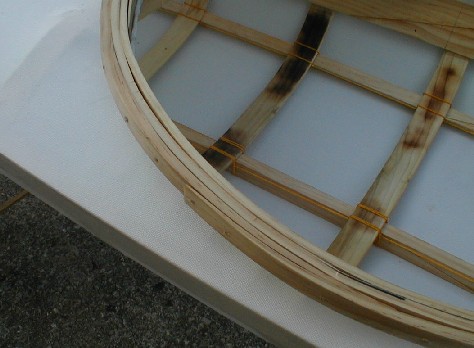
Coaming Detail

Homemade Steamer
I built the steamer from an old scrap of thin wall steel tubing, to which I welded a cap. The tube is about 4 feet long. Add water and a camp stove and I have bent wood. I found the pine bent well with about 2 minutes of steaming for 1/4 inch thick stock. For the rim, I steamed half of the rim at a time.
July 23: Sewing comes next. Morris' method of laying down a temporary strip and using thumb tacks works very well. Two curved needles from Dyson makes the job easy. I used regular dental floss as my thread and tied the thread onto the end of each needle.
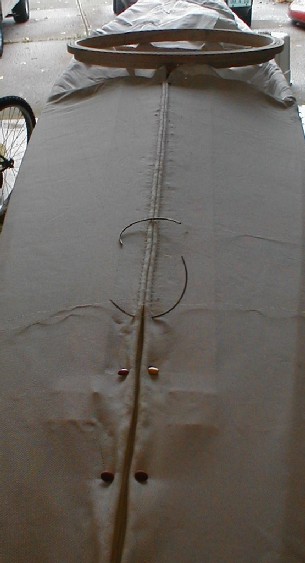
July 24: Finished sewing the 'yak and shrunk the skin. Ready for varnish. I was reading the varnish instructions one last time before committing and saw in little print, "inside use only". I will go exchange the Minwax product for the Varithane product, as others have had very good experience with it and it is only a few more dollars per gallon. With this picture, I can finally see the lines I had in mind 3 weeks ago when I began the project.
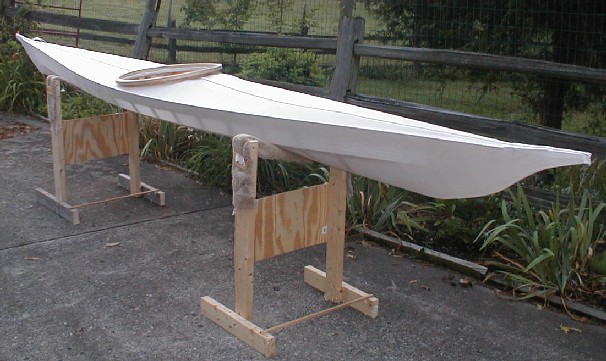
July 28: The varnishing with Varithane water borne polyurethane went well. I put on 8 coats which gave a not quite smooth surface to the 12 oz nylon. Waiting for the stuff to cure for 4 days was too hard. First day, I took some anatomy pictures of the kayak:
The next day, I had some portraits taken by my son:

And then on the 3rd day, I could stand it no longer and decided to launch! Here is the picture of the first wetting of the boat. Since the boat will be used in this body of water for practicing rolls quite a bit, it seemed natural to wet it here first:
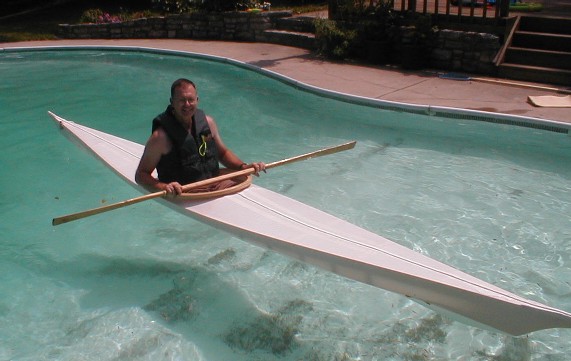
I still have deck lines to install, and all the registration details to accomplish, but here is the 'yak complete. My first action was to make sure I could get out easily in a wet exit with my son standing by as a lifeguard. I could very easily. Then, even though I have not finished my sprayskirt for this boat, I could not help rolling it. It popped right up. This week I will try to get the skirt finished so that I can begin really learning the rolling capability of the boat.
Experiences so far:
29 July, a very windy day, I stopped at Buck Creek Lake. Waves running up to two feet. I had no spray skirt yet. I planned to just see how it worked near shore, but on getting to the beach, a couple kids came up and said that their sister's ball had been blown by the wind out of the swimming area. I gave chase and caught up with it about 500 yards off shore. The waves were impressive coming from behind, with a little surfing. Not the place to be in a new boat and without a skirt. After that I spent some time along the shore and had fun learning better how to get into and out of the boat. The boat does weather cock a little, but it is easy to control with turns made with a lean outside the turn to increase the rocker of the boat.
31 July, a calm day. I had a picnic to attend, and launched the boat on a 10 acre lake on base. It paddled straight as a train and turned very nicely. It is a little twitchy right in the middle, but has great secondary stability. It was easy to sit straight up without the paddle. I believe it would be easy to fish from the boat with the paddle on the cockpit rim, much like my other kayaks.
31 July, I completed a homemade spray skirt using the available on line instructions. (See index of my kayak page) I look forward to trying this in the pool later today....
Unfortunately, the balance brace seems as far away as it was before. The rolling was great! I can't wait to put air bags in the front and back and try reenter and roll practice.
11 August: A report I listed on the Kayak Builders Pages:
This is no grand story, just a little adventure with a few lessons learned.
This last Saturday, I returned from the Boundary Waters Canoe Area, after a great week of canoeing with my 13 year old son and four of our friends. We did portages and had a great time fishing. I did not take a kayak, as we now were a group of 6 and with three groups of 2 we were able to carry all our gear across long portages (mile long) in one trip. (Ugh! I will have a SOF canoe by next year! 67 pounds of aluminum is getting to seem a LOT heavy.)
On returning home, my new little SOF Greenland kayak was in its supports in the garage. I looked at it and promised to make use of it the following day. The Little Miami is running a bit low right now. The summer has been dry and the flow is down to a minimum. Nevertheless, I was able to persuade First (and only) Mate Diane and the 13 year old, William, to make a go of a short section of the river after church the next day.
The two of them took the Grumman canoe and I had the SOF. After a week of paddling the canoe, the kayak seemed a little tippy for a few seconds. But soon I was back in the groove and thrilled that I could slip through the water a lot easier than the canoe work of the last week. They called from behind, "Wait up!" I did.
We got to the first little class I riffle with a bit of a strainer on the left side of the river. The canoe bumped over and I made it over in the deepest section with just a touch or two from rounded rocks that I could feel going past my legs and bottom.
The next riffle was a bit wider and not so deep. They stuck fast in the first couple feet and I knew I would too. I listened as the material slid past several rocks, just like opening a long sleeping bag zipper or running a thumbnail across a taut canvas sail. Then I brought myself to a stop and put the paddle across the aft deck and out to the right. I put weight on my left hand on the gunwale and about 3 inches outside of the gunwale on my right. Pulling myself out of the cockpit had gotten easier with practice, and I now scrambled out the the cockpit and holding onto the stern of the yak, I moved it between pebbles as I helped it through the riffle and reboarded at the bottom of the "white water".
The next riffle was just a little short thing. The canoe bounced noisily over the rocks, but the kayak hung up. It looks like it requires about 4 inches of water to float the kayak and the canoe about 3 inches. Since the riffle was short and gentle, I just put the paddle across the spray skirt and lifted myself up on both hands, scooting the 5 feet in two or three lifts, until the stern came free of the gravel at the tail of the riffle. Same on the next riffle, and several more required getting out and going through the riffle in my water shoes.
That's it. No near death experiences. Just a pleasant paddle through the farmland. The 12 oz ballistic nylon did its job of protecting the frame. The urethane stayed water-tight, and we had a good hour's entertainment. Along the way I gained some confidence in the durability of the Greenland kayak on a stream I had been not too keen to try my wood strip kayak on. I had a nice view of the woods, saw a Great Blue Heron that we chased down the river for a mile or more, kingfishers, and it was a nice time with my wife who had been left out of the BWCA trip.
I look forward to a DC al Coda.