Exhibit D
Ken's Regenerodyne (AA7JC)
Some time back, Ken Lot sent me pictures of his Regenerodyne. Over the
months i lost the file, not having identified it by his name. I found
it only recently, and with his permission, i am posting his superb
looking rig here.
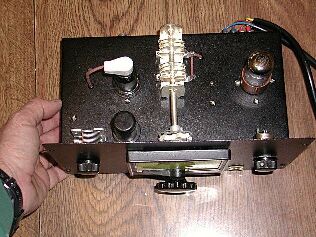 If you visit Ken's site,
you will also be treated to other great examples
of the art of Homebrewing, plus actual on-air sound bytes from his
R-dyne. From his site Ken indicates he built this receiver from the
specs on this site, so from that i can gather the upper deck layout.
Clockwise starting from the upper left is the mixer pentode, the 6J7
or possibly 6K7 ( nice ceramic cap there, Ken. ). To the right is
the detector and audio dual triode, the 6SN7. At lower right is the
local oscillator triode, a 6C4 or 5. And as can be seen, power is
being cabled in from an external PS. Ken did the smart thing, here,
by moving that tuning cap as far to the rear as possible, and shaft
coupling to that gee-golly gorgeous vernier dial. While i am personally
a National HRO-dial and PW reduction drive fan, i would really like to
run into one of these verniers someday. Really dresses up the front
panel, and looks very precision.
If you visit Ken's site,
you will also be treated to other great examples
of the art of Homebrewing, plus actual on-air sound bytes from his
R-dyne. From his site Ken indicates he built this receiver from the
specs on this site, so from that i can gather the upper deck layout.
Clockwise starting from the upper left is the mixer pentode, the 6J7
or possibly 6K7 ( nice ceramic cap there, Ken. ). To the right is
the detector and audio dual triode, the 6SN7. At lower right is the
local oscillator triode, a 6C4 or 5. And as can be seen, power is
being cabled in from an external PS. Ken did the smart thing, here,
by moving that tuning cap as far to the rear as possible, and shaft
coupling to that gee-golly gorgeous vernier dial. While i am personally
a National HRO-dial and PW reduction drive fan, i would really like to
run into one of these verniers someday. Really dresses up the front
panel, and looks very precision.

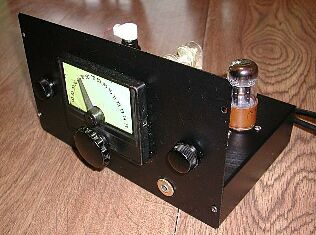
Here is another view more to the front, showing more front panel detail.
The knob on the left side looks to be the front end preselect. The one
on the right is the reactance / regeneration control. And, obviously,
the 'phones plug in from the front. I am not entirely clear if Ken
used black crackle for the front panel or not, but there does seem to be
a slight patina to the front panel finish.
Another front perspective for your perusal. I have entertained the
idea of painting the chassis black on several of my homebrew rigs.
It gives a finished look to the project.
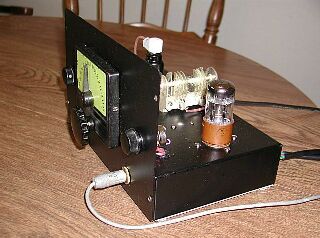
And finally, the last entry into Exhibit D, more of a right-side view.
The overall dimensions look to be around 12" by 7". This would give
Ken lots of space in the lower deck to place his components. The nice
thing about having lots of room is that you can use larger gauge wire,
and stray coupling can be minimised if one is careful not to run
parallel wire lengths, and shielding when possible. Larger gauge wire
contributes to overall stability due to it's stiffness.
That is one beautiful receiver you made, there, Ken, and thanks for
sharing it on the Rogues' Gallery !