A while back, NorCal came out with the NC-20, a QRP 20 meter transceiver designed by Dave Fifield, AD6A. Well, I wanted one real bad, but didn't get to ordering one while the kits were available. (One thing I have learned to do is procrastinate!)
Well, some time back, I bought an unbuilt kit from a guy who had bought it from a guy ... well, you know. And, like the many owners before, the kit sat on my shelf waiting for me to get the time to build it.
A couple of weeks ago (Early April '00), the burning need to melt solder bit me, and while I had some homebrew projects that were really a higher priority, the somewhat more simple pleasure of building a kit called to me, and it was still sitting there.
The NC-20 is not a beginner's kit, but it's not all that tough, either. Dave's construction manual was wonderful. There is a commercial version now, the Red Hot 20, and I can just imagine what that is like! They also have a 40 meter version.
One "downside", if it can be called that, is that Dave's manual is so good, I found it easier to just follow along with the instructions, instead of studying and understanding the schematics as I went. As a result, I don't have nearly the understanding of the circuit that I should. On the other hand, Dave has lots of ideas for experimentation and improvement as you go along, and that is pretty nice.
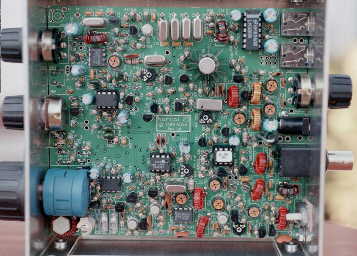 Here is an image of the guts of the thing. The lower left is
the VFO, the lower right the PA, the Driver is the round transistor just
below the crystal filter. The IC in the upper right is the
audio amp, and the approximate middle of the board contains the
logic.
Here is an image of the guts of the thing. The lower left is
the VFO, the lower right the PA, the Driver is the round transistor just
below the crystal filter. The IC in the upper right is the
audio amp, and the approximate middle of the board contains the
logic.
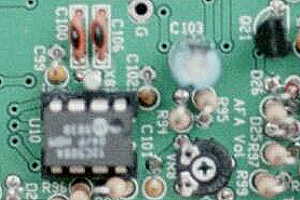 One of the really cool things about this radio is the AFA.
Instead of trying to calibrate the VFO, Dave has included a
PIC based counter, which announces the frequency in Morse.
One of the really cool things about this radio is the AFA.
Instead of trying to calibrate the VFO, Dave has included a
PIC based counter, which announces the frequency in Morse.
The little white circle between pins 2 and 3 of the PIC and C100 and C106 is the crystal for the PIC - a really tiny thing.
 One place where I messed up was in the VFO. The radio comes with a
standard 270 degree pot for tuning, but there are holes on the
board for a number of different 10 turn pots. One type supported
was a Bournes 3540. Well, I had a 3590 which fit the holes perfectly
and as best I could tell, only different from the 3540 in being a few
millimeters shorter.
One place where I messed up was in the VFO. The radio comes with a
standard 270 degree pot for tuning, but there are holes on the
board for a number of different 10 turn pots. One type supported
was a Bournes 3540. Well, I had a 3590 which fit the holes perfectly
and as best I could tell, only different from the 3540 in being a few
millimeters shorter.
The pot fit the holes perfectly, so fat dumb and happy, I merrily proceeded along. Of course, it didn't work. Fortunately, it only took me a few minutes to figure out what was going on, although it took a bit longer to convince myself I was right! The 3590 is a very tight fit, tho, as you can see from the picture. The 3540 is a few millimeters deeper so it must be pretty interesting. Oh, and I was able to use the 3590 with the appropriate bending of the lugs.
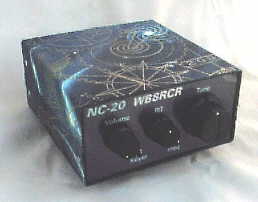 Well, a little computer work produced a perfectly useable front panel and
the XYL covered the radio in a kind of cool material, so the result is a
pretty unique looking NC-20. Unfortunately, the nice teal color of the
front panel shows up as too dark in these quickie digital pictures.
When I get ambitious I'll go do the pictures right.
Well, a little computer work produced a perfectly useable front panel and
the XYL covered the radio in a kind of cool material, so the result is a
pretty unique looking NC-20. Unfortunately, the nice teal color of the
front panel shows up as too dark in these quickie digital pictures.
When I get ambitious I'll go do the pictures right.

This turns out to be a nice radio. It's a pleasure having the keyer built in, and while it takes a while to get the hang of the AFA, it's pretty nice not having to locate the radio where you can see the front panel. Although I haven't tried it yet, I bet this would be ideal for /QRP/M.
I operated the radio in the ARCI Spring QSO Party, and while I didn't work at it too hard (and thus didn't come up with a great score), I did have a lot of fun. The radio seems to encourage a relaxed sort of operating. All in all, quite nice.
Well, it wouldn't be my radio if I didn't go in mucking with it. But I did manage to wait until I got it working first, and so far, the changes have been pretty minor.
Priority one was the addition of an on-off switch. I managed to find a miniature audio pot with a switch, but it's pretty deep, so it took a bit of fussing to get it in. I also added a speaker to the inside of the radio. Of course, Dave provided pads to make both of those changes a simple deal.
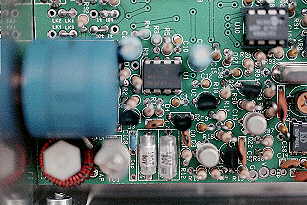
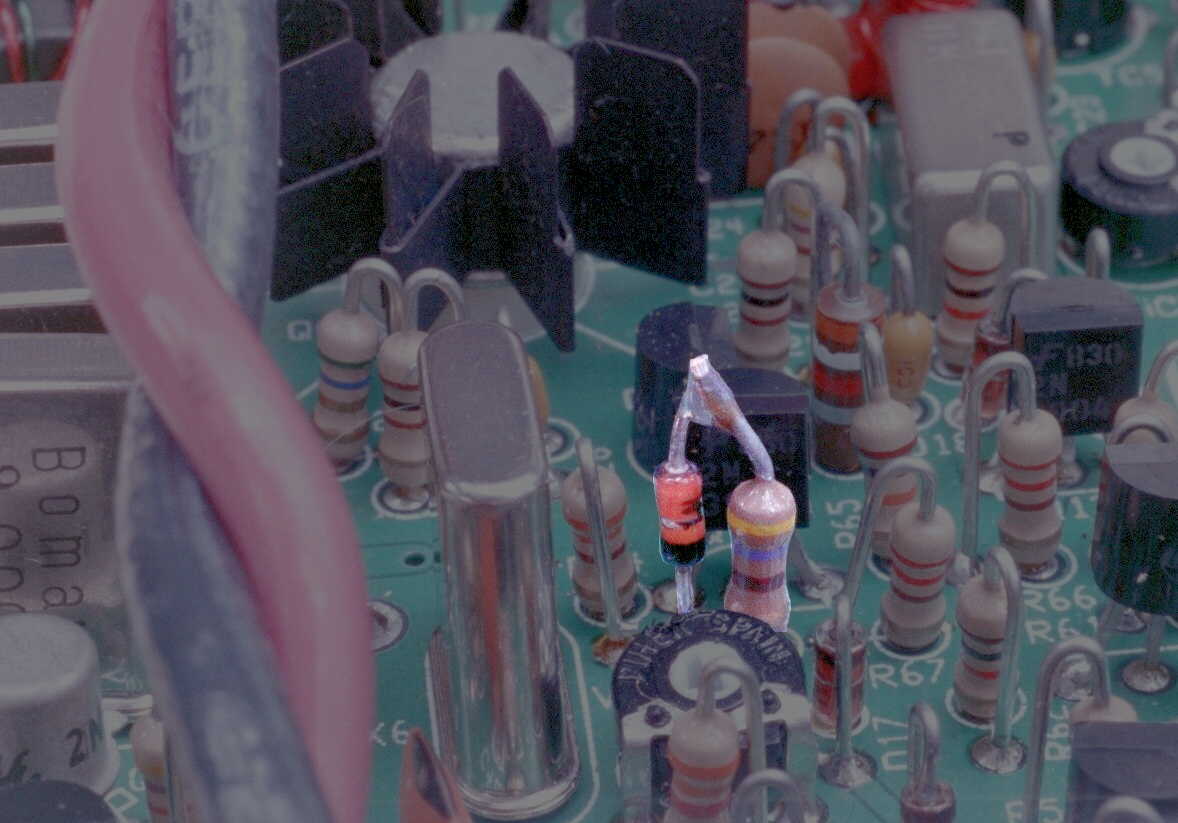 A couple of
mods from the Red Hot Radio page are shown here. The diode in the AGC is the one on the right. It helps the AGC from getting
too carried away. One of the more challenging mods, shown on the left, is the double regulation
of the VFO. This dramatically reduces the chirp in the rig. On both of these, clicking on the
image will show a closeup. Dave Fifield's AGC mod was also performed. However, it mostly
involves taking things out so it doesn't lead to very interesting pictures.
A couple of
mods from the Red Hot Radio page are shown here. The diode in the AGC is the one on the right. It helps the AGC from getting
too carried away. One of the more challenging mods, shown on the left, is the double regulation
of the VFO. This dramatically reduces the chirp in the rig. On both of these, clicking on the
image will show a closeup. Dave Fifield's AGC mod was also performed. However, it mostly
involves taking things out so it doesn't lead to very interesting pictures.

The next thing to do is to change out the 2.1mm power plug for a 2.5mm unit that is more or less standard in the shack. Also, Dave has a different opinion than I do of which side of the paddle is dit - gotta work on that. I also added a Tick 4 keyer chip in there - the Tick 1 doesn't have any memories and the 4 has non-volatile parameter settings, which is a big win. It would be nice to have a non-volatile message memory as well, but I guess you can't have everything!