Proceed with these modification at you own risk. Your radio might be different!
I first made this change over 25 years ago. If you have the DFC-230 (which tunes in 20 Hz steps) or
another method of generating a stable VFO (huff-and-puff?), you will want
the 10 Hz resolution display.
This modification is done entirely on the DISPLAY board.
WARNING: The drawing has an error! It shows the wrong trace to cut near RB5. And shows a jumper on the wrong pin of RB5. The text is correct.
This modification involves removing IC 17 and cutting
several traces near IC 17 as well as adding some diodes,
resistors and an FET. Please read the following
instructions before proceeding with the modifications. The
instructions presented here are not the only way to add 10
Hz display resolution to the TS-120S -- other possibilities
include putting the required additional curcuitry on a
daughter card and attaching the new circuit to the display
tube.
Observe usual cautions dealing with CMOS circuits.
Some of the ICs have become very hard to find.
You will need:
PARTS LIST
qty
item
1
D4011B CMOS IC (or use IC removed from IC 17)
1
14 pin IC socket
1
P-channel FET 2N5462 or equivalent
2
switching diodes 1N914 or equivalent (1N4148, etc)
3
47k ohm 1/4 watt resistors
1
200 ohm 1/4 watt resistor
small tubing or heat shrink
small wire (28 guage wire wrap wire)
Procedure:
Remove the DISPLAY and COUNTER boards from the unit.
The DISPLAY board is attached to the COUNTER unit via a
short ribbon cable.
CUT the following traces on the top of the DISPLAY
board:
pin 15 of the display tube to pin 4 of RB5,
pin 3 of IC 18 to signal G4 on the ribbon cable going to
the COUNTER board.
ADD the following wire:
pin 4 of RB5 to pin 26 of the display tube.
Test the modification done so far. Reinstall the
COUNTER and DISPLAY boards in the unit and apply power. The
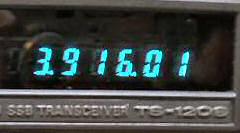
10 Hz digit will now be active and will show 10 Hz
resolution. The 100 kHz digit will be dark. The remaining
steps will reactivate the 100 kHz display.
NOW FOR THE HARD PART ...
Remove IC 17 (CD4011B) carefully. The IC may be removed
by using a vacuum desoldering tool or by cutting the legs
off of the IC. Remove the IC carefully to avoid damage to
the DISPLAY board.
CUT the following traces:
(top) pin 1 to pin 11 IC 17,
(bottom) pin 4 to pin 13 IC 17,
(bottom) pin 12 of IC 17 to signal M11 on the ribbon
cable going to the COUNTER board,
(bottom) pin 5 & 6 of IC 17 to signal QC on the ribbon
cable going to the COUNTER board. Pins 5 & 6 of IC 17
should remain connected together.
Install a 14 pin IC socket at IC 17.
ADD the following wires:
pin 11 to pin 5 of IC 17,
pin 13 of IC 17 to pin 2 of IC 18,
pin 12 of IC 17 to pin 1 of IC 18,
pin 4 of IC 17 to signal G4 on the ribbon cable going to
the COUNTER board. (Trace that was cut from pin 3 of IC 18
in step 2 above)
ADD a 47k ohm 1/4 watt resistor from pin 1 of IC 17 to
pin 1 of IC 19 (ground).
ADD a switching diode (1N914 or similar type), cathode
to pin 1 of IC 17 and anode to pin 9 of IC 17.
ADD another switching diode, cathode to pin 1 of IC 17
and anode to signal QC on the ribbon cable going to the
COUNTER board. (Trace was cut from pins 5 & 6 of IC 17 in
step 6 above)
ADD a 47k ohm 1/4 watt resistor from pin 15 of the
display tube to pin 1 of RB5.
Prepare the P-channel FET as follows:
solder a 47k ohm 1/4 watt resistor to the gate lead,
solder a 200 ohm 1/4 watt resistor to the drain lead,
solder a short (about 3 inch) peice of wire (28 guage wire wrap wire
for example) to the source lead,
cover all connections with small tubing or heat shrink.
Solder the free end of the 47k resistor on the gate
lead to pin 6 of IC 17.
Solder the free end of the 200 ohm resistor on the
drain lead to pin 7 of IC 17 (ground).
Solder the free end of the wire on the souce lead to
pin 15 of the display tube.
Install a CD4011B or equivalent in the IC socket at IC
17.
Reinstall the COUNTER and DISPLAY boards and turn on
the unit. The 10 Hz digit should work as before -- the 100
kHz digit should be restored.