 |
Poqet PC Plus Serial Port Adapter Cable Craig LaBarge, WB3GCK |
|
Poqet PC Plus Serial Port Adapter Cable Craig LaBarge, WB3GCK |
When I had the chance recently to pick up a "new-in-the-box" Poqet PC Plus, I jumped on it. I had picked up one of the original Poqet PCs (Model PQ0181) a few years earlier and had been using it for packet radio and logging. I was looking forward to the additional features and power provided by the PC Plus.
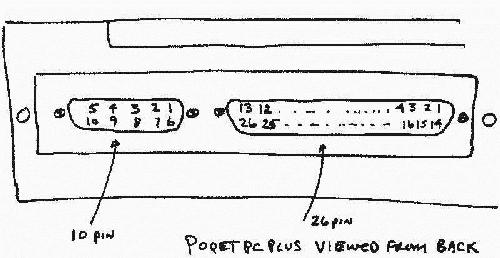
One drawback with the Poqet PC Plus is that it uses an unusual, 26-pin, miniature connector for the serial port. So, unless you have some way to convert to a standard DB-9 connector, the serial port is useless.
The original Fujitsu adapter cables are extremely rare and it is next to impossible to find one for sale. The mating connector (Model TX20-26P-D2LT-1A1) made by JAE is only available in lots of 50 with a 12 week leadtime; not too good when you only need one connector. The good news is that Poqet was not the only manufacturer to use this unusual connector.
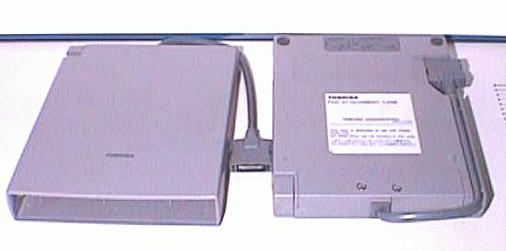
It turns out that Toshiba used this type of connector on some of their laptops to interface to external floppy drives. If you look around at hamfests, flea markets, or on eBay, you can find a Toshiba floppy drive bay for a few dollars. They come with a 7 inch cable which is terminated with the connector you need for the Poqet PC Plus. I wish I could be more specific as to the model numbers of the appropriate Toshiba devices, but I can't. The one that I found on eBay was marked only as "FDD Attachment Case."
So, assuming you've located a Toshiba floppy drive bay with the right connector on it, here's how you can turn it into a serial port adapter cable for your Poqet PC Plus.
| Function | DB-9 | Poqet PC Plus | Wire Color |
| TXD | 3 | 2 | Orange/Black Stripe |
| RTS | 7 | 3 | Gray/Red Stripe |
| DTR | 4 | 4 | Gray/Black Stripe |
| GND | 5 | 5 | White/Red Stripe |
| RXD | 2 | 6 | White/Black Stripe |
| CTS | 8 | 7 | Yellow/Red Stripe |
| DSR | 6 | 8 | Yellow/Black Stripe |
| DCD | 1 | 9 | Pink/Red Stripe |
| RING IND | 9 | 10 | Pink/Black Stripe |
