THE $4 SPECIAL by Joe Tyburczy, W1GFH
- Sure, you can find "all-band wire antennas" for sale in the back pages of Ham magazines costing $150 or more. But beware: Marconi spins in his grave everytime a ham buys an aerial instead of building it. The plain and simple truth is that wire antennas for the HF bands were intended to be hand-made and not store-bought.
- Untold generations of intrepid Radio Hams have fashioned their own equipment out of spit and baling wire. Do you think the spark-gap dudes of the 1920's just went out and bought ready-built G5RV's from HRO or AES? No way! They slapped together aerials out of bedsprings, chewing gum, and frozen cow poop. For them, every day was Field Day. I think that home-built antennas should be awarded 10 db of "honorary gain" simply by virtue of their ingenuity. And in this world of microprocessor controlled micro-rigs, constructing one may be your only chance to build something and actually see it work on the air. Think about it.
- RadioWorks, Alpha-Delta, MFJ, B&W, Van Gordon, W9INN, and W7FG...nothing wrong with the wire antennas they sell. But buying one is no substitute for "rolling your own". Don't be overawed by their advertising rhetoric. You can make an antenna every bit as good as theirs, and even better in many cases.
- Just Do It
- Don't be intimidated by SWR, either. Your rig will not blow up and kill you. Most modern rigs will politely refuse to transmit into a really bad match. A perfect 1:1 SWR is for sissies, anyway. All *real* hams have conducted perfectly good QSO's at 3:1 (or more) at some time or another. You may be surprised to know that the vast majority of hams didn't fret about SWR until after WWII when coax cable and SWR meters ("SWR Bridges" as they were first known) became available on the commercial market. Before that time, you simply cut your antenna to frequency, loaded the transmitter final for best output according to the plate current meter, and that was that.
- I am a big fan of "balanced line" (twinlead, open wire line, etc.) vs. coax. By using balanced line and a tuner you can have one, single-element antenna that works well on all bands. You can't do that as easily with coax. The basic "W1GFH $4 SPECIAL" shown below is a variation on the type of versatile skyhook I've been using for years.
Now at this point, some of you may be looking at the diagram and muttering, "Jeez Joe, that's just a dipole fed with twinlead and used with a tuner". Well of course it is. Virtually all antennas are "di-poles" (i.e. "two sides") in some form or another. This one just happens to be made from low-cost materials.
I won't go into the theory here, but trust me: balanced feedline, properly used, does not "leak" RF and is less lossy than coax. I've tried the commercial 450-ohm ladder line, but prefer 300-ohm TV twinlead, and the cheaper the better. Radio Shack TV twinlead is ideal. Home Depot has some good stuff, too. Forget all the obsessive junk about standing waves, impedance and velocity factor. What you really need to concentrate on is getting an interesting set of antenna insulators.
Hang It Up
- Back during the disco era when I first got on the air, I got a pair of really cool antique pyrex antenna insulators from a flea market table in Derry, NH for 25 cents each. They looked like the kind Hiram Percy Maxim used in 1910, and seemed able to pull in exotic DX all by themselves. The other day I found out that Radio Shack wants $5 apiece for insulators made from some kind of white plastic crap. So I improvised my own by sawing up pieces of an acrylic adjusting rod from a discarded miniblind. I think Hiram would've been proud of me.
- Hang the center of the antenna from a tree limb, or use a support as pictured. The exact height of the antenna's feedpoint is not crucial. The higher, the better. 20 feet might be considered the minimum. 60 feet is ideal. However, in the real world, 30-50 feet is average.
- For the antenna wire itself, virtually anything will work, but something close to #18 stranded/insulated is ideal. My favorite stealth antenna material is magnet wire. You can dig this out of an old transformer or even a busted loudspeaker's coil. This ultra-thin stuff is truly INVISIBLE to neighbors and wives alike, and it'll handle 100 watts, no sweat. If you need to keep a low profile, try it as a long longwire, end-fed from your tuner's "wire" terminal. (Be sure and ground everything in the shack like crazy) No trees in your yard? Use a sock filled with sand for a weight and hurl the far end of the wire onto a NEIGHBORS roof or tree. (I would advise doing this at night. If you are caught, claim you are "trying out an old FARMERS ALMANAC recipe to keep bats away". People universally hate bats, and love farmers) If you can't possibly scheme to get your wire more than a dozen feet off the ground, try flinging a few hundred feet of the magnet wire all around the yard in a big loop (find out measurements in the ARRL Handbook or Google "80 meter loop antenna"). Loops can perform satisfactorily at low heights. And remember, don't fuss too much about SWR. A little mismatch is good for you and builds character.
- The ends of the antenna will be "hot" with RF, so it's a good idea to keep them out of reach of people and pets, say, at least 10 feet above ground. However the antenna will still function if you bring the ends down closer to the ground.
Love Your Tuner
- An antenna tuner with a balanced output (internal or external balun) is a must. Using one is a simple matter of adjusting capacitance and inductance for the lowest SWR on a given frequency. Always begin your adjustments at low power, increasing to full power only when you have a reasonable match. At first, you may think it's inconvenient and old-fashioned to manually tune your antenna every time you change frequency, but you soon discover the unique satisfaction of tweaking the variable caps and watching the reflected power dip lower as the received signals grow a bit louder in your receiver. It's "real radio".
- My first tuner was a 1980's wood-grain cabinet style MFJ-941 I got at a swap meet for $15 a long time ago and featured an internal balun and connections for balanced lines on the back. Make sure YOUR tuner is an outboard manual type antenna tuner such as this, and not an "automatic" or internal tuner that is a pushbutton feature on many modern rigs. Because they must use small, light-duty components, these built-in tuners are typically limited to handling mis-matches of 10:1. The mis-matches YOUR feedline will be seeing can be as high as 100:1. But don't worry. The he-man sized coils and air-variable caps in a typical outboard tuner will handle it just fine.
- Don't believe the folklore about MFJ tuners being junk. It's true, they are cheaply made and their Quality Control is spotty, but the majority of them work perfectly OK if they aren't abused. So do old Dentron's, Drake, Vectronics, Nye Viking, etc. A link-coupled balanced tuner arrangement like the Johnson Matchbox would be even better, but use what you have. Or make one. Ham radio (unlike some other hobbies) isn't a competition to see who can own the best or most expensive gear. The idea is to get on the air with what you have or can afford, enjoy your self making contacts, and as time and money permits, try something else.
- I had a 65ft. per leg version of this antenna working in Massachusetts, and it'd tune up on all bands 80-10. At my Burbank, California QTH, I used a 35 ft. per leg version, and it tuned up on 40-10. By the way, you'll notice it's an inverted vee --- a real advantage if you don't have room for a full-sized dipole in your yard. If you still don't have room, bend and angle the legs to fit the space you've got. Antennas gently bent into Z-shapes still work fine!
The Magic Of Twinlead & Wire
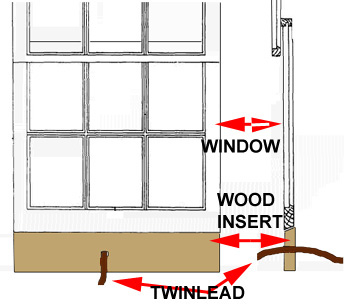
- The uncut feedline comes straight in thru a clever window sash arrangement first used by hams in the 1920's. Alternately, you can attach the wires to feed-through bushings (which can be anything from two steel bolts...to a pair of banana jacks end-to-end) set into holes in the wood sash or a glass pane (or a plexiglass panel). 300 ohm twinlead only needs about 2" separation from metal objects in its path. Unlike coax, its "gotta be free" -- don't coil it up, kink it, bury it, or lay it on the ground. Gently brushing against tree limbs or tied to non-conductive surfaces like wood or plastic is OK. The 100 watt output of most transceivers makes TV twinlead a safe and practical choice, but a number of hams have used it successfully with power ranges up to 1KW PEP. You can obtain or construct an external 4:1 balun to make the transition from your twinlead feedline to a short length of coax, then bring the coax into the house via a single feedthough hole if you'd like.
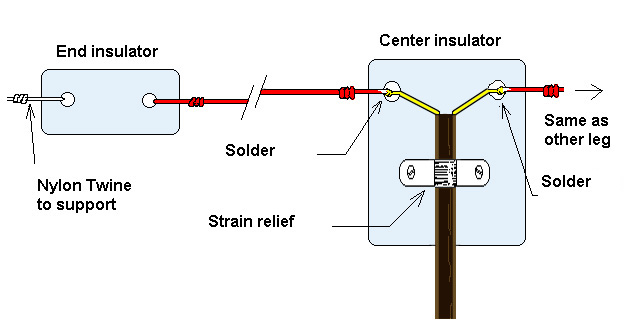
- OK, back to construction for a moment. Here's a variation of the $4 Special that uses center and end insulators made out of plexiglass sheet. But you can improvise yours out of an old DVD, sawed-up PVC pipe, a plastic Coke bottle...or anything you'd like.
- If you want to be adventurous, try using 110VAC lamp cord ("zip" cord) as a feedline. Yeah, it'll work as a crude balanced line, believe it or not. Impedance varies, but is usually "close enough" to work. And that reminds me...
Ham Tradition
- Today's new hams have been cheated out of the constructive experience of being harangued and berated by crabby old "Elmers" preaching about how they did things in the "good old days", so I am taking it upon myself to provide you with a taste of it here.
There is very little experimentation among hams these days, and most stations are cookie-cutter duplicates of one another: same antenna, same Japanese transceiver, same 599 QSO. This is not the ham radio tradition of old. In the 1930's and 40's you might find one ham using twisted bell wire as a feedline. Another might be using bare electric fence wire on ceramic standoffs nailed to wooden planks. Another might be using copper tubing. Or pieces of metal roofing. Or auto ignition cable. Or tin cans soldered together. If you looked at their stations you'd discover a wealth of marvelous invention, idosyncratic design, and an incredible ability to press available objects and materials into service. During the 1960's, groups of hams would get together to swill cases of beer and then make antennas out of the discarded cans by soldering them together, end-to-end. Improvise. Experiment. Take notes of what works and what doesn't. This is what ham radio is all about.
When you put up your antenna is also crucial. I must mention here the importance of what many early hams called "antenna weather". That is, snow, sleet, freezing rain, or combination of all the above. It has been proven time and time again that any antenna installed in conditions better than abysmal will not function worth a damn. Or, put another way, it takes bad weather to put up a decent antenna. Dark and cold New England winter days are ideal for this activity. Any antenna erected on such a day will inevitably produce miracles.
- Many of you will recognize THE $4 SPECIAL's design as the venerable "double zepp" aerial, a variation of the "end-fed Zepp" -- the skyhook responsible for the dramatic Hindenberg tragedy in Lakehurst, NJ. It seems the blimp's radio op decided to work a little DX while waiting for landing clearance. He sent out a few CQ's. Unknown to him, the ladder line had twisted in the breeze, shorting the bare conductors. A brilliant spark flared up, and....well, that's another story altogether.
- To see an "end-fed Zepp" version of the $4 Special, click here.
- Alas, I never had a 100 foot tower to hang this antenna from. The one in Mass. was up 50 ft. and worked what I considered terrific DX. The one I have now is only up 30 ft. and gets good to average results. It won't outdo a yagi at 100 feet. Very few things will.
- But for $4....who can complain?!

            ADDENDUM:
            March, 2006

            Since
            writing this article in 1998, I've gotten a lot of
            questions.

            • Some are
            new to antenna tuners. There's no mystery, using one is
            very simple. It's a matter of adjusting capacitance and
            inductance for the lowest SWR on a given frequency. There
            is a quick tutorial at:

            http://www.hamuniverse.com/tuner.html

            • Others
            are curious about the end-fed Zepp. In my opinion, this
            is a highly impractical antenna unsuited to modern ham
            operation.It CAN work without RF radiation into the
            shack, but it is a fussy antenna that demands an "ideal"
            installation. When it was popular in the 1920's there
            were no consumer electronic devices to interfere with and
            transmitter antenna output circuits were constructed of
            half-inch-thick copper tubing. However, I will leave the
            link and illustration up as a curiosity for
            experimenters. I suggest you go to L.Cebik's fine page on
            this subject for an explanation of the theory behind the
            end-fed Zepp:

            http://www.cebik.com/gup/gup12.html

            If you are a
            beginner, you'd do well to read all of Mr. Cebik's
            antenna articles. They are a wealth of practical
            knowledge.

            • Many
            want to know about feedline lengths. Is there any 'ideal'
            length? Yes and no. Some feedline lengths will present an
            extremely high impedance to the tuner on certain bands.
            Each installation is different, but here are some rough
            guidelines that may help:

            Start by trying
            a feedline listed in the lengths below. It may take some
            trimming or adding of feedline to work well on the range
            of bands you want to cover. The worst possible feedline
            lengths are shown in brackets:

            If Ant is 120 ft
            per leg it will cover 160 thru 10 meters. Feedline of
            40-70 or 150- 190 feet suggested. [Avoid lines around
            120 or 240 ft]

            If Ant is 65 ft
            per leg it will cover 80 thru 10 meters. Feedline of
            25-40, 80-100 or 140-160 feet suggested. [Avoid lines
            around 60, 120, or 180 ft]

            If Ant is 33 ft
            per leg it will cover 40 thru 10 meters. Feedline of
            40-50, 70-80, 100-110 or 130-140 feet suggested.
            [Avoid 30, 60, 90, 120 ft]
