INSTALLATION
SECTION 2
SECTION 2
INSTALLATION
2.1 UNPACKING.
After removing the unit from
the packing box, inspect the unit for loose screws or bolts. Be certain
all controls, such as switches, dials, etc. work properly. In case
of damage, file all claims promptly with the transportion company.
If a claim for damage is to be filed, the original packing case and material
must be preserved. To assure the clearing away of all packing or
blocking materials, remove the transmitter from its cabinet. When
removing the transmitter, support the rear of the chassis to prevent breaking
the interlock switch on the right rear edge. Check all tubes to see that
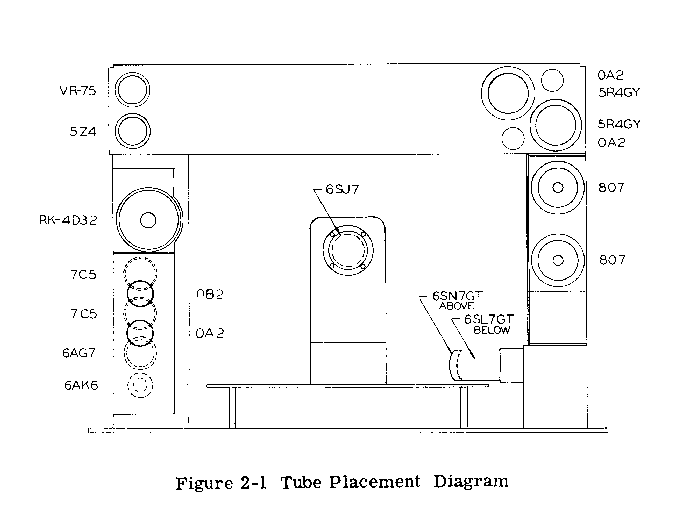
they are fully in their sockets. See figure
2-1 for tube placement.
2.2. PLACING TRANSMITTER.
The console type cabinet, is
designed to be placed on the operating table along with the receiving equipment.
Allow enough space at the rear for making the necessary external connections
and for replacement of fuses, Provide sufficient clearance at the
sides for full circulation of air.
2.3. EXTERNAL CONNECTIONS,
Place the two power switches
in the off position before attempting to make any external connections.
These connections are as follows:
(1) AC Power Line
(2) Microphone and Key
(3) Radiation System
(4) Remote Relay
(5) Receiver Disabling Circuit
(6) Remote Push-To-Talk
2.3.1. POWER LINE, - The 32V-3 operates from a 115 volt, single
phase, 50/60 cycle power source. The maximum power required from
the line is 500 watts. Check the power line to see that it meets
these specifications. Insert the 115 volt plug into a convenient
standard outlet.
2.3.2. MICROPHONE AND KEY, - The microphone plug is inserted in
the microphone jack, J201, on the front of the transmitter. Make
sure the clamping ring on the microphone plug is tightly turned on the
thread around the input receptacle. Push-to-talk control connections
are made to pin number 2 to ground in the microphone plug if the microphone
being used is equipped with a push-to-talk switch. When using a microphone
that does not have such a switch, the transmitter can still be controlled
from a remote position by running a pair or leads from terminal 11 and
12 on the rear terminal strip (E308) to a switch box located at some point
convenient to the operator.
CAUTION
Do not get the microphone and push-to-talk connections reversed
when assembling the microphone plug as the relay voltage present could
damage certain types of microphones.
2.3.3. RECEIVER DISABLING CIRCUIT. - Terminals 24 and 25 on a rear
terminal strip are connected to normally closed contacts on the carrier
control relay and are to be used for connections to the receiver disabling
circuit. Remove the jumper on the receiver terminals and connect
to these two terminals. The receiver can then be made inoperative when
the push-to-talk switch is pressed, or whenever the HV switch is operated.
2.3.4. REMOTE RELAY CONNECTIONS. - Terminals 8, 9, 22 and 23 at
the rear of the terminal strip may be used for operating an antenna change-over
relay, or (when the 32V-3 is used as an exciter) they may be used as a
relay for turning on the plate power of a power amplifier stage.
If a 115 volt a-c type relay is used, connect the leads from the relay
coil to terminals 22 and 23. In this manner, the relay coil will
be energized thru contacts 8 and 9 of relay K3O1 whenever the push-to-talk
switch or HV switch is operated. If a d-c type of relay is used, remove
the jumper from terminals 8 and 9 and use terminals 9 and 23 to control
the operation of the remote relay through the contacts of the transmitter
relay.
CAUTION. - Terminals on E-3O8 are not filtered for TV1.
CAUTION. - Do not use the RECEIVER DISABLING CIRCUIT AND REMOTE
RELAY CONECTIONS for conducting large currents, as damage to the relay
contacts may result.
CAUTION. For safety reasons, remove the 115 volt plug from
the a-c power outlet while making connections to the rear terminal strip.
2.3.5. RADIATION SYSTEM. - The output network will match resistive
loads of 26 to 200 ohms on all bands. It will tune out inductive or capacitive
reactances normally encountered. The output network is unbalanced with
respect to ground and may be used to feed directly into unbalanced systems.
Connection to the antenna transmission line is made by means of a UG-21B/U
(Amphenol 82-61) 50 ohm coaxial connector. Do not end feed antennas which
are multiples of 1/2 wave in length directly from the antenna terminals;
rather, use an external antenna tuner. Refer to "The ARRL Antenna Handbook"
or any other good antenna handbook for antenna constructional information.
To prevent accidental shocks, attach a ground wire to the lower left hand
(Viewed from the cabinet rear) bolt that holds on the largest rear terminal
cover.
2.3.6. EXTERNAL ANTENNA TUNER. 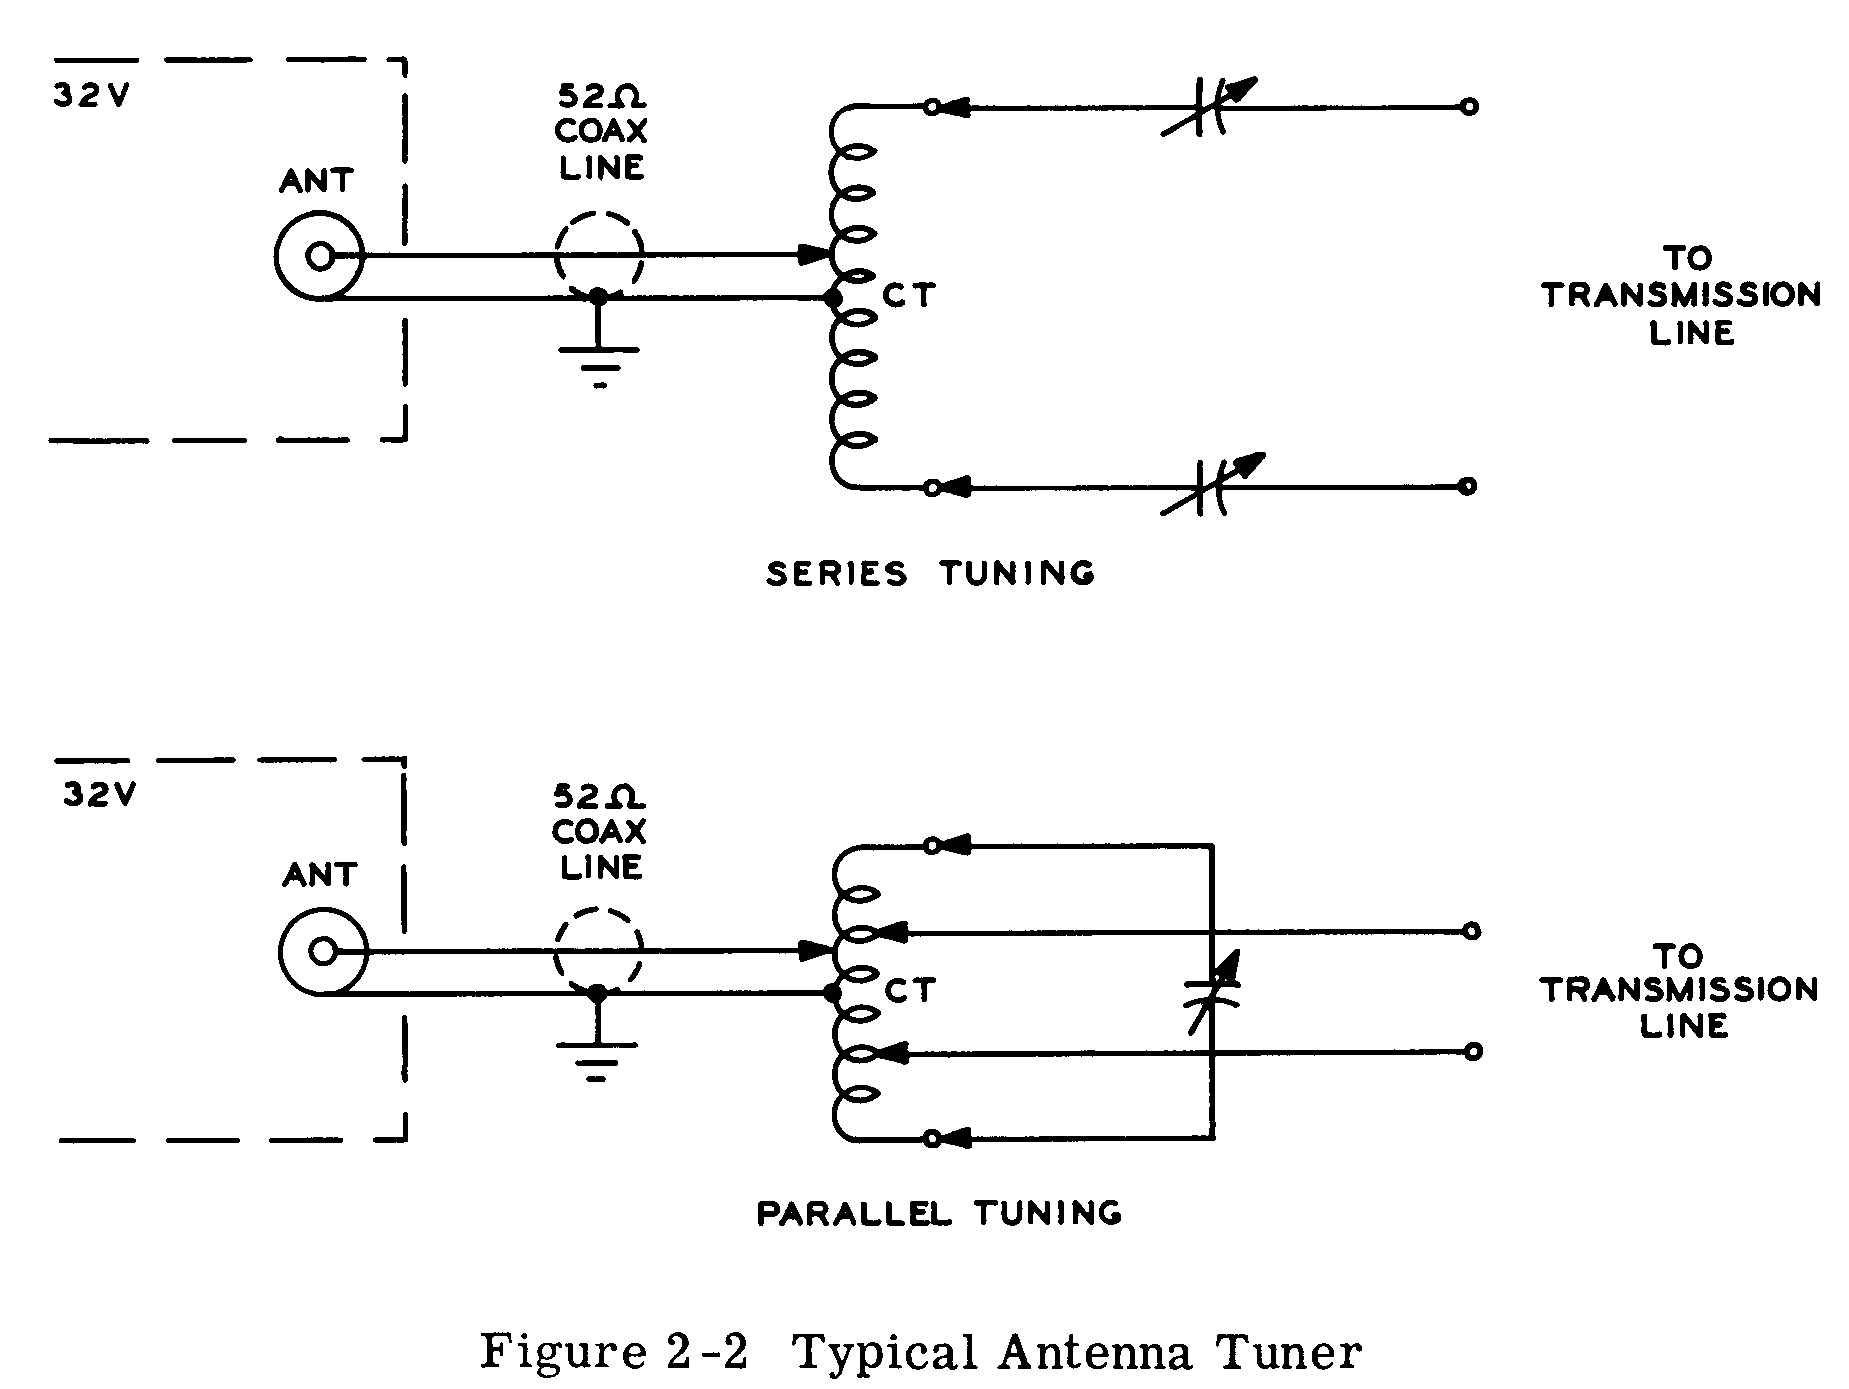 (Not
Available) To feed balanced transmission lines, tuned or untuned, couple
the transmitter to the transmission line through a simple,
tuned circuit. This arrangement will match a wide range of impedances.
It will also add further attenuation to harmonics causing TVI, providing
it is completely shielded.
(Not
Available) To feed balanced transmission lines, tuned or untuned, couple
the transmitter to the transmission line through a simple,
tuned circuit. This arrangement will match a wide range of impedances.
It will also add further attenuation to harmonics causing TVI, providing
it is completely shielded.
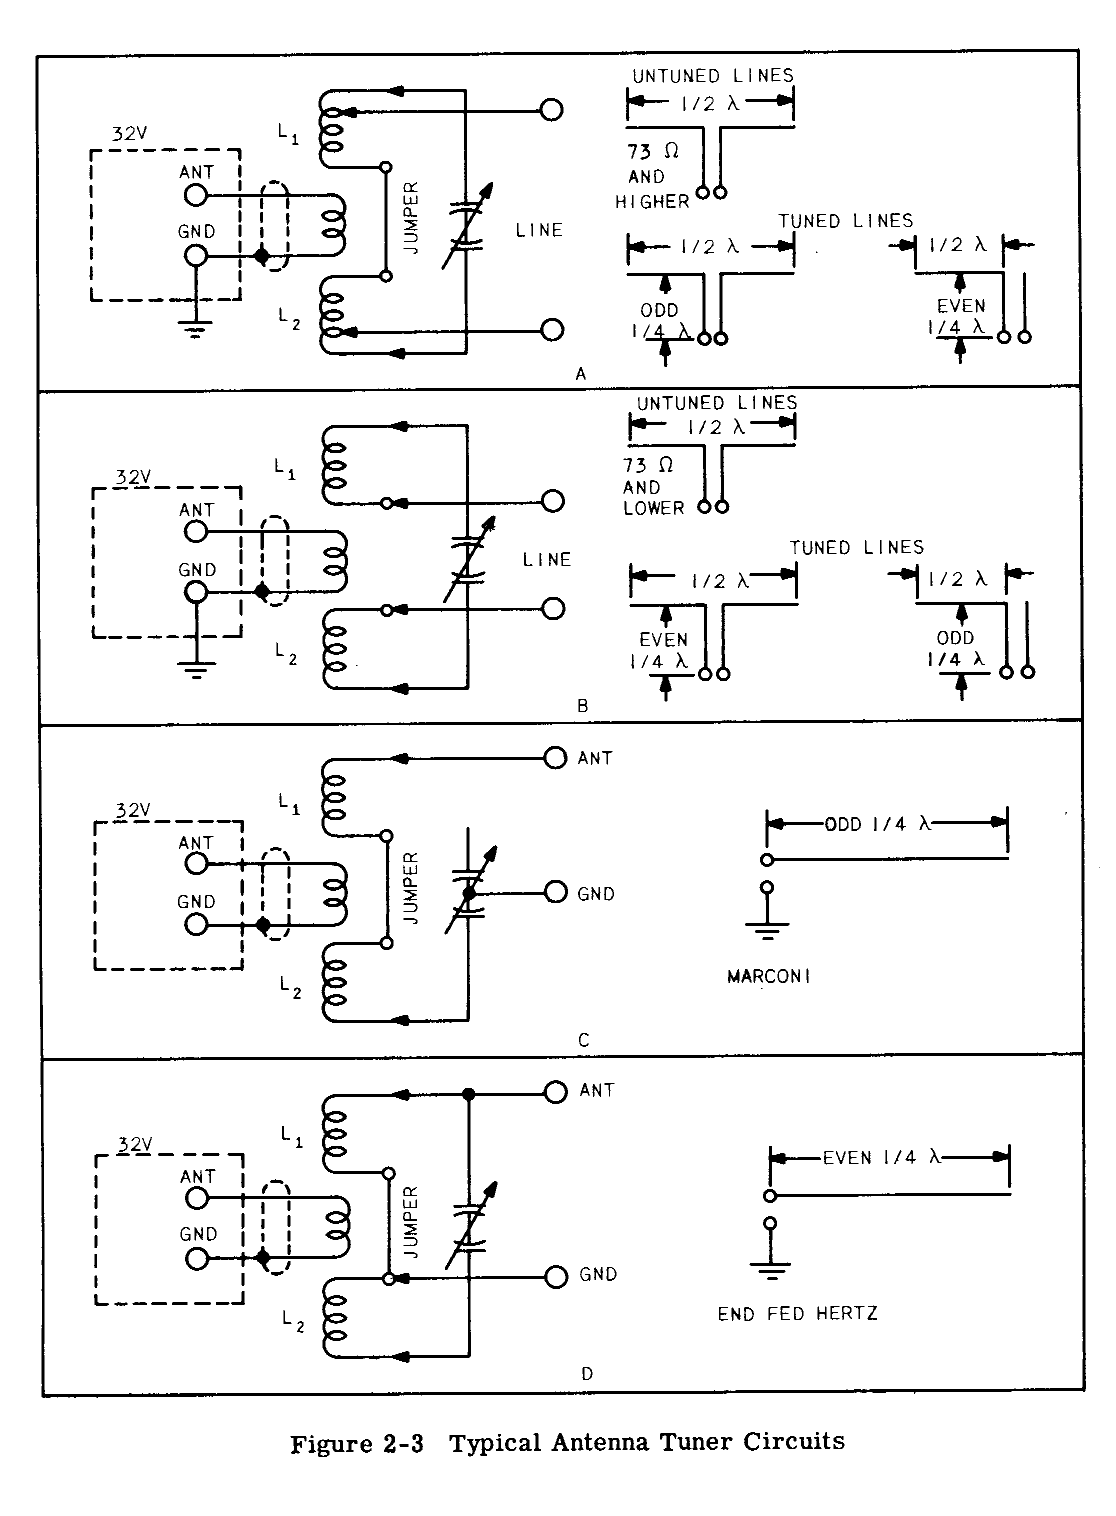 Figure
2-3 illustrates an antenna tuner that will function satisfactorily
in this application. The impedance of the transmission line is matched
by proper choice of taps on the inductances L1 and L2. The coupling link
is coupled as tightly as possible and all loading adjustments are made
by means of the LOADING control on the 32V-3. On the 15, 11, and 10 meter
bands, the number of turns in the coupling coil should not exceed one turn;
two turns may be necessary on the 20 meter band.
Figure
2-3 illustrates an antenna tuner that will function satisfactorily
in this application. The impedance of the transmission line is matched
by proper choice of taps on the inductances L1 and L2. The coupling link
is coupled as tightly as possible and all loading adjustments are made
by means of the LOADING control on the 32V-3. On the 15, 11, and 10 meter
bands, the number of turns in the coupling coil should not exceed one turn;
two turns may be necessary on the 20 meter band.
a. UNTUNED HIGH IMPEDANCE TRANSMISSION
LINE. - If the line has a characteristic impedance of 73 ohms or more,
employ parallel tuning of the antenna coils L1 and L2. For parallel tuning,
close the jumper between the antenna coils. Transmission line taps then
should be set on the same turns as the capacitor taps to start with, varied
toward the center of the coils until proper loading is obtained. In this
type of operation, low values of capacitance and high values of inductance
for the operating frequency generally are best. See illustration A., figure
2-3.
b. UNTUNED LOW IMPEDANCE TRANSMISSION
LINES. - Transmission lines having a characteristic impedance of lees than
50 ohms require series tuning of the antenna coils. This is done by opening
the jumper between the coils and moving the transmission line tap arms
to the inside coil turns. The capacitor taps should set at the outside
turns and varied toward the inside turns until proper loading is obtained.
Higher values of tuning capacity usually work out best in this type of
operation. See illustration B., figure 2-3.
c. VOLTAGE FED TUNED LINES,
- Transmission lines that have high voltage points at the tuner should
be connected and tuned according to specified instructions in paragraph
a, above. These lines should be cut to exact multiples of a quarter wave
in length.
d. CURRENT FED TUNED LINES.
- Transmission lines having high current at the tuner end should be connected
and tuned according to instructions given in paragraph b. above, These
lines should also be cut to exact multiples of a quarter wave in length.
e. QUARTER WAVE MARCONI. - Series
tuning is indicated for quarterwave Marconi antennas. In this type of operation,
connect the antenna tuning circuit so that the two sections of the antenna
coil and one-half of the antenna tuning capacitor are in series. To do
this, place a grounding jumper to the rotor of the antenna tuning capacitor,
connect the antenna to one end of the antenna coil, connect one stator
of the tuning capacitor to the other end of the antenna coil and disconnect
the other stator completely. See illustration C., figure
2-3. In event r-f voltage appears on the cabinet, it can be minimized
by extending the ground wire to 1/2 wave length and series tuning it until
resonance is obtained.
f. END FED HALF WAVE. - This
tuner can be used to tune this type of antenna also. Employ parallel tuning
for this type of operation. Connect the antenna to one end of the antenna
coil, make a ground connection to the inside turn of one of the antenna
coils and close the jumper between the coils. The tuning capacitor taps
should be equally spaced from each end of the antenna coils for proper
tuning at the operating frequency. See illustration D., figure
2-3.
2.3.7. ANTENNA TUNER ADJUSTMENT. - After recognizing the high order
of filtering that it was necessary to incorporate in an amateur transmitter
operating in close proximity to television receivers, Collins engineers
designed an output network to be used in the 32V-3 which should offer a
greet deal of attenuation to high order harmonics. In order to do this,
it was necessary that an additional "L" section filter be added to the
existing pi-section. This new section contributes a great deal of filter
action, but also offers some disadvantages. The first apparent difficulty
noted is the apparent sharpness of tuning on the high frequency bands,
particularly 28 mc, It must be recognized that this is inherent in any
tuned filter where a high degree of selectivity is needed, and the fact
that it does tune so sharply indicates that it is operating properly.
The pi-section network was designed
so that when used with the L section, a suitable range of impedances could
be satisfactorily matched. The extreme cases were tabulated and the resulting
voltages and currents were calculated. These voltages and currents
were of such a magnitude as to not exceed the ratings of the components.
However, when the customer connects the 32V-3 to an antenna system, frequently
the standing waves are of such a nature as to reflect sufficient reactance
so that the assigned endpoints of impedances are exceeded. This may
result in an excess current thru the loading capacitors and subsequent
failure.
However, when adequate precautions
are taken, this problem can be greatly reduced. These precautions may be
described simply by stating that they are directed in such a manner as
to insure a flat 52 or 72 ohm line from the 32V-3 to the antenna tuner.
The tuning procedure is as follows.
Disconnect the coaxial line
from the antenna tuner link and terminate it in a non-inductive resistor
whose value is the same as the Zo of the coaxial line, and whose power
rating is sufficient to dissipate 50 watts or so for prolonged periods.
The transmitter should then be tuned and loaded to the proper point in
the "tune" position. The unit should then be momentarily switched to the
operate position to see that the final plate current reading is correct.
In the event that non-inductive resistors are not available, it is possible
to use a 100 watt lamp and obtain a SWR of about 1.5/1 on a 52 ohm line.
The coaxial line should then
be connected through a series variable capacitor to the antenna tuner link
of one turn on 10, 15 and 20 meters, two turns on 40 meters and three on
80 meters. The antenna tuner is resonated with the transmitter and the
link reactance tuned out with the coaxial line series capacitor. The feeders
should then be moved in equal increments out from the center, with the
tuned circuit resonated, until the same loading condition exists that was
noted with the dummy load. This will set up the desired condition
where the transformation of impedance from the coaxial line is from 52
or 72 ohms to the antenna impedance. If this is done no standing
waves will exist on the coaxial line and the loading capacitors will not
be operated at excessively high values of current.
2.3.8. 35C-2 FILTER INSTALLATION. - If a 35C-2 Low Pass filter is
used, install as indicated in the 35C-2 book. Make the interconnecting
coax lead as short as possible and clean the paint from around the mounting
holes so that the case is well grounded.