Every couple of months I hear from someone who asks what they need to buy to get started repairing their radios or tinkering with projects. I've answered the question enough times that I decided I'd pull together my thoughts here for anyone who's interested.
It's important to understand that one size doesn't fit all. Something that one person finds indispensable might sit unused on another person's bench. Think about what you want to do and don't be afraid to take babysteps instead of rushing in and buying a bunch of expensive equipment.
This isn't meant to be a shopping list that tells you exactly what to buy. Rather, it's my thoughts on what I find useful and ideas about how to go about building your home lab.
I've assumed that you're on some budget, and even if you could rush out and buy everything at once that's not always the best approach. Sometimes you can build simpler gear and save yourself money while you learn. Then, if it turns out that it's something you use a lot, you can refine it or maybe buy a commercial unit.
The advice that's been around for years is, "Buy the best you can afford." Growing up, I borrowed tools from my dad's tool box. He had owned most of the tools for decades back then and still uses many of them today. I tended to buy decent tools, but recently I had an experience that really drove home the value of good tools.
I found a really nice looking set of dikes and needle nose pliers at a bargain store. They had nice cushioned handles and spring returns. They felt good in my hand size and weight wise. And they were only a bit over a dollar each. I bought them and started using them.
About three months later, I began to notice that the dikes didn't cut well. Apparently the edges had dulled and I could also see notches where they didn't meet even though I hadn't cut anything particularly tough. Back out came the Kleins I've used for a decade.
Get a decent set of:
You'll probably also want to get a set of alignment tools, but PLEASE store them away until you've got the proper equipment to do a proper alignment. Tweaking and peaking without things like a signal generator will typically lead to more problems than they solve.
You'll use your soldering iron a lot, so get a good one. Probably something around 35 watts. Make sure it uses iron clad tips--copper tips will pit and wear quickly and are a sign of a cheap iron. A grounded iron is nice and temperature control can be handy at times. I'd suggest getting something like a Weller and building the soldering station found in older Radio Amateur Handbooks. I use a Weller workstation that I got in return for some repair work I did a decade ago. Before that I bought new irons every few months it seemed. The Weller is still going strong.
You might also want to consider a soldering gun (100 watts or 150 watts) for making up antennas and coax fittings. Some people also use a small portable torch for this type of work.
Also get a good set of soldering tools--pick, brush, etc.. Personally I don't like the ones with plastic handles--I've had several sets break. (Although I'll admit in a pinch I still use a wooden toothpick to clear solder pads.) Get a good heat sink or two (believe it or not, I've used the same small heatsink since I was a teen, around 30 years now). Get some solder wick for repair work.
Pick a decent grade of solder and a reasonable size. I've had people write me about difficulties soldering and it turned out the were using coreless solder about the size of 12 gauge wire. I've also seen gear that has had acid core solder used on it, although this seems to be more a problem from years gone by.
A good DMM is almost always the starting point when someone begins to gather test equipment. I've used a variety of makes and models. You probably want to buy a decent one, but even my experience with $15 bargain meters hasn't been that bad. I'd probably watch for Radio Shack to have a sale or maybe look for a medium priced meter from Home Depot, Lowes, or even WalMart.
I will admit that top names like Fluke are worth the money, especially if you expect the meter to see rough use (like tower work). But you generally won't find a more expensive meter drastically more accurate and many times they concentrate on doing a few functions well.
You'll also need a decent collection of parts or you'll find yourself ordering or running to the parts store all the time. A good assortment of resistors, disc capacitors, and NPO caps is important. Also a few 'typical' transistors like 2N2222 and the MPF102.
I won't even try to go into an all inclusive list. Shop around at hamfests or order from one of the suppliers who specialize in ham radio parts (Ocean State Electronics, Dan's Small Parts, etc.) or use one of the bigger suppliers (Jameco, Mouser, etc.).
The other thing I highly recommend is keeping a lab book. Make notes about what you do and what you learn. Staple copies of interesting articles or articles with projects into it. Most people who do this find themselves referring back time after time.
For example, say you build a project--maybe a simple transmitter. When you have it working, copy the schematic and note the voltages you read at various points in the circuit. Also note the power output, operating voltage, and other important characteristics. Years later, if the project doesn't seem to work properly you've got something to refer to without digging through back issues of magazines. And even if you find the article, it's rather unusual for there to be much information about voltages.
Now I'd like to run through my top indispensable items...
I use my o'scope a lot. I can check for power supply hum. I can look for oddities in waveforms. Only a lucky few use to own scopes, but these days you can pick up a decent 20 MHz scope for less than $50 at many hamfests.
I use an oldie but goodie--a Tektronix 7704A. It can do all kinds of tricks and even with a decent assortment of plug-ins and some spares you'll end up spending maybe $250 or so. I have to admit that I really like this scope.
But I'd still recommend considering something a bit lower-end to start with. One thing I've been told is, 'It takes a scope to fix a scope.' So if you upgrade, it's still nice to have a spare in case you need to troubleshoot your main scope.
There are few projects of any kind I work on without using the o'scope at least once...
I mentioned earlier, put the alignment tools away until you have one of these! You can build one yourself, but there are also usually bargains to be had at hamfests. A hobby grade model or an older tube model should work fine. For the most part, simple alignment work or putting together a characteristic curve for a filter doesn't require long-term stability. If you can listen to it on your receiver (set to CW mode) and don't hear a noticeable shift in frequency, then it's probably stable enough.
If you build receivers or want to align a receiver, a signal generator will be indispensable.
One thing you find these days is that surplus crystals have become fairly cheap (under a dollar). Instead of buying a signal generator initially, you may want to built a crystal tester (discussed later) and have a hand full of crystals for different frequencies. You lose some flexibility, but you will have a fairly accurate signal source without the need for a frequency counter.
Sooner or later you'll need to know the frequency of something. There are various approaches to this. You can use a receiver and tune around looking for the signal of interest. You can use an oscilloscope and measure the period of the waveform and calculate the frequency from that. But typically the fastest and easiest way is with a digital frequency meter.
The other thing that a decent frequency meter will do for you is improve the accuracy of the other gear in your lab. You can figure out the frequency coming out of that 50 year old signal generator with a questionable dial calibrations. You can use it with your grid-dip meter. You can use it with a simple crystal oscillator to match crystals for building a filter in that latest receiver project.
Most digital frequency meters can be calibrated. Some hook up test oscillators and beat them against WWV or use other elaborate methods. For most work, I use a CB radio and transmit on a channel and adjust the frequency. CB radios have fairly stringent accuracy requirements and it's fast and easy. For very precise measurements I go through convoluted methods along the lines of those used by old timers in the ARRL frequency measurement contests. These take time, but can get you to a very accurate measurement and are actually interesting if you don't have to do them but a couple of times a year.
If you tinker with antennas a lot, an antenna analyer is a nice piece of gear to have. When I build a new project, I like being able to tune the antenna before I even connect the transmitter to it. It also makes it easy to plot curves for antenna projects that would be very difficult and time consuming with nothing but a transmitter.
It can also serve a lot of other useful purposes. My MFJ analyzer can take the place of a signal generator, a grid dip meter, and a frequency counter. If you're just starting out and looking for a few smart places to put your money, this may make sense.
There are a couple of decent function generator kits around these days for reasonable prices. I'd probably go this route instead of picking up one of the older tube models, but if you can pick up something like one of the BKs at a hamfest, go for it.
If you build or repair receivers, you're likely to use a function generator for troubleshooting and characterizing the audio section. (You can see a curve of the Realistic DX-302's audio response that I put together on my 302 technical page).
They are also handy for a lot of basic lab work. I use them to drive a simple impedance bridge to measure parts and as part of an ESR tester I put together (see the September 2002 issue of QST for details).
This is a safety item. If you work on older tube radios, invest in one! Many old radios didn't have a ground prong and may have a hot chassis. Electricity needs a path if current is going to flow--using an isolation transformer helps keep you from becoming part of that path.
You can buy these at hamfests, although some times they run a bit high. Some people also use back-to-back transformers to do this, although not all transformers have been found suitable. (The theory is that those wound with the primary inside and the secondary outside don't work well in reverse because it's tough to magnetize the core with the secondary. I haven't experimented with this, but what I've read makes me think transformers with adjacent windings where both the primary and secondary are against the core would work best.)
Some call these Dummy Loads. It has been pointed out to me that this device is a dummy antenna, but a real load. Since then I've always tried to keep my terminology correct...
If you do any work with transmitters or transceivers, you'll need a dummy antenna. But just what you need can vary drastically. There are two that see use on my bench.
The first is a low power one I use when working on QRP transmitters. It's more a novelty than anything, but it still sees a surprising amount of use.
The other is one that I built into a meatloaf tin flipped over and mounted on a wood base. It uses seventeen 850 ohm resistors I bought at a hamfest. These have virtually no inductance and I mounted them in parallel on parallel runs of heavy wire. Then I brought in a piece of coax to connect to these wires. I've measured SWR up on 70 cm and it's still well under 1:1.1. Not bad for less than ten dollars worth of parts. As for power, I'm not sure what wattage they are, but they are as thick as a roll of dimes and nearly as long, so I suspect they're good for well over 5 watts continuous. I've operated the load with 100 watts in for minutes at a time without any issues (or burning smells).
This is definitely one of the projects I suggest you consider building for yourself. If you look at used dummy antennas, I'd avoid older oil-filled ones. You don't know what kind of oil was used or what kind of shape things are in inside. If something has corroded, performance will suffer. And over the years there have been a lot of chemicals that went on the list of things we probably shouldn't have tinkered with. Why risk it?
You need to peak one of the LOs in a receiver you're working on. Normally you'd hook up the scope and tweak away, but the LO is up above 50 MHz on your superdupper triple conversion rig and your scope is good to 20 MHz.
The fastest and easiest way to measure these levels is with an RF probe. There's been a design in the ARRL Handbook for years. There are slight changes for modern 10 megaohm digital multimeters (compared to the older 11 megaohm vacuum tube voltmeters), but they are very straight forward.
Old RF probes often draw what seem like outrageous prices when you consider there's a buck worth of parts in there.
There are some precision RF probes and RF voltmeters. These might be worth considering down the line, but they are probably more than you'll need starting off (or even thirty years down the road like me).
You'll probably use your digital multimeter for virtually all your measurements, but there are situations where an analog meter is nice.
I have a cheap 20,000 ohm per volt analog meter on the bench all the time. I like to use it for testing batteries and I use the ohmmeter for measure low value resistors. It's probably more of a habit than any real need.
The time I do consider it a necessity is when I'm aligning a receiver. If you don't have AGC, the most common alignment method is to use an AM signal from an RF signal generator and tune for maximum output. I use the analog voltmeter (rather than my ears) to figure out when I've hit the peak.
I also have two old RCA Voltohmists (one is the big meter face I always longed for when I was browsing catalogs as a kid, the other is like the one my dad had and that I used while I longed for the other one growing up). I use the VTVM with an RF probe when I need to measure RF voltages. The analog meter makes it easier to peak sections than it would be with a digital meter and the 11 megaohm input impedance keeps it from loading most circuits.
Nostalgia and habits aside, I'd suggest picking up a low price VTVM that's in decent shape when you browse the hamfest. You can often find them for $10 to $20.
Some way to measure the value of a capacitor or inductor is important. Many times you'll see old LCR bridges with eye-tube indicators at hamfests for a song. For many hams who measure a component or two at a time, this may work fine. Solid state LCR bridges with an analog meter are a bit more expensive, but tend to go a bit faster.
I build a lot of projects with parts from my junk box, hamfest grab bags, or pulled out of carcusses of old gear. Nothing is more frustrating than building something, having it now work, and eventually finding one of the components you used was bad from the start.
In fact, I find a fair number of bad parts in kits I build. My experience has been that once in every two or three kits I build (with roughly a hundred or so parts in a typical kit), I get a bad component. The most common bad components are diodes and capacitors.
Because of this, I measure every capacitor I put in projects. I recently bought the AADE LC meter. This is a nice meter and I don't hesitate recommending it. But I would say it probably isn't one of the first dozen pieces of gear you need to buy.
A regulated supply is nice, but typically won't handle a lot of current. In addition to your variable power supply it's nice to have a regulated 13.8 volt supply for the bench. You can usually pick up one good for several amps at a reasonable price if you shop around the hamfests a bit.
I've actually only had to use this a handful of times over the years, but when you need it, you need it. There are some computer programs floating around that can generate a two tone signal. If you get deep into building or repairing sideband gear, you'll eventually need one.
I can keep my terminology straight on dummy antennas, but it doesn't sound right calling the audio equivalent a dummy speaker...
If you do much receiver alignment, it's nice to be able to use your analog meter across an audio dummy load instead of having to listen to the screech of your alignment tone filling the shack. An audio dummy load is nothing more than a hefty resistance typically of around 8 ohms. I took a alligator jumper, cut it in half, and soldered these ends to a large 8 ohm resistor. This lets me clip it into place easily. It also makes a handy way to test power supply regulation since it's fairly low value resistance that can handle a fair amount of power--clipped across a 12 volt supply you'll draw about 1.5 amps.
It's also handy to have a test speaker that can be wired into circuits you're testing. On low cost general coverage receivers it's not unusual for the speaker to be built into the upper case. Many times it's easier to clip in a test speaker than to arrange things such that you can use the built-in speaker.
This is one of those things that's handy to have and easy to build. You can buy simple audio amplifier kits for under $10 from a lot of places. Mount it in some type of housing and maybe even use the same housing for a speaker that can be used separately and your audio dummy load.
Build a demodulator probe and you can follow an AM signal as it goes through the radio and find where the problem is if the signal isn't making it to the radio's speaker.
If you build a 1kHz square wave generator (using something like a 555 timer chip) in the same enclosure, you've got a way to do signal injection as well as signal tracing.
Let's say you need to use a voltage divider to get a meter to read accurately. You can calculate things out and plug the calculated value into the circuit, but what if it's not accurate?
One common trick is to put a value slightly larger than you think is needed into the circuit, and then add relatively large resistors in parallel with it until you bring the combined resistance down to the desired value.
Doing something like this is easy with a resistor substitution box. You just clip the box across the circuit and try values until you find one that works.
You can do the same thing with a variable resistor, but resistor substitution boxes can be bought in kit form for very reasonable prices and they are often found at hamfests for a bargain.
One warning about used substitution boxes, it's not unusual to find those that have been used in labs or educational setting to have a few resistors burned out or inaccurate because of abuse. Fixing them is easy, but always check before you plug it into a circuit.
All of this also applies to capacitor substitution boxes.
If you do much receiver work, a step attenuator is a handy piece of gear to have. For example, what do you do if you want to calibrate an s-meter to read S9 at a particular level?
Typically S9 is so weak in terms of things we deal with in the lab that it posses a challenge. But, with a step attenuator I can use my signal generator, sample it into an oscilloscope, and then feed it into a step attenuator. If I want something like an accurate 100 microvolts, I can pull a 100 milliamp signal from the signal generator and then attenuate it by 30 dB.
For years I used a variable attenuator that I bought at RadioShack and that was designed for use with a television. I bough some F-connector to BNC adapters to make it easier to use. Even though it was designed for 75 ohms, I never had any trouble using it with 50 ohm gear.
Building a step attenuator is fairly easy, but careful construction is necessary if you're going to use it up into the VHF and beyond range. If you buy one used at a hamfest, check it over carefully. I have yet to see a used step attenuator that doesn't have some issues with at least certain settings.
You might also want to have some fixed attenuators around the shack. I have several of these that are capable of handling much more power than a typical lab step attenuator (usually rated around 100 mW). Being able to step 10 watts down 3 dB, 6 dB, or 12 dB is handy when you're working with outboard amplifiers or transverters?
They say if you have one clock you always know what time it is, if you have two you never know for sure.
Wattmeters are similar. It's rare to find two that measure exactly the same. You can use an o'scope, a calculator, and a bit of patience to check the calibration.
If you're determined to know what power you've got coming out with a high degree of accuracy, you probably ought to spend some money on a good wattmeter.
I have several meters that I use. My MFJ antenna tuner has a meter built in and I have an old Siltronix meter I like (because it's large and easy to read). I also have a tiny power/SWR meter designed for the CB market that I use a lot when I'm operating portable and a homebrew NoGAWatt meter that I use for more accurate QRP measurements.
One thing to watch out for is that most older meters will read average power. For CW work, average and peak power are the same. But if you use SSB, it is typically better to talk in terms of peak power. There are equations to convert back and forth, but these equations make some assumptions about the signal. Brush up on this in the ARRL Handbook or you'll likely find yourself wondering why everyone else gets more power out of their rig than you do.
One of the things I plan to do some day is convert the Siltronix meter to read true peak power. There are details on how to do this (for a Heathkit meter) in the technical articles found on the ARRL website. I don't operate sideband a lot so I haven't felt compelled to make the conversion yet, but it would be interesting to be able to read true peak power at some point.
Over the years, I've owned several transistor testers. Early on I use to buy bargain packs of transistors and test them before I used them. These days I don't do much of that. I do still test most transistors that come in kits before I install them. I haven't found a bad transistor that I can think off in the last few years.
When I'm repairing something, I'll check the voltages around a transistor. If they look suspicious, I usually just cut the transistor out of the circuit and test it. It's also easier to check all the bias components with the transistor removed. Different people troubleshoot different ways, this is just the way that seems to work best for me.
Older cheap transistor testers aren't very valuable. They were designed more to measure certain static characteristics of a biased transistor. Most modern testers make the transistor actually do something (i.e., oscillate). Personally, the combination crystal tester and transistor tester found in the ARRL Handbook for years is one of my favorite designs although I haven't built one.
Okay, I rarely use my transistor tester so you'd think I'd use my tube tester even less. But, surprisingly, I actually use it more.
Many of the tubes I use come from hamfests, so I usually test tubes before I ever use them. Also, when I'm working on a piece of tube gear it only takes a few minutes to pull a tube and test it (whereas doing the same for a transistor involves removing a circuit board and unsoldering the leads).
I will be the first to point out the old addage that, "The best way to test a tube is with the circuit you're going to use it in." I've had gear with problems where a particular tube tests good, but after swapping out that tube it suddenly springs to life. I've had other gear that seems to work just fine even though the tubes test bad in my tester.
I wouldn't spend a lot of money on a fancy tube tester, but I got a nice one for about $35 and it lets me at least have some idea about a tube's state.
The crystal tester I use these days was one of my early "Manhattan Style" construction projects. It's built into an Altoids tin and is powered with a nine volt battery.
I've got crystals that aren't marked that I need to test. Other times I need to match a couple of crystals from a batch for something like a crystal filter. On older crystals I need to figure out whether they even work or not.
The other thing I use it for is on old tube transmitters I can connect it like a VFO and use the tiny crystals widely available today. The nice thing about this is it tends to eliminate chirp since the oscillator is always on and separate from the transmitter.
For a long time, I used a half constructed Tuna Tin 2 transmitter as my crystal tester. When I got around to finishing the project, I needed something else.
If you do much homebrew work you'll probably want to build a crystal tester at some point.
Conventional wisdom has it that the best way to fire up an old piece of gear that hasn't been powered up for a while is to slowly bring up the voltage using a variac.
Some people disagree with conventional wisdom and I'll admit I don't turn bringing a piece of gear up into a two day ordeal, but I will bring a piece of gear up slowly over an hour or two period some times.
There's a couple of reasons to do this. If something is going to "pop", this can minimize the impact. For example, an old electrolytic capacitor may fail well below it's rated voltage if it has dried out. Older caps also needed to be "reformed" sometimes and bringing up the voltage can allow this to happen.
I know people who lost hard-to-find transformers in old gear because of power supply faults. Bringing the voltage up slowing and watching the current can help prevent things like this from happening.
Some people use a light bulb in series with the radio to protect it from faults. Variacs have actually gotten cheap enough the last few years at hamfests that I'd suggest anyone who works on older gear consider purchasing one.
And when it comes time to fire up that old rig you bought (that the seller "thinks it works sorta"), do some research on the web about how to best bring it up.
IMPORTANT NOTE: The light dimmer from Home Depot is NOT a variac. These work fine for controlling a light bulb or even a soldering iron, but never connect one to a radio. They don't reduce the voltage. Instead they "chop off" part of the sine wave. Feeding this into a transformer can cause all kinds of problems.
Just about all modern gear has microprocessors, memory chips, MOSFETs, and other devices that should be worked on in a "static free" environment. I use an anti-static work pad on the bench most of the time. It makes a nice work top and can be replaced easier than wood if it gets pitted with solder burns and such. I also have an anti-static wrist strap and a soldering iron with a grounded tip. If you're going to work on the more delicate parts of modern gear (or on computers and such), I'd suggest springing for these types of items.
IMPORTANT NOTE: Don't just "ground" yourself! Most static wrist straps actually have what we would normally consider a fairly high resistance (maybe a megaohm or so) to ground. This is done for safety reasons. Also, anti-static mats are also resistive, so it's not like setting a circuit board on a piece of copper. I have seen "homebrew" straps and benches, but my personal feeling is that these can be dangerous and I'd recommend getting the real thing if you're going to do this time of work.
I'm an ESR evangelist--I just want to be up front about that...
I wrote an article about ESR and a way to test and measure it that appeared in the September 2003 issue of QST. I won't go into the details what it is here, but read a bit on the web if you're not familiar with it.
Bad electrolytic caps are one of the most common problems--and sometimes one of the most difficult to diagnose. A capacitor can measure fine in terms of its value and pass little leakage current, but still not function properly. An ESR tester will quickly find these troublesome components.
An ESR adapter is easy to build if you already have an o'scope and a function generator (see the QST article I mentioned). I was first shown how to test capacitors this way as a teenager by an audio repair tech that worked next door to the store where I was a computer repair tech.
Until about five years ago, I never realized that what I was testing was ESR. Once I found that out, I came across dedicated ESR meters. I eventually bought one for work and have been using it ever since. I've also noticed that a fair number of computer repair shots and virtual every television repair shop has one these days.
Not everything above needs to be one box = one purpose. I mentioned the antenna analyzer can often be used as a frequency counter and/or a signal generator. Also, the transistor tester I mentioned from the ARRL Handbook also works as a crystal tester.
Or an improvised ESR tester can be put together from an o'scope and a function generator.
That's one reason I suggest you spend some time thinking about what you want to be able to do and then consider some basic 'building blocks' that will let you do that. It may take some cables or an adapter here or there, but I'd save the big investments until you're pretty sure that you'll really use that fancy piece of test gear as much as you think you will before you plunk down your money.
Used gear is usually cheap compared to new gear. Some of my nicest gear was purchased after it had seen thirty years of lab use. But a lot of it also had issues which is why it was retired and they bought something new.
Spending time fixing your test gear can be frustrating, especially if you haven't done a lot of troubleshooting and you don't have much gear beyond the gear that's broke to troubleshoot with.
Simple gear you build yourself is often less frustrating that a precision piece of test equipment with a problem. Trust me, if it was easy to fix the guy who maintains the lab gear would have just fixed it instead of retiring the equipment.
So my advice started out would be to build the $15 function generator kit instead of spending $50 on that nice signal generator that has some 'minor' issues.
But down the road, it's nice to have quality test gear. The thing is that you don't have to pick it all up at one time or spend a fortune on it. I highly recommend is that if you're going to pick up used gear 1) buy the best quality gear you can find at affordable prices and 2) make sure that documentation (including schematics and service information) is either included or available on the Internet.
Until a few months ago I pretty much prided myself on not having much invested in my test gear even though I had a decent setup. A while back I was lucky enough to come across a guy who deals in used test gear at very reasonable prices. The only catch has been that while it wasn't too expensive in dollars, it has been time consuming getting some of the minor bugs worked out of the gear, calibrating it, etc.. But below is a picture of my bench as it is today.
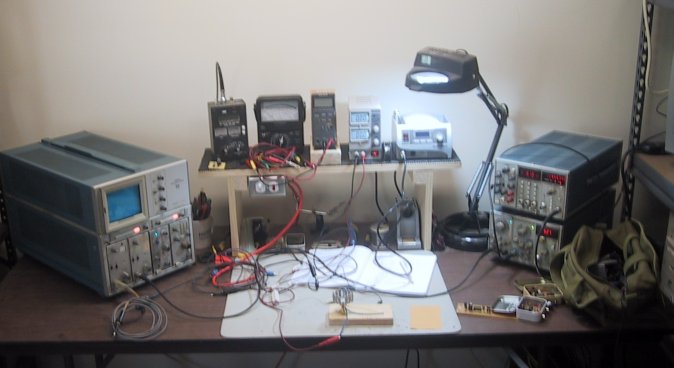
Things have changed a bit since I wrote some of the stuff above and I'm very happy with the setup. The Tek 7704A scope on the left can go up to 100 MHz with no problems with the plug-ins I typically use. One of the horizontal bays has a frequency counter so I can measure the frequency of whatever waveform I'm triggering off of while the other has the time base. I also have a Tek 7514 that's on the shelves off to the side. It's more for backup and for things that need X-Y display.
Across the back of the bench (left to right) are my MFJ antenna analyzer, a FETVOM analog meter, a DMM, a variable power supply with digital meters (up to 18 volts at 1.5 amps), and the control portion of a Radioshack soldering station (the iron itself is just below in a cradle on the bench top).
To the right are a pair of Tek TM503 frames. The top frame holds (left to right) a PS503 dual variable power supply (up to +/-24 volts at 400 milliamps), a DM511 digital multimeter, and a DC508A frequency counter. The bottom frame holds an FG501 function generator, an FG503 function generator (two function generators so I can generate a sawtooth wave off the FG501 and sweep the frequency of the FG503), and an SG503 constant level signal generator (good to 250MHz, although the top band doesn't work so mine only goes up to 100MHz at this point).
One the bench is a temporary lash-up where I'm testing a keying circuit that will eventually be used in a low frequency transmitter. Notice the lab book--trust me on that one, if you don't keep one there will come a time when you wish you had.
There is a florescent light fixture above the bench and a lighted magnifying lamp on the bench. You can also see a switch with a pilot light just below the analog meter. This is fed by an isolation transformer that is under the bench (and a variac if needed). The switch has the pilot light so I can easily tell if power is on to whatever I'm working on. I try to unplug things generally, but at least with this set up there's no excuse for at least not hitting the switch. Out of the switch is the tail end of a three prong extension cord that whatever I'm working on can be plugged into.
The olive canvas bag on the right side of the bench holds my commonly used handtools. The shelves on the right hold a computer (an oldie, but it can call up PDF manuals or play MP3s while I work), the Tek 7514 scope I mentioned, several other power supplies (for higher voltages and currents), resistor and capacitor substitution boxes, an ESR meter, my AADE L/C meter, a couple of other digital and analog multimeters, and a bunch of other odds and ends.
It's a nice setup. But, trust me, I've made do on a kitchen table using test gear that I'd scrounged or built. Nice test gear doesn't always let you do something you couldn't do before, but it usually makes it easier. But I don't think I'd be half as effective with the gear I've got now if I hadn't struggled through those early steps that forced me to really understand how my gear worked, what it could do, and how you could make do. So the bottom line is, don't be afraid to start modest. It's probably a good thing in the long run.
Copyright © 2009 by Jim McClanahan All rights reserved.
All trademarks and brands are the property of their respective owners.