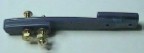
Original TFR Paddles by W4ED . Key to this paddle
(pun intended) is the plastic spring material. Spent
a year trying out various samples, finally found a keeper.
It's a plastic picnic/party knife sold in bags of 24,
marketed by Sovereign, Fedralsburg, MD.
Goals for this paddle were: rugged, light weight,
cheap.
Older one is about 2 ounces, new one below is 1 1/2 ounce.
It can be built in a few hours with simple hand tools,
collecting parts takes longer !
 Click to expand
 Click
to expand
Click
to expand
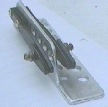
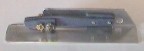
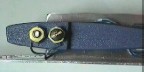
A look from the other side.
 Click
to expand
Click
to expand
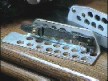
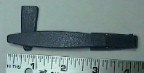
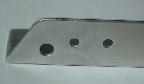
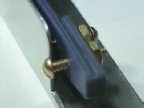
Closer look at business end of W4ED TFR CW paddle.
 Click to expand
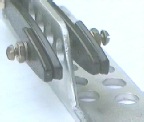
Last, a top view of contact gap adjusting
screws.
 Click
to expand
Click
to expand
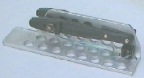
Here are the steps I took in building a TFR single paddle.
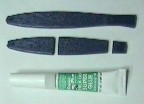
First, collect the parts... (B/M not done yet, sri)
 Click
to expand
Click
to expand
Next, cut spacers to length 1 1/2" each from one
of the two plastic knives, keep the scrap.
 Click
to expand
Click
to expand
Then Super Glue aft spacer under main paddle. Length from
left paddle tip to aft spacer sets stiffness. 2 3/4" shown
gives
medium stiffness, while a shorter length will be stiffer.
 Click
to expand
Click
to expand
A closer look at the aft section. Be careful to place plenty
of glue at the 2 3/4" mark since it is the area that sets
paddle side-to-side stiffness.
 Click
to expand
Click
to expand
Now, glue front spacer on top of main paddle. Goal here is
to
align the spacer exactly on top of the main paddle. Also use
just enough glue for good coverage, but not too much.
 Click
to expand
Click
to expand
Next is a busy step. Trim front tip of spacer (and paddle) back
to
a length of 1 1/4". Trim aft spacer (and paddle) to 1 1/8".
Using the
drill bit that came with the 6-32 tap, drill four holes. Starting
from the
front tip, center each on the paddle, place 1st 5/8" from tip. Place
2nd hole 7/16" from 1st one. Measuring from the aft tip, place
3rd
hole in 1/4" place last hole 5/8" from 3rd. Use 6-32 tap to
cut threads
in each hole. This plastic can break a tap, so back out the
filings as
you go, and don't rush it. Each tapped hole will be through
two
layers of plastic. Insert two sets of 3/4" screw, washer,
and nut as shown. These screws could be knurled thumb screws,
if you really like to tweak, and can find them !
 Click
to expand
Click
to expand
In this step, the 1/16" x 1" aluminum angle is prepared. I
used a
hack saw and medium file to cut the shape. Overall length
is 5 3/8"
Front set-back is 1 1/2". Top of aft taper is 1/2".
Drill holes after
shape is finished. The two holes that secure the aft spacer
are
tricky and will be oversized. Use a 3/16' or 5/32" drill bit
and you
may still want to "stretch" the holes horizontally.
Place the paddle with front screws in final its position.
Scan ahead if not sure, then come back here.
Then mark the aft spacer holes on the angle aluminum.
Try to leave a small gap (1/32") between 1st front screw and
vertical set-back. Drill two holes as just marked. Drill
1/4" hole
for stereo jack about 3/4" from aft and up 3/8". This hole
location
is not critical, but do check for clearance with paddle.
 Click
to expand
Click
to expand
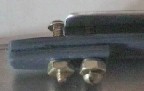
Closer look at flip side, aft holes.
 Click
to expand
Click
to expand
I enjoy this step the most. Using two 3/8" 6-32 screws,
mount the paddle onto the angle base.
 Click
to expand
Click
to expand
Closer look at 1st front screw gap.
 Click
to expand
Click
to expand
Another look at 1st front screw.
 Click
to expand
Click
to expand
Solder two 5" insulated wires to 1/8" stereo jack.
 Click
to expand
Click
to expand
Mount the 1/8" stereo jack. Run wire pair between paddle and
angle aluminum. Cut wire for comfortable single turn around
front two screws, one each. Strip about 1/2" insulation, then
form an inverted 'U' with the bare wire. Place the 'U' wire
between the washer and plastic paddle. Try to keep the wire
out of the 6-32 threads, it can bind making contact
adjustment difficult. For adjustment, turn each front
screw for the contact gap that gives best feel, for both
sides. Then tighten the nuts. It may take a little re-adjustment
to find the best feel. A far as stiffness goes, making the
paddle
swing softer can be done by weakening the area where the main
paddle meets the aft spacer. This can be done by drilling a small
hole through the main paddle, 3/8" in front of inboard aft screw,
and enlarge as need. To make it stiffer, need to start
with
a new main paddle and decrease the 2 3/4" length, thereby
thickening the area where the main paddle meets the aft spacer.
This design was not driven by adjustment of side-to-side
spring stiffness, instead, was driven by finding a plastic
material that would give a good medium feel (imho), as is.
 Click
to expand
Click
to expand
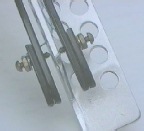
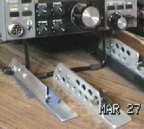
That's it. Done. Here is my latest one, ready for action.
 Click
to expand
Click
to expand
Since it is so light, it will need more than its own gravity
to hold it down. The set up above works because
the
weight of the K2, pressing down via left bracket, pins the
TFR paddle in place. Under the paddle is a special material
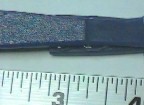
that makes all the difference. Sold as "Magic Cover GRIP",
a non-slip liner, was found at the local grocery. Also have
used a small C-clamp, placed just aft of the stereo jack.
These paddles are what I use for CW. I switched
over
from a Vibroplex bug at home , and could not send fast
(or well) enough in the field with a straight key. Just
what I needed, and the price was right. CUL HF CW.