Disclaimer: The inclusion of the recommended products are not an endorsement of these manufacturers or their products. It is purely that these particular recommended parts happen to fit together as if made for each other, therefore making for a very simple assembly of this reactor design. No formal endorsement is expressed or implied.
The image to the right shows a drawing of the completed unit. The unit will work with DIY yeast systems, or the more complex pressurized CO² systems commercially available. The primary purpose of this reactor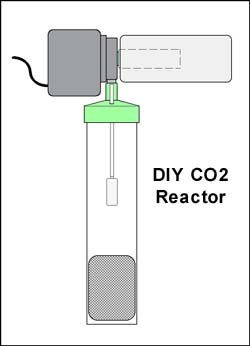 is to allow CO² to be thoroughly dissolved into the water. This is accomplished by injecting the CO² into the reactor, and keeping it contained in a chamber with a high flow rate of water. This is an active system, which means it brings water under pressure to the CO² instead of simply allowing the CO² to passively meet standing water, as in a diffusor with scintered glass. It also is much less prone to clogging like the aforementioned diffusor. The system prevents CO² bubbles from escaping the tank before being dissolved; meaning nearly all the CO² you inject gets dissolved.
By having a large foam pad over the inlet for the powerhead, instead of the usual inlet basket, the unit doubles as a foam filter. This also prevent clogging of the pump impeller and keeps the mesh pillow at the bottom of the reactor chamber clear from debris. If debris was allowed to collect on this pillow, flow would be impeded and the CO² would have a difficult time getting into the reactor due to back pressure in the chamber. A check valve on the CO² line is therefore a requirement. I have determined that this foam filter would be sufficient to supply all the filtering needs in a heavily planted tank, with a moderate fish load, of up to 30 gallons. No other filtration would necessarily be needed.
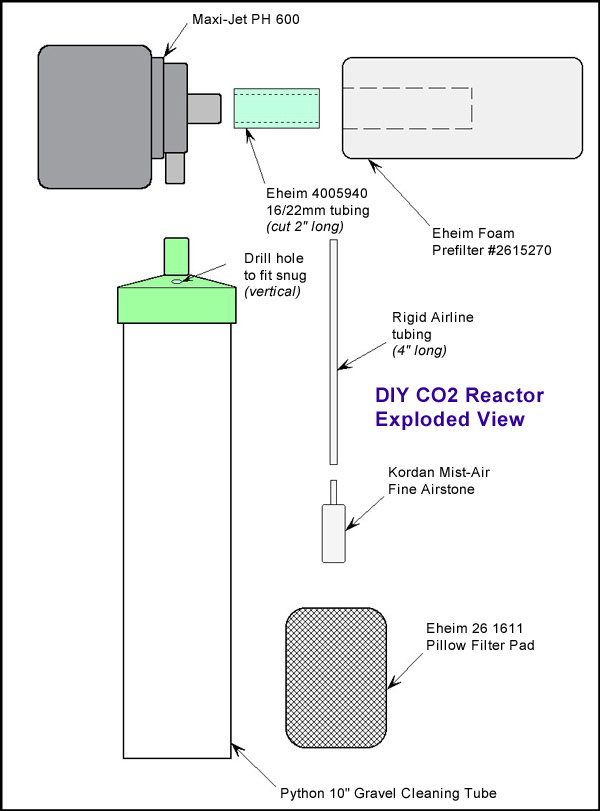
The pump is a standard powerhead, a Maxi-Jet PH 600 manufactured by Aquarium Systems. This unit sells on the web for about $14 and is used to pump water into the reactor chamber and as the filter. 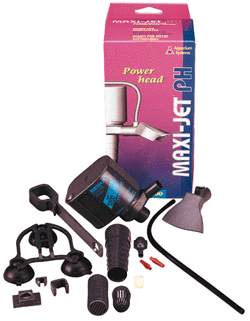 It delivers a flow rate of about 160gph, which in theory would pump the water of a 55 gallon tank twice every hour through the reactor chamber. Most of the Maxi-Jet's supplied accessories are unused except the suction cups used to attach it to the tank wall. The pump itself will be used unmodified for this application. The Maxi-Jet 600 PH pump and power head includes an innovative triple-suction cup mount which is sufficient to hold the entire reactor in place inside your tank. It is a fully submersible powerhead and the only items that need to be fed out of the tank will be the AC power cord for the powerhead, and the CO² supply line.
The design of this powerhead is of a very simple three piece construction. A simple twist of the inlet/outlet flange, and the impeller simply pulls out for cleaning or replacement, if necessary. The unit also has, as an option, a basket and foam filter which could be used instead of the foam filter I will recommend shortly. This foam prefilter is not as large, nor will it supply the amount of filtration as the foam filter used in this reactor design. It could however be used on tanks that already have a pre-existing filtration system. Either way, a foam filter of some kind should be used to prevent the powerhead, or especially the chamber pillow, from clogging with debris. Since the foam filter is on the top of the unit, it makes it easier to remove, rinse, and reattach. If the chamber pillow gets clogged, because a prefilter is not used, the entire reactor would have to be removed to gain access to the pillow, which is located at the bottom of the reactor chamber. In short, make sure you use some kind of pre-filter on this reactor.
The foam filter used in this design is an Eheim prefilter that was supplied with my Eheim 2227 wet/dry filtration system. The Eheim part number is 2615270. It is a cylindrical foam filter that fit snuggly over 1/2" tubing. I cut a piece of tubing (again supplied with my Eheim filter) approximately 2" in length. This slips snugly over the inlet pipe of the Maxi-jet powerhead. The foam prefilter is then slid onto this tubing. That's it!
The next item is the device for the reactor chamber itself. If you haven't figured it out already, its a gravel cleaning tube. This specific one is from the Python Products  No-Spill water changer system. These tubes cost about $10US. This particular one is the 10" version. The tube is a clear plastic and the flange at the top is a softer more pliable plastic. Take this flange and remove it from the tube. On the top, halfway between the outer edge and the hole for the tubing, drill a small hole to fit the rigid tube that will be inserted for the airstone and the inlet of CO². This can be done by twisting a drill bit between your fingers. Make sure this hole is drilled perfectly parallel to the clear plastic tube walls. The diameter of the hole will be determined by the particular rigid tubing you use. Make sure the hole is slightly smaller than the outer diameter of the tubing chosen, so as to assure a very tight fit. More on this later.
What I liked about this tube (and by the way, what gave me idea for this reactor) is the fact that the flange on top is slightly conical. This is advantageous because any bubbles that may rise to the top of the reactor chamber are forced back into the center and into the flow of water coming from the pump. The inlet at the top also fits snuggly over the outlet of the Maxi-Jet 600's outlet tube, without the use of any adapters. It is soft and pliable enough that it will not be split when pushed onto the powerhead.
Next I found that if a fine airstone is used the efficiency is increased. I choose a Kordon Mist-Air Fine airstone, item #62503, which I highly 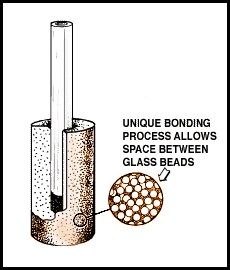 recommend in this application. One of the things I have found with airstones in general when using them with CO², is that the acidic environment tend to make airstones disintegrate quickly. The Kordon Air-Mist stones do not exhibit this problem. Also the fine airstone produces very small CO² bubbles. There is a medium airstone from Kordon that produces bubbles the same size in fresh water, but the added back pressure in the fine stone helps in the regulation of yeast based DIY CO² generators. It sells for about $3US.
These stones are of a glass bead construction. If you use this airstone make sure you get a stiff plastic tube that fits over the airstem. The airstem has an outer diameter of .195" and you must have a tight fit. You probably can get ¼" rigid tubing from your LFS. You need about 4" in length. Once you get this rigid tubing, drill the hole in the Python tube flange slightly smaller so the tube fit very snugly. I recommend you start with very small drill bits and work your way up in size until you get the right, tight fit. If you do this, you won't have to resort to adhesives like silicon. In addition, do not attempt to use silicon or regular airline tubing. Once the pump is turned on, an airstone dangling from the end of a piece of soft airline will rattle around inside the reactor and make quite a racket. Go for the stiff, rigid tubing.
Next, in order to keep the CO² bubbles from blowing out of the reactor chamber, an Eheim Filter Pillow. This particular one was used in the Eheim 2211 cannister filter as a course filter and a media separator. The Eheim item number is 26 1611 and it is available. 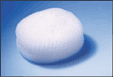 It is a course, stretchable, nylon webbing tube rolled-up into itself to form a pad. Take this and insert it into the bottom of the gravel tube. Any material that is like course webbing will work, this was simply convenient for me. Do not use a foam pad, unless you can see through it easily. Foam pads will clog, mostly with nitrifying bacterial growth, which will inhibit out-flow of the reactor. This may lead to excessive back pressure problems on the CO² supply, especially when yeast generators are used. So use something very course, and that fits snuggly into the reactor chamber. Otherwise, it may be blown out of the bottom of the tube. This Eheim pad works great if you can find it. I will give a list of online dealers who have it (and the other parts) in stock, as of this writing.
Lastly, it is recommended you use a check valve on the CO² line leading to the reactor, especially if you use Yeast generators. Make sure you use plastic ones or types specifically made for use with CO². If you don't they may fail over time due to the corrosive nature of carbon dioxide.
Below is an exploded view drawing of the Reactor. It gives you a better idea, visually, of how it all goes together.
Here is a parts list and a list of online places that stock these products. Remember, many if not all of these items can probably be found at your LFS, as well.
| Manufacturer | Description | Item Number | Dealers |
| Eheim | Prefilter | 2615270 | That Fish Place Big Al's |
| Eheim | Tubing 16/22mm | 4005940 | That Fish Place Big Al's |
| Eheim | Course Pillow Pad | 26 1611 | Big Al's Do search under "2211" |
| Python Products | 10" Gravel Tube | 13-D | That Fish Place Big Al's Python Products |
| Aquarium Systems | Maxi-Jet PH | 600 | That Fish Place Big Al's |
| Kordon | Mist-Air fine airstone | 62503 | Big Al's |
Aquatic Plants Forum