VK5CU'S Home Page


An easy D I Y method of making professional looking PCB's.

Updated April 10th 2006
 

History

Back in 1969 when I attended a meeting at the Morrabbin and District Radio club the guest speaker was Harold Hepburn VK3AFQ. He gave a very interesting and informative talk and demonstration of designing and making a printed circuit board. His example was a 2-meter pre amp circuit, which was hand drawn onto a PCB with a marking pen and then etched with ferric chloride.

This technique was the basis of many projects that I constructed over the years and I personally owe a lot to Harold for his inspiration.

Since that time I have tried different methods in the quest for perfection. A couple of years ago I started using the ultra violet light and photo etching methods with some excellent results. Unfortunately there was often several attempts required before a fault free board was produced. This method was rather expensive for the one off projects.

More recently I have continued my search for a better way and have now come up with a method, which gives almost perfect results every time and no scrap.


References and acknowledgements.

There are many pages on the Internet devoted to various ways for the hobbyist to make his own PCB's.

I have extracted some of this information and used it to develop my own method, which is described in detail.


Advantages

This method is simple to use and can be carried out in limited space such as in the kitchen. There are no messy chemicals and no special environments required such as dark rooms and dust free workshops.

It is far cheaper than the photographic method and can even be used to produce quick mock-ups generally done using Veroboard.


Equipment required

  1. PCB Design Program.
  2. Laser printer.
  3. Electric Iron.
  4. Transparency Film.
  5. Printed Circuit Board.
  6. Plastic Dish.
  7. Ammonium Persulphate Etchant.
  8. Jex Steel Wool.


Method Summary

  1. Produce the artwork for the PCB using a design program or the artwork supplied with the project.
  2. Copy the artwork onto transparency film using a laser printer.
  3. Transfer the artwork to the PCB using an electric iron.
  4. Etch the PCB with ammonium persulphate.
  5. Rinse and clean board.


Detailed Method
 

This description may seem lengthy but the process from printing to a finished board is not more than 15 minutes.


1. I obtained a copy of Eagle PCB, which can be obtained from http://www.cadsoft.de/freeware.htm This is a free version and allows the hobbyist to produce boards up to 100mm x 80mm. This size of board is easy to handle and will enable you to produce designs of a quite complex nature. If the artwork is provided with a design from a magazine or from the Internet you can then begin the process of producing the transparency.

Laser printers are now quite cheap and not beyond the hobby equipment. You may have access to one through your local library or school.

I use "Paint Shop Pro" available from www.jasc.com to make any changes before printing and to obtain a good black and white transparency of the correct size.


2. To transfer the drawing from the Eagle PCB program I have found that the best way is to select a dark blue color for the tracks or bottom in the "display options" and set the Pads and Vias to green.
Also, use a colored background selected from the "User interface" options. Select "Export/Image" to the clipboard after setting the resolution to 300 dpi.

Open Paint Shop Pro and "Paste as new image".
To get this to the correct size select "image/resize"
set the resolution to 300 dpi. and change the width and height settings to 100%
Now, convert it to a 2 color black/white image using "image/decrease color depth to 2 colors".

It will now print the exact size required.


3. I have a Lexmark E219 Laser printer capable of 600dpi. The transparency film used can be Kodak Inkjet Transparency film cat. No. 882 0151 or most other inkjet transparencies. Load the film into the printer to print on the SMOOTH side. Set the scale as 1 : 1 and print off the artwork. Do not make a mirror image as this is done automatically during the heat transfer stage. I often print several onto one page and select the best for transferring.


4. If you are not satisfied with the printing and heat transfer of the artwork the markings can be removed from the copper using some lacquer remover obtainable from your local hardware shop and then clean up the copper with steel wool.


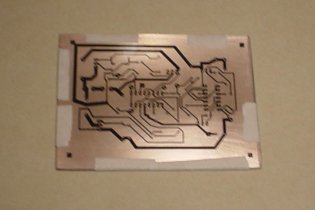
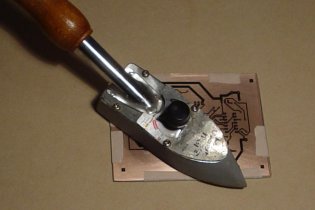
5. To transfer the artwork to the PCB requires a little care. I use an aero modeller’s iron with the setting on hot. These irons can be obtained for about $A50. A normal household iron works just as well with a setting around that used for ironing wool. Apply gentle pressure and be careful not to move the transparency. It takes a minute or so for everything to get warm and the laser printing to firmly adhere to the board.


6. Leave the transparency in place on the board for about 5 minutes to allow it to cool down. You will find if the above has been done properly the transfer will peel off easily and leave the artwork on the PCB.


7. I use 1 part of ammonium persulphate (about 1 oz) to which I add 5 parts of water from the electric jug just under boiling point. The plastic tray is placed in a bath of hot water in the kitchen sink and the PCB gentle agitated for about 3 to 5 minutes. The copper should dissolve quite quickly and leave the black outline of the circuit.


8. Rinse the PCB and dispense with the ammonia persulphate by weakening the mixture in plenty of cold water and allowing it to drain away. The PCB is then cleaned firstly using some lacquer remover and then polished with a Jex steel wool pad until all printing is removed and you are left with a perfect board ready to solder. To prevent any oxidization of the copper surface before soldering you can give it a light spray with some clear enamel.

Further developments:

It is possible to produce a double sided printed circuit board using small pilot holes to accurately align the top and bottom.


John  (VK5CU)

This RingSurf Australian Amateur Radio Net Ring
owned by John VK5CU.

The BEST way to tour Australian Ham sites. Want to join the Australian Amateur Radio Ring?

[ Previous 5 Sites | Skip Previous | Previous | Next ]

[ Skip Next | Next 5 Sites | Random Site | List Sites ]

*****************