
19-03-2000 R-1000 AGC, AM bandwidth changes
Author: Trio-Kenwood Communication, inc.
Mute Circuit:
The R-1000 has a mute circuit four use in combination with a transceiver or transmitter.
The R-1000 RF stage will mute by grounding pin 7 on the remote
terminal.
(See Fig 3-9) in the opertors manual.
This information was inadvertantly omitted from the Owners Manual, and will
be included in manuals for serial number 0030502 and above.
19-03-2000 R-1000 AGC, AM bandwidth
changes
Author: Trio-Kenwood
Communication, inc.
AGC
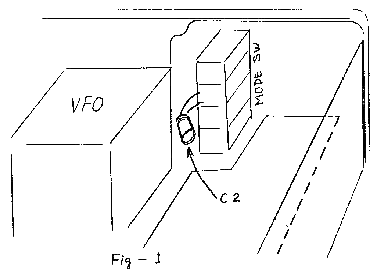
To shorten the AM AGC time constant, C2, the AGC capacitor may be changed from the original 4.7uF, or simply delete C2 by clipping out the 4.7uF as supplied. Access to this component is by removing the top case. On early models, C2 is located behind the MODE switch, and on later models, is located on the RX unit as C138 adjacent to connector 13.
AM Bandwidth optional wiring
If you desire substituting the AM 6KHz filter in favor of the 12KHz for AM WIDE, and the 2.7KHz filter for AM narrow, install the optional BWK-1 connector kit (see reverse) in-line at connector 3 on the RX unit X55-1250-00.
24 HR clock
Contrary to popular rumor, the clock module IS NOYT convertable to 24 hour format.
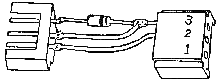
BWK-1
The BWK-1 is an optional AGC and Narrow bandwidth kit for early production
R-1000 receivers. It allows using the SSB 2.7KHz filter for AM narrow, and
includes a 1uF cap for shortening the AGC time constant.
This kit includes
instruction to fabricate and install the connector and to locate and replace the
cap. This does require some technical ability.
This kit is for serial numbers before: 0030001-0051600 & 0060001-0060400 cap change and before serial numbers 010xxxx for selectivity. Later production has the 1uF cap, and internally selectable AM bandwidth.
| Contents of this kit: 1. Diode 1. Male connector 3 pin 1. Female connector 3 pin 2. Female connector pins 1. 1uF @ 16V (or greater) capacitor 1. instruction sheet |
Additional Requirement 45 Watt or smaller soldering pencil. 60/40 rosin core solder small cutting plier #2 Philips screwdriver |
Installation:
Install as outlined on the reverse side of the instruction. Disconnect power before opening the R-1000.
Connector fabrication read before proceeding.

The RF Attenuator may be converted from the standard 20 dB step to 10 dB by replacing resistors on the RX unit X55-1250-00.
| Replace | With | Type |
|---|---|---|
| R1 2 3 4 5 6 7 8 9 10 11 12 13 14 15 16 17 18 |
No Change R3 1.2K 1.8K R7 1.2K 4.7K 15K 1.8K 1.2K No Change R16 56ohm No Change 100 ohm 68 ohm R13 220 ohm 820 ohm 100 ohm No Change R12 56 ohm |
R (Radial) R A (Axial) A R A R A R A A A A R |
Note: How to Solder on the PC Board.