Modifications for the Kenwood
TS-930

19-07-1998 TS-930S PLL
Unlock
Author: Trio-Kenwood
Communication, inc.
Service Bulletin no. 869 (29-3-1983)
Some users of the TS-930S have reported a problem where the PLL will
sometimes not lock (digital display does not come on) if the power switch is
turned off and on while xx.499.9 MHz is displayed, after the unit has warmed up.
This may occur also in the FSK mode.
This may be caused by detuning of VCO-2 and VCO3 in the PLL unit
(X50-1880-00). This may be cured by a simple increase in the voltage obtained in
the PLL alignment procedure. Make the following change in your service manual.
Service Manual page 58.
3. VCO-3 T14 change 3.7v to read 4.2 vdc
4.
VCO-2 T15 change 3.0v to read 3.5 vdc
Notes:
Be sure to adjust T14 and
T15 of VCO-2 and VCO3 whenever a PLL related circuit is serviced.
This change
applies to units before S/N 306XXXX.
Installation time for this change is 1/2
hour or less.

19-07-1998 TS-930S Service Notes on
AT-930
Author: Trio-Kenwood
Communication, inc.
Service Bulletin no. 877 (23-8-1983)
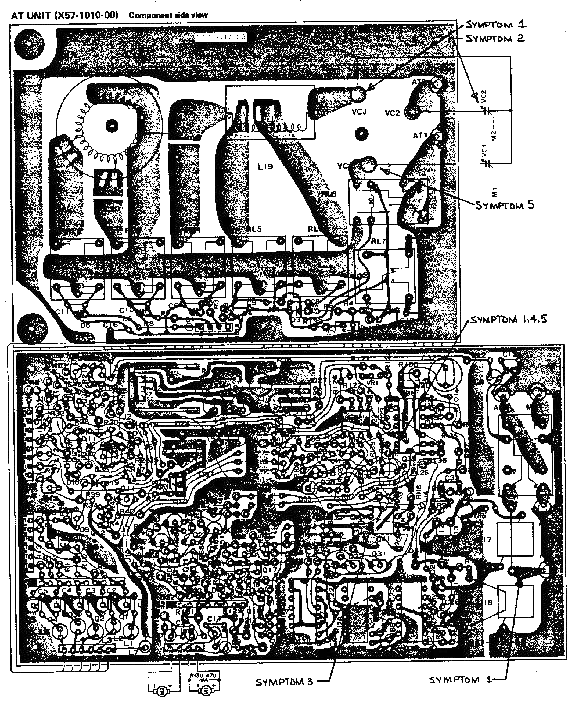
Some of the symptoms and cures for troubles that have been encountered with
the AT-930 are listed below.
- The motors do not stop on all bands.
Possible causes:
a. Cold
solder joint of platee VCJ wire.
b. Cold solder joint of L18 lead.
c.
Cold solder joint of the wire between pin 13 of Q39 and R139, D33 and
R138.
- The motors do not stop on the 7 MHz band.
Possible Cause:
The
rotor of VC2 contacts (shorts against) the stator.
- The motors do not stop on the 28 MHz band.
Possible Cause:
Cold
solder joint between D33 and R84
- The AUTO mode does not reset.
Possible Cause:
The wire from
R138, R139 and D33 may touch Q39 pin 14.
- The motor stop when SWR is at Maximum.
Possible Cause:
The wire
from R138, R139 and D33 touches Q39 pin 14 and the foil is broken around VC1.

19-07-1998 TS-930S Intermittent TX Power
Output
Service Bulletin no. 886 (11-5-1984)
The following procedure should correct any tendency of the TS-930S to exhibit
intermittent TX power output. Most of the reported cases of this nature have
been traced to poor contact of one or more plated thru holes mentioned below.
Careful adherence to this procedure should prevent reoccurrance of this symptom.
Procdeure:
- Remove the top and bottom covers.
- Remove the 10 screws securing the final unit to the chassis.
- Disconnect all cable assemblies from the final assembly, and remove it
from the radio. The fan motor cable may have to be removed for easy access.
- Remove all Final Unit PC board screws and turn the circuit board foil side
up.
- Desolder Q6, D2, and the plated-thru hole connecting the foils from R20
and Q8 base together (between T2 and VR1). Do not remove the components!
- Carefully remove the green solder resistant coating from the immediate
areas of these six points, so that there is bare copper foill up to and
surrounding the eyelets.
- Carefully resolder these six points, and those listed below:
Q1 Emitter
and base
D4 anode and cathode
Q2 Emitter and base
Q3 Emitter and
Base
Q7 Emitter and Base
Q4 and Q5 Base and collectors
Plated-thru
hole between C36 and C15
(2) Plated-thru hole sby the molex
connector.
Check and resolder the input and output coax connectors.
- Double check your work to ensure that there are no solder bridges or
splashes.
- Check the value of R19. If it is not 6.8 K ohms, change it so it is.
- Reinstall the final assembly, and readjust the idle bias currents of the
driver and final transistors in accordance with Service Bulletin 867.
CAUTION:
Ensure that no cables are pinched between the final
assembly and chassis when reinstalling the final unit. The fan cable is
especially vulnerable, so pay close attention!

19-07-1998 Tuning Mods TM-930
- The resolution of the main tuning digital readout can be increased from
100Hz to 10Hz. No digits are lost since the readout has the extra digit for
this purpose. This change can be accomplished by grounding pin 1 of connector
8 on the digital unit PCB.
- The tuning rate is 10KHz per revolution of the main tuning knob.
The
tuning rate can be changed to 5KHz per revolution by removing or lifting one
end of diode D-13 on the digital unit PCB.
- Note that the black marks on the tuning knob itself are exactly 500Hz
apart. The knob can be "corrected" by tuning in an exact frequency, such as
10,000.00KHz, pressing the DIAL LOCK switch, then turning the knob to line up
a black line. As long as you don't spin the dial too fast, it will track
nicely from one end to the other. With the slow rate tuning modification
above, the dial increments become 250Hz per division.
- You may desire to switch the new reduced tuning rate on and off. For
example, you can select the new rate on just VFO B by using an unused section
of the FUNCTION switch to make or break the circuit on diode D-13. Another
pssibility is to use the display DIM switch.
- There are an additional 8 memories available. These can be util- ized by
grounding pin 5 of connector 7 on the digital unit PCB. This lead is
designated as "M3". The additional memories can be selected by using the
unused contac on the FUNCTION switch or by adding a new switch.

19-07-1998 Amtor keying mod
- Look at the signal board and locate C500. C500 is an electrolytic 4.7uF
located near the center of the board (if viewed with the radio upside down
with the front facing you) near connector 30.
- Remove this capacitor by carefully twisting it with a pair of needle nosed
pliers. This capacitor cannot be easily removed any other way without
completely disassembling the radio. The function of this capacitor was to
de-bounce the PTT switch and is a big reason why the TS-930 will not work
satisfactorily in AMTOR mode.
- Next, locate R476 wich is on the same board as above and is positioned
just above the large CW filter. The lead that is exposed needs to be grounded.
An easy way to do this is to locate R474 which is right next to R476 and
scrape away some of the insulation from both of the exposed leads, then solder
a bridge between them.

19-07-1998 TS-930S CW Pitch Tone
Shift
Author: Trio-Kenwood
Communication, inc.
Service Bulletin no. 872 (6-7-1983)
Some users of the TS-930S have reported a slight change in the CW pitch tone
when the MONI switch is turned ON and OFF.
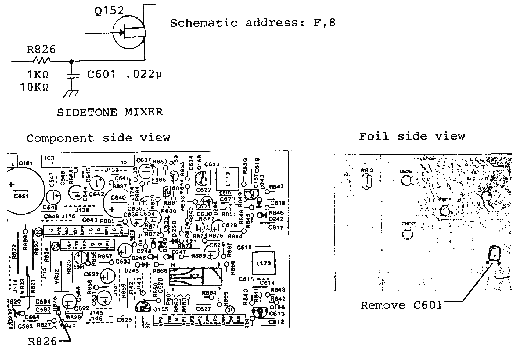
This may be corrected by changing the following components:
On the Signal unit (X57-1000-XX) change R826 from a 1 K ohm resistor to a 10
K ohm resistor and remove C601, a .022uF capacitor from the foil side of the
circuit board.
Notes: This change is applicable to units before serial number 3070221
only.

19-07-1998 TS-930S 15
Meter Internal Beat Tone
Author:
Trio-Kenwood Communication, inc.
Service Bulletin no. 884 (27-1-1984)
Some users have reported an internal beat tone that appears every 10 KHz,
when operating in the range of 20-21.5 MHz. Apparently the RV terminal switch
unit H is being affected by the 1st loop of the PLL unit.
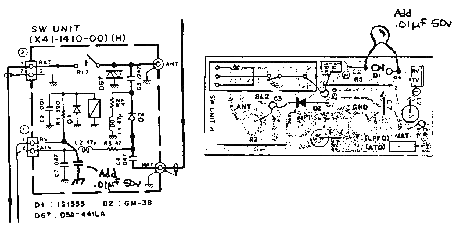
The cure is
relatively simple. Add a .01 µF 50V disc ceramic capacitor on the RV line of
switch unit H as shown below.
Time required for this modification is ½ hour or less.

19-07-1998 TS-930S RF
Feedback
Author: Trio-Kenwood
Communication, inc.
Service Bulletin no. 874 (15-7-1983)
For reports of RF feedback from the external speaker, especially when using a
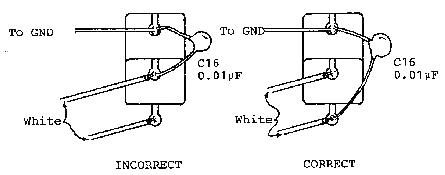
vertical antenna, or a linear amplifier, check for correct installation of
capacitor C16 on the EXT SPKR jack.
C16 should go from ground to the white wire on the opposite side of the jack.
Some units have the capacitor soldered to the middle terminal in error!
Note: This bulletin is applicable to radios with serial numbers prior to
3070420. Time required for this procedure is ½ hour or less.

19-07-1998 TS-930S SSB TX Tone
Quality
Author: Trio-Kenwood
Communication, inc.
Service Bulletin no. 867 (29-3-1983)
The transmitted audio tonal quality of the TS-930S may be improved by the
following procedure:
In the TS-930S Service Manual page 64, make the following change:
5. 100 W Final Bias VR2 adjust for 70 ma
                    VR1 adjust for 1.3A
Note:
This change is applicable to units with serial numbers prior to S/N
3080001.

24-01-1999 Error in the operator's manual of
the DIGITAL UNIT pin
Note: In the operator's manual
supplied with the 930, there is an error on one of the drawings. On the upper
left corner of the DIGITAL UNIT schematic locate connector 8. The lead
designations are as follows (note that some of the designations do not appear on
this sheet so you can add them to the drawing):
        Pin     Desig.
         1       100
         2       MU
         3       SCN
         4       M2
         5       MIN
         6       FSK
         7       B2
         8       FT
On the main drawing, called SCHEMATIC DIAGRAM, the pin numbers shown on
connector 8 are reversed from the way they are numbered on the DIGITAL UNIT
schematic. In the following changes, I am assuming that the numbering on the
DIGITAL UNIT sheet is correct. In any event, it will be obvious which end is
which since the end pin is vacant.

09-04-2000 Incorrect AC line voltage
setting
Author: Trio-Kenwood
Communication, inc.
Service Bulletin no. 863 (22-10-1982)
It has been found that a few TS-930S (and other) transceivers have been
shipped in the 220V or 240V line position. If you should encounter an initial
transceiver failure, please check for correct line voltage selector setting. The
voltage selector is located on the bottom case at the rear of the
unit.

09-04-2000 TS-930S CW
Hetrodyne Tone
Author:
Trio-Kenwood Communication, inc.
Service Bulletin no. 866 (24-3-1983)
Some users of the TS-930S have reported that a hetrodyne is heard when the
VFO control is turned in the CW mode. The tone may be more noticeable with no
signal present, (e.g. no antenna connected.), or when the AF tune or CW PITCH
controls are tuned. This may be reduced or eliminated by the following
procedures.
Parts required
Qty     Description                 Kenwood part number
 1      Shield Kit                  Z930CARSHIELD
        Cover CAR 1                 F11-0813-04
        Shield CAR 1                F10-1308-04
        8.2 Kohm ¼ Watt Resistor
        22 Kohm ¼ Watt Resistor
        3 pF disc capacitor
        .5 pF disc capacitor
        1 pF disc capacitor
Procedure
- Remove the top and bottom covers from the TS-930S.
- Turn the radio bottom up to allow access to the Signal unit (X57-1000-11).
- Remove the twenty-two (22) screws that secure the Signal Unit/Heat sink to
the chassis. Unplug the RAT, DRV, XVT, FRQ and the VCOF coaxial cables from
the Signal unit. These are located along the rear and the left side of the
Signal unit. Unplug connectors number (16) and (20) located along the right of
the Signal unit.
- Gently lift up on the rear of the Signal unit and fold the board over
towards the front panel to allow access to the bottom of the board.
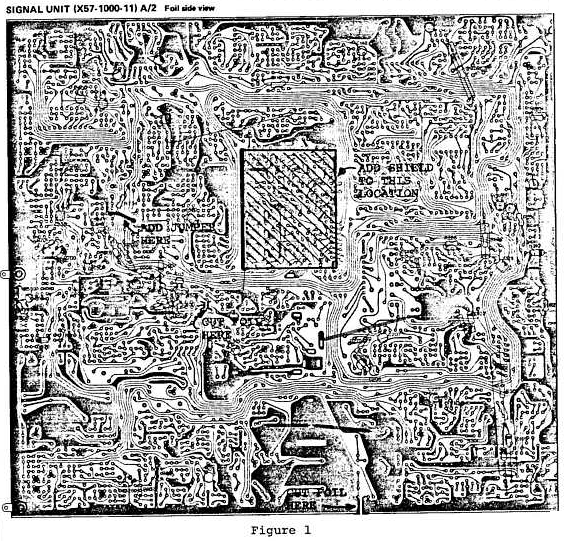
- Install the shield plate as shown in figure 1. Cut the circuit foil and
add the jumper wire as shown.
- Change the following components:
Change R635 to 8.2 Kohm
Change
R501 to 22 Kohm
Change C469 to 3 pF
Change C473 to .5 pF
Change C476
to 1 pF
- Reinstall the Signal unit. Pay careful attention to the coaxial connectors
when reinstalling to ensure they are in the correct locations.
- Install the top cover to CAR 1 enclosure to complete the Signal Unit
modification.
- Turn the set over so top is up. Remove the four (4) screws that secure the
speaker assembly to the chassis and lift up gently (unplug the battery backup
connector). The assembly may then be folded over to the right with cables
attached.
Remove the four (4) screws that secure the Digital assembly to
the chassis and fold the assembly up and towards the front panel, to allow
access to the PLL unit.
- Remove resistor R73 and capacitor C99 from the PLL unit.
- Reverse the procedure in step 9 to reinstall the Digital and Speaker
units.
Adjustments.
- Connect an oscilloscope probe to the CAR 1 terminal (24) of the Signal
unit. Adjust L161 for 300 mV p-p signal amplitude.
- Connect the oscilloscope probe to the emitter of Q79.
Adjust L142,
L144, and L145 for maximum signal amplitude, then adjust L139 for 1 V p-p
amplitude.
Note: Note the USB frequency before adjusting L139
- Adjust TC4, TC5, and TC6. (Refer to Service Manual)
- Adjust TC3 so the frequency is again the same as measured in step 2.
- Replace top and bottom covers to complete the modification.

09-04-2000 TS-930S Low RX
sensitivity
Author: Trio-Kenwood
Communication, inc.
Service Bulletin no. 868 (29-3-1983)
A loss of receiver sensitivity (6-30dB) may be caused by shorted switching
diodes in the Signal unit (X57-1000-xx). The following procedure will increase
the capability of the unit to withstand high RF voltage levels.
Procedure
Signal unit (X57-1000-xx)
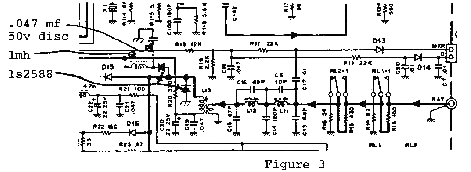
- Replace Signal unit jumper J27 with an XZ-070 Zener diode.
(PCB
coordinate C-1, see figure 2.)

- Change diodes D15 through D33 from BA2B2's to 1S2588's. Change only the
defective diodes when making the repair.
- Figure 3 show a circuit that is capable of withstanding antenna input
levels of up to 50 Watts. Use this on units that may be subject to high levels
of RF. (This is an optional change that may not be done in-warranty.)
Installation time for this procedure is ½ hour or less.

09-04-2000 TS-930S CW
VBT
Author: Trio-Kenwood
Communication, inc.
Service Bulletin no. 873 (15-7-1983)
This procedure will allow a simplified alignment method for the TS-930S CW
VRT section, when a VBT-1 jig is not available.
Test Equipment required
- Oscilloscope
- Audio signal generator (2)
- AF VTVM
Procedure
- Preset the TS-930S controls as follows:
- MODE: …………………. LSB
- Disconnect the DRV connector from the Signal unit.
- Confirm that CAR2 frequency is the same when switched from transmit to
receive. If it does not stay constant adjust VR23.
- Connect the oscilloscope probe to R176 in the Signal unit.
- Connect the two Audio Generators as shown in the figure below. Set AG1 to
300 Hz and AG2 to 2.9 KHz.
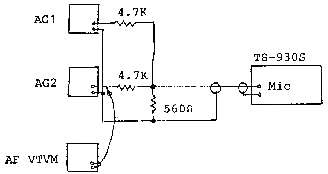
- Ensure that the output level of AG1 and AG2 are equal by using the AT
VTVM.
- Connect the cathode of D133 to that of D132 in the Signal unit using a
0.01 µF capacitor.
- Clip the lead of D124 and place the STBY switch to SEND.
- Adjust TC4 (CAR1 8.8315 KHz for USB) so that complete tone waveform is
observed, as shown in figure 2. Return to REC, and resolder D124.

- Remove the 0.01µF capacitor installed in step 5.
- Set STBY to SEND and adjust TC3 (CAR2 8.375MHz) so that a complete two
tone signal is displayed, as in Figure 2.
- Return to REC, and reconnect the DRV connector. This completes the
simplified alignment procedure.

09-04-2000 TS-930S Audio
oscillation
Author: Trio-Kenwood
Communication, inc.
Service Bulletin no. 875 (16-8-1983)
Some users have reported an audio oscillation when the AF gain control is set
between 10:00 and 12:00.
The cause may be that Signal unit (X57-1000-xx) capacitor C642 is installed
backwards. See figures below. Please change your service manual schematic to
reflect the correct positioning when you check the board.

Note: This change is applicable to units before S/N 307xxxx.

09-04-2000 TS-930S
Feedback into MIC CRT
Author:
Trio-Kenwood Communication, inc.
Service Bulletin no. 876 (16-8-1983)
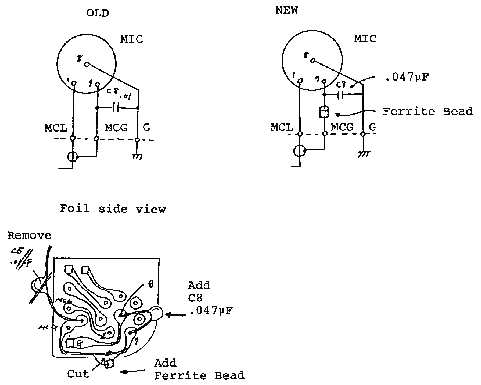
Some users may report RF feedback to the MIC at low frequencies, for example:
3.5 MHz.
Make the following changes to SW unit (J) (X41-1410-00):
Note: This change is applicable to units before S/N
308xxxx.

09-04-2000 TS-930S ALC level drift 28 MHz
CW
Author: Trio-Kenwood
Communication, inc.
Service Bulletin no. 879 (25-8-1983)
Some users have reported that the ALC meter indication occasionally jumps
during long key down periods on the 28 MHz portion of the bands. The symptom may
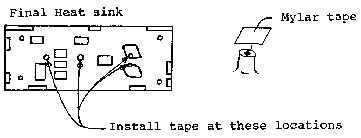
be caused by the ground foil of the Final unit (X56-1430-00) coming in contact
with one or more of the projections on the final heat sink, due to expansion
when the temperature rises.
Apply Mylar insulating tape to the projections on the heat sink, to prevent
reoccurrence of this symptom. See figure below.
Notes: This bulletin is applicable to units prior to serial number
3080001.
Time required for this modification is ½ hour or less.

09-04-2000 TS-930S
Power Supply surge protection
Author: Trio-Kenwood Communication,
inc.
Service Bulletin no. 881 (27-10-1983)
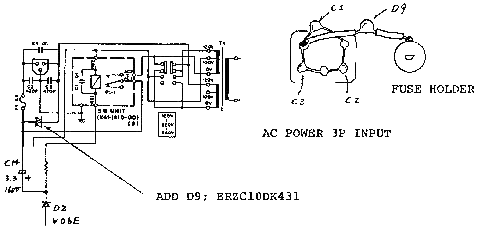
A line surge (exceeding approximately 4.5 kV) due to static electricity or
nearby lighting discharge may short power relay diode, D2 (V06E), and cause
electrolytic capacitor C14 (3.3 µF to break down. This results in relay chatter
and the relay contacts may finally weld.
Addition of the surge absorber to the primary power supply input circuit, as
shown below, should help avoid this type of failure.
Note: This symptom has occasionally occurred in those limited areas
subject to frequent and violent lighting discharges. A good earth ground and
antenna system lightning protection is still strongly recommended.
Note: This change applies to units before S/N 3080301.

15-04-2000 TS-930S Noisy Power Supply
Fan
Author: Trio-Kenwood
Communication, inc.
Service Bulletin no. 893 (3-1-1985)
Some users of the TS-930S have reported that the Power Supply Fan motor makes
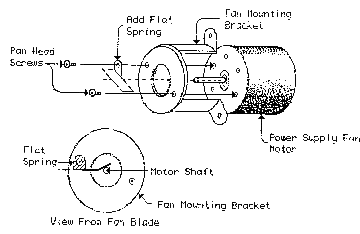
excessive noise. This fan motor was originally designed to drive a pulley
system. By adding a small amount of lateral tension to the motor shaft this
noise is reduced or eliminated. The procedure listed below should correct any
tendency of this motor to make noise.
Parts Required: Flat Spring Part Number: G02-0549-04
Add the Flat Spring as shown in the figures below.
Time required for this modification is ½ hour or less.


