|
|||||||||||||||||||||||||||||


Telemetry decoding software: RASCAL
RASCAL is the name of the software package that we, the Delfi-C3 team, are offering to radio-amateurs around the world to be able to collect and decode data of the Delfi-C3 satellite. RASCAL does this by decoding the incoming audio-signal on the system's soundcard that is originating from a transceiver tuned to the frequency of the Delfi-C3 telemetry downlink. Next to decoding and making the telemetry information visible to the users, RASCAL also stores and forwards the telemetry to our data collection server(s).
Please read this entire page before downloading and using RASCAL for the first time, it contains some valuable information on how to use the software and some other details! Details about the current status of Delfi-C3 can be found on the Mission Operations page.
Contact
For any questions or comments about RASCAL please send an e-mail to
Downloads
* RASCAL version 1.0.1 (1.7 MB .zip file, April 26 2008)
* Java Runtime Environment 6 from Java SE Download site of Sun Microsystems.
System Requirements
* Operating system capable of running the Java Virtual Machine (Windows, Linux, Mac OS, Solaris, ...)
* Java version 1.6 or higher
You can check the current version of your java installation by executing java -version at the command line. The picture belows show an example of the generated output. The version number can be found on the first line of the output and should start with 1.6 or higher.
|
* Soundcard capable of sampling at 44100 kHz
Instructions
Installing RASCAL
Download the RASCAL zip file and extract ALL contents from it. This will create a directory called 'RASCAL', which should contain the RASCAL.jar file and a subdirectory called 'lib'. If you do not have this 'lib' subdirectory you will not be able to run RASCAL. After running RASCAL two more subdirectories will appear, named 'config' and 'repository'. Always run RASCAL from this directory. If you have to move it somewhere else after installation, make sure to include all the subdirectories.
Upgrading RASCAL
If you find a newer version of RASCAL here than the one you have installed on your PC, please upgrade to the latest version. In order to do this while saving any local data the program may have stored, please follow these instructions.
- Download the new version of RASCAL
- Extract the conents of the ZIP file
If in step 2 you have overwritten the previous installation of RASCAL you are good to go. If not please copy the RASCAL.jar file and the entire lib/ directory to your installation directory of RASCAL, overwriting the current files.
Please check if the upgrade was completed succesfully by referring to the version information in the about window ('File' menu, select 'About RASCAL').
Starting RASCAL
If Java has been installed on Windows you can start RASCAL by double-clicking the RASCAL.jar file. If for some reason this is not the case or doesn't work, you will have to start RASCAL from the command prompt. You will also have to use the command prompt on other operating systems other than Windows. This can be done as follows: <path to JRE directory>/bin/java -jar RASCAL.jar or java -jar RASCAL.jar if the java executable is available at all locations (e.g. through the PATH system variable).
Using RASCAL
RASCAL will sample the system's soundcard to try and decode the telemetry downlink signal. This means that in order to decode the telemetry you will have to connect your transceiver to the soundcard input (microphone or line-in). Please make sure that the appropriate input is selected on your soundcard's mixer panel. Please note that applications like Skype are known to modify these mixer-settings, so please do ble check!
Below is a screenshot of RASCAL's main screen, the different sections will be explained below.
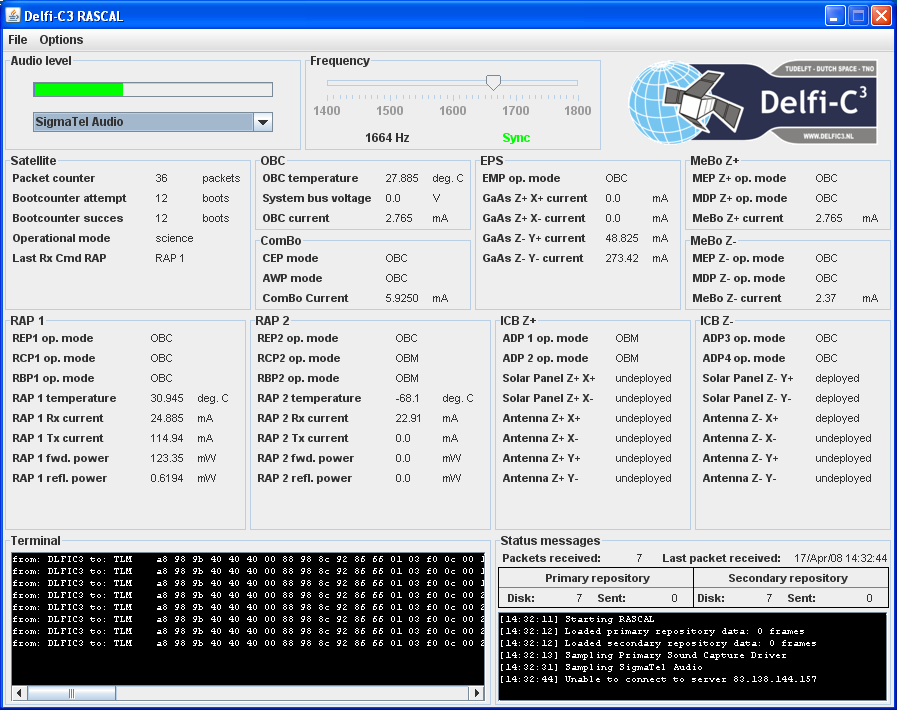
Audio Level
The bar at the top of this area indicates the input level of the audio signal. RASCAL performs best if the bar stays green, while the optimal input level is about half of the bar.
The dropdown box contains a list of soundcards detected on your system that are ready for use with RASCAL. You can select another soundcard at any time and RASCAL will immediately start sampling the selected soundcard.
Frequency (and tuning)
RASCAL expects a BPSK signal with a center frequency of 1600Hz. Therefore, when using an Upper Side Band (USB) receiver, you must tune 1600Hz below the actual downlink frequency. RASCAL can compensate for tuning errors and Doppler shift up to + and - 200Hz using a software Costas loop PLL algorithm, but, since the Doppler shift on VHF can be as large as + and - 3500Hz, either manual or computer controlled tuning (by means of tracking software) is required in order to keep the signal within the lock range of the demodulator. Once lock is achieved, the green "sync" label will light up, and decoded packets should show up in the terminal screen.
Tuning can sometimes be difficult, in the presence of Doppler shift, fading due to polarization changes, frequency offset due to temperature of the spacecraft oscillators and there is the possibility that the Costas Loop indicates a false sync because of lock on one of the signal's sidebands. If possible, you can use a waterfall display in software like MixW running parallel to RASCAL which will give you an indication of the centerfrequency. During transmission of flags, the actual carrier frequency is the highest peak, with sidebands exactly 150Hz apart. Now, using the waterfall display, tune such that this peak corresponds to 1600Hz +/-100Hz, in order to achieve sync.
Terminal
This area shows the decoded AX.25 frames as they are decoded by the program. The source and destination address are shown, followed by the contents of the data field in the AX.25 frame.
Status messages
This area gives an overview of the status of RASCAL.
- Packets received - number of valid packets received and decoded by RASCAL during this session
- Last packet received - time at which the last valid packet has been received and decoded
- Repository data
- Primary / secondary repository - the names for our two data collection server(s)
- Disk - the number of telemetry frames that are currently stored on your harddisk (waiting for submission)
- Sent - the number of telemetry frames sent to the repository during this session
- Status messages - shows a number of messages concerning connectivity and actions taken in the program
Telemetry fields
The remainder of the screen is dedicated to displaying the decoded values received in the telemetry downlink. Almost all of these values are housekeeping values and will be updated once every 5 seconds. Please note that you can also see the IV-curves produced by the TFSC payload in real-time by selecting 'Show IV curves' from the 'Options' menu.
Getting a user account
RASCAL uses the anonymous 'guest' account by default for submitting decoded telemetry.
We would however like to encourage all participants to request a user account by sending an e-mail to
Radio Amateur section
Delfi-C3 will have a downlink in the amateur satellite segment of the VHF amateur radio frequency band. Telemetry decoding software will be made available to participating amateur radio operators and universities which allows them to decode and display real time telemetry. Furthermore, the software allows for a data upload to the central Delfi-C3 ground station via the Internet for data processing. The Delfi-C3 team would like to invite all interested radio amateurs to receive, decode and forward telemetry data to the Delfi-C3 ground station.
Delfi-C3 includes a mode UV linear transponder.
The satellite will be in telemetry only mode for approximately the first three months of the mission, after which it is switched to transponder mode.
Frequencies:
Primary telemetry downlink: 145.870 MHz 1200 Baud BPSK AX.25 400mW
Backup telemetry downlink: 145.930 MHz 1200 Baud BPSK AX.25 400mW
Linear transponder passband downlink: 145.880 - 145.920 MHz (inverting) 400mW PEP
Linear transponder passband uplink: 435.570 - 435.530 MHz
Transponder mode beacon: 145.870 MHz CW (10dB below transponder PEP)
Telemetry decoding software for radio amateurs worldwide is available.
We would like to ask you to use this software to help us decode and gather telemetry from Delfi-C3.