Welcome to
My Clark-mast
Introduction
Everybody knows what a Clark-mast is. It is a telescopic, metal mast. Usually 2m when collapsed and about 10m when entirely extracted. You can find them at HAM-markets, dump, surplus and second-hand pages. Anyway, I got mine from a very good friend who was interested in something I didn’t use anymore so we had a fair trade.
The only problem with the
mast was that is was not entirely as I wanted. These are the things I had to
change or fix and I think it is useful for other owners to check these points:
- Greasing the elements
- Adjusting the alignment of the elements
- Replace fixation-screws
- Making an antennamount
- Fix air leak in bottom
- Remove crap
- Make durable air-inlet
These points are easy to
handle and when you have a good store nearby (www.frissen.nl)
you will be able to do all the things.
Every section is well
described and where necessary I made a drawing since I forgot to make pictures.
No, I am not going to disassemble the whole thing!
1.
Greasing
the elements
The former owner was so nice
to clean everything but since it must be air-tight and without friction, you
will need to grease every moving part.
Careful: not every grease is good.
I had original Clark grease, but it is far too expensive. When I have time, I’ll
find a replacement!
First you have to do the most
annoying part: disassemble the mast. This is quite easy when you have the right
equipment. You’ll need the following tools:
-
screwdriver flat
-
screwdriver cross
-
imbus or torx key
-
hammer
Ofcourse I forgot some, but
you’ll find out.
When you unscrew the rings,
take care not to loose any screws and other parts. The plastic things in the
rings must be adjusted afterwards; take them out of the ring. You can put them
back in from the outsied.
Be careful with the
alignment-thing. It is a brown part that prevents the mast from rotating. There
is a little feather in it!
Let’s assume you have al the
parts removed. You can now reassemble it while greasing the inside of the
rings. Also the elements must be greased. Take a plastic glove and rub it in.
Hmmmmm…..! I advise you to do this in the very end because you have to handle
the mast a few times…
2.
Adjusting
the alignment of the elements
When assembling the mast, let’s
take the first ring to learn how to assemble.
The ring must be fixed with
the normal screws; the plastic things should be pressed into the ring and then
the torx screw has to be inserted. Now do the following:
- When the mast is horizontally, screw the
bottom screw inside so the mast will rise a bit until it is in the centre.
- Screw the upper screw inside until the mast
is locked.
- Repeat for the horizontal screws by
rotating the mast 90 degrees.
- Make sure every screw is locked.
- Unscrew every screw 90 degrees and check if
the mast will come out. Repeat until it does.
Now you have perfectly
aligned the mast. When it is greasy in the end, it will slide in and out very
easily.
Always make sure the mast
doesn’t move up and down; when it does, the screws are too loose! It must be
like it is locked.
3.
Replace
fixation screws
Some models have fixationrings (which hold the elements up when pressure is gone) that can be fixed with strange screws. Other have screws with a knob on it and they are great. I replaced the screws by imbus or torx screws. However, the screws have a strange thread of 6mm by 1mm. Normally this is 6mm by 1,25mm but no…
You can replace the original
by normal m6 screws. I took imbus for it’s stability and good tools. Don’t puch
the screws with too much force. The thread of the ring might break!
Buy screws of 40mm length;
they will do.
4.
Making an
antennamount
The top of the mast has a 24mm
end that is about 5cm long. Far too short for an antenna and Clark sells
something that should make this work out. Will cost a lot.
No, if you take a screw-nut
of about m10 that is 30mm long (or any other size that can be fitted within)
you can take the edges off until it fits exactly into the mast. Now you have a
good thread in the mast.
When you have a piece of 40mm
pipe of about 20cm long and a screw of about this length with the above mentioned
diameter, you can fix this pipe over the mast against the upper ring by
screwing the screw into the nut.
Now you can attach a normal
antenna.
5.
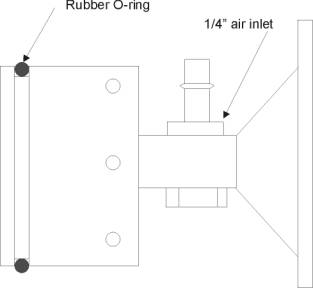
Fix
airleak in the bottom
When you receive a secondhand mast, I bet it leaks air through the bottom. This is caused by a rubber O-ring in the bottom that tends to be rotten away. This is caused by water, penetrating into the bottom section. It should be removed by the air flowing out, but when stored improperly the water stays in.
Leaking air can be detected by inflating the mast with the sections locked so there will be some pressure inside. If you hear the air leaking away or when the pressure drops within a few hours, this might be happening.
Now let’s change this ring.
- Unscrew the bottom screws
- Take a hammer and gently tick against the
bottom away from the mast. The bottom should come out revealing the
problem.
- Remove the ring and grease
- Grease the new ring, put it into the bottom
and (very important) make sure the space between the bottom and the ring
is filled with grease so it will slide
- Remove any pumpholder or other rings (see
point 6)
- Re-insert the bottom with gentle ticks with
the hammer.
- Screw the screws inside
- Ready.
Important is that the rubber
O-ring fits exactly over the bottom and into the space. When disassembled, take
the bottom to the store and ask for the best fit. The ring should be thicker
than the bottom so it will be pressed together when inserting. Don’t take a
ring too thick; 0,5mm thicker is good enough.
6.
Remove
crap
Yes, the mast is full of
crap. I left it on so it wouldn’t roll over the table, but the pump-holder is
not used anymore and maybe the bearing-ring on the top for the four legs can be
left away. I kept it on, despite of it’s weight. It may be useful for fieldday.
When you unscrew the
pumpholder, you’ll notice it won’t slide. Take a flat screwdriver and jam it
between the two halfs until it becomes wide enough to slide it. Grease may help
although you have to clean the mess afterwards…
When you are going to take
the bottom off, it is recommended to do this at that time…
7.
Make
durable air-inlet
The pump stinks and so does
the hose. The inlet on the mast has a standard ¼” screwthread. Go and buy a
fast-coupling airplug to fit into the mast. This is the same as a compressor
has and there are a lot of hoses for low prices to get.
I bought a 12V compressor and
put the same coupling on it. Now I can raise the mast with one toutch of a
button!
Using this sort of couplings makes
it possible to raise the mast, unplug the compressor or pump (same thread) and
the air stays in the mast so it won’t come down.
In the end…
Now these were my problems. Alltogether it takes about a day to do all this and the result is a great machine. Don’t forget to use guyinglines when using it entirely because it is not very stabel.
Also remember that humidity
is bad, although the mast is made of some kind of aluminium. Move the mast up
and down every two weeks or so to keep it in shape. I have a quite long hose
attached to it and I only raise the mast when needed. If not, I let it down
entirely so I can still receive the local repeaters.
Hopefully you got enough
information to do this work and I wish you a lot of fun!