Kenwood TS-570 Back-up battery current drain
Author: Kenwood Communication, inc.


Service Bulletin no. 1062 (23 January 1998)

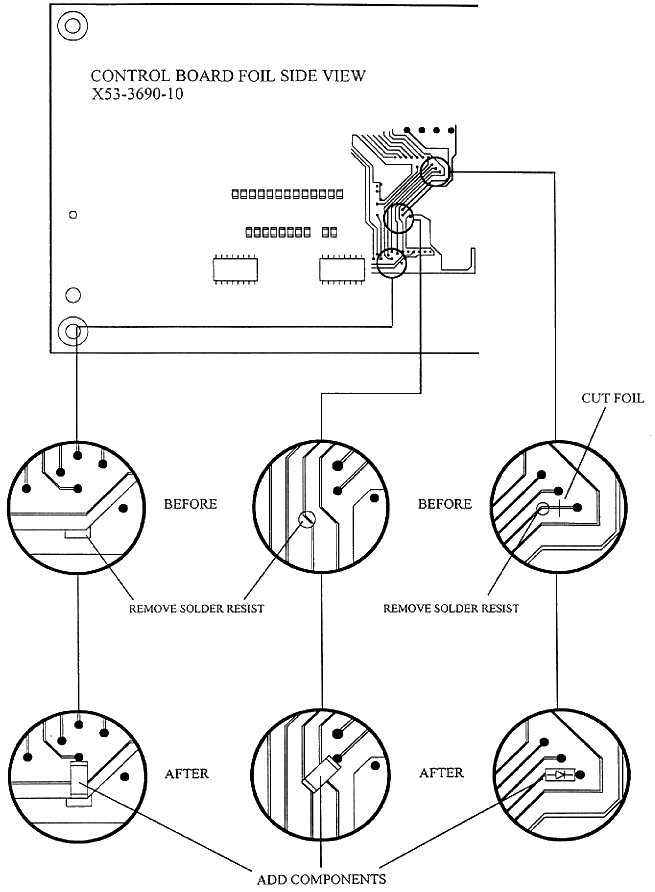
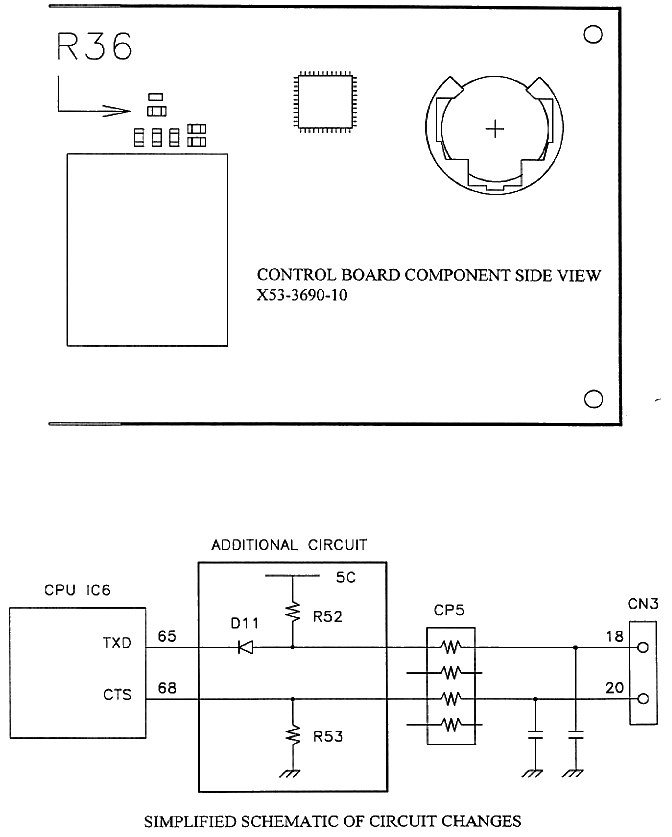
When the transceiver is turned off, there is a momentary increase in back-up battery current drain. In addition, if a personal computer is connected to the transceiver, excessive back-up battery current drain can occur when the transceiver is turned off. The following circuit changes will eliminate the increased current drain.

Caution: This modification requires soldering equipment rated for CMOS type circuits. It also requires familiarity with surface mount soldering techniques. If you do not have the proper equipment or knowledge do not attempt this modification yourself. Seek qualified assistance.

Parts required:

Qty   Description                      New Part No.
 2    10 Kohm resistor                 RK73FB2A103J
 1    Diode                            1SS355         *
 1    470 ohm resistor                 RK73FB2A471J   **

* You can substitute an MA110 diode in place of the 1SS355 diode.
** The 470 ohm resistor is only required for S/N 903xxxxx and higher.

Procedure:

  1. Disconnect the power cable and remove the covers of the transceiver.

    Access the foil side of control board X53-3690-11.

  2. Remove the solder resist from three foil locations.

  3. Cut one foil trace. Do not cut too deep.

  4. Add the two 10 Kohm resistors and one diode.

  5. On the component side of the Control board, replace R36 with a 470 ohm resistor if a 10 Kohm resistor is installed (This must be done from S/N 903xxxxx and higher).

  6. Remove the lithium battery and measure it's voltage. If it measure 2.8 V or less, you need to replace the battery with a new one (part number W09-0873-05).

Battery installation procedure:

Perform the following steps when installing the original or replacement lithium battery.

  1. Once the battery is removed from it's socket, wait 20 seconds or more before going to the next step.

  2. Connect a power supply to the transceiver. The transceiver should turn on by itself.

  3. Install the original or replacement battery.

  4. Turn off the transceiver from the front panel power switch.

  5. Reset the transceiver by holding A=B key depressed while turning on the transceiver from the front panel power switch.

Units with a number 3 stamp on the outside box were already modified at the factory.

Time required to make this changes is 1 hour.

Modifications