Table 1: Parts List
By Charles Scharlau, NZØI
This easy-to-build and inexpensive antenna is also made to store easily. It's designed for hand held use, so it's great for fox hunting! Several kits were put together for NKARC and the cost of the kits was under $15.00 each.
Dimensions are given for a 146-MHz (2-meter ham band) antenna, and for a version that will work on the 121-MHz aircraft band.
Heavy gauge wire elements make the antenna sturdy and broadband. A ferrite bead balun is used, but no attempt has been made to match the antenna to the 50-ohm transmission line impedance. The impedance mismatch is of no concern for receiving, and has also proven to be of no concern for short transmissions.
- 10-foot length of 1/2" schedule 40 PVC pipe (1)
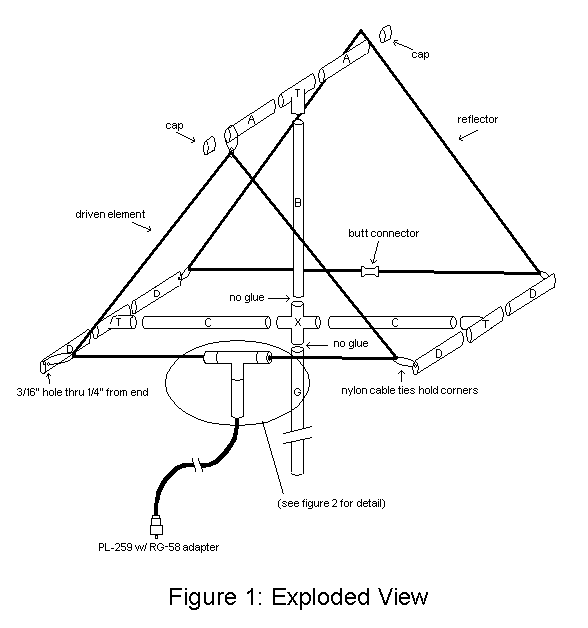
Other PVC:Cut PVC to these lengths for a 146 MHz antenna:A = 5-1/4" (2)B = 25" (1)C = 14" (2)
D = 4-1/2" (4)
E = 1-1/8" (2)
F = 2-1/4" (1)
G = 34" (1)Cut PVC to these lengths for a 121 MHz antenna:A = 6-1/4" (2)B = 30" (1)C = 17" (2)
D = 5-1/2" (4)
E = 1-1/8" (2)
F = 2-1/4" (1)
G = 17" (1)Other Components:
- T = 1/2" Tee (4)
- X = 1/2" cross (1)
- 1/2" caps (4)
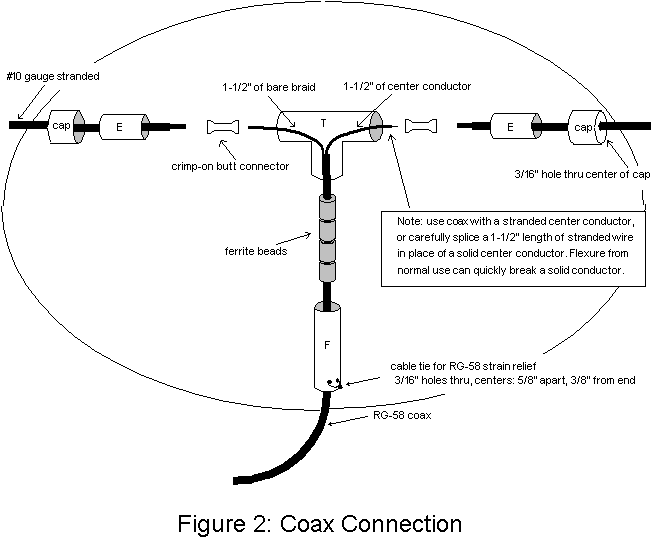
- RG-58 coax (3 feet of high-quality stranded center)
- PL-259 connector (1)
- RG-58 adapter for PL-259 (1)
- Nylon cable ties (9)
- #10 gauge stranded wire (166" for 146-MHz antenna, or 201" for 121-MHz antenna)
- #10 gauge butt connectors (3)
- Ferrite beads: Amidon FB 43-6301 (4)
Table 2: Tools, etc. * item not needed for assembly of antenna kit
- Tape measure*
- Hack Saw, or PVC pipe cutter*
- Drill with 3/16" bit*
- PVC cement w/ applicator
- Crimping tool
- Soldering iron (for PL-259 installation)
- Wire cutter/stripper

*1. Obtain needed parts (Table 1) and tools (Table 2). Then mark the PVC pipe per the parts list (Table 1). Note that pieces A, C & E have a quantity of 2, and piece D has a quantity of 4. (It's also helpful to temporarily mark each piece to ease later identification during assembly.)
*2. Cut the 10' PVC pipe into appropriate lengths.
*3. Drill 3/16" holes into the center of 2 caps.
*4. Drill 3/16" holes per plan in (4) pieces D and (1) piece F.
*5. For a 146-MHz antenna, cut the #10 gauge wire into one 78" (driven element) and one 88" (reflector) piece. For a 121-MHz antenna, cut the #10 gauge wire into one 94-5/8" (driven element) and one 106" (reflector) piece. Strip 1/4" of insulation off all wire ends.
*6. Connect together the ends of the reflector wire into a loop using a butt connector.
7. Slide piece F (drilled hole side first) onto one end of the RG-58 coax.
*8. Slide the four ferrite beads onto the same end of the RG-58 coax. (It may be necessary to shave off some of the coax's outer jacket to accomplish this.)
*9. Strip 1-1/2" of coax outer jacket. Separate the braid and center conductor. Strip 1/4" of dielectric off of center conductor.
10. Slide one cap (small hole first) and one piece E onto each end of the driven element wire per Figure 2.
11. Feed ends of the driven element wire into opposite sides of the "Tee" and out the center of the "Tee".
12. Crimp the coax conductors to the ends of the driven element wire using 2 butt connectors.
13. Slide ferrite beads up to the end of the cable insulation.
14. Gently pull the wire out each side of the "Tee."
15. Glue the caps and pieces E and F to the "Tee"
16. Route a tie wrap through the holes on piece F and snug the cable against the inside of the "Tee" for strain relief.
17. Assemble 3 large "Tees": one with pieces A & B and a small "Tee" and 2 pieces C & D (DO NOT GLUE PIECES D YET) and a small "Tee" per Figure 1. (When inserting pieces D be sure you insert the side without the small hole into the "Tee".)
18. Glue caps onto the ends of pieces A.
19. Glue the free end of pieces C to opposite sides of the "X" piece, ensuring that the Tees are parallel to each other and perpendicular to the "X". Remember: No glue for the other end of piece B and none for piece G either.
20. Assemble the frame per Figure 3.
21. Attach elements to the frame. Use tie wraps to hold the antenna elements in place (keep them loose to start and adjust as needed.) Rotate the pieces D until the small holes are aligned properly for holding the wire elements then glue them in place.
22. Install a PL-259, or another appropriate VHF connector, to the free end of the coax.
Now try it out!
*These steps are not required if you are assembling the antenna kit.