North Alabama SKYWARN APRS
The site is set up to help facilitate new users to SKYWARN APRS find the files they need to get started with UI-View32
Download the full version of Ui-View32 from here:
Once you have downloaded the software you will need to register it. So, go ahead and follow the registration instructions.
If you want to see the counties high lighted with colors to signify advisories, watches, or warning then you will need to load the most current shape files for the AWIPS Counties, Zone Forecast Areas, and Coastal Marine Zones.
Download Counties Zones file prefixed with "c_"
Download Public Forecast Zones file prefixed with "z_"
Download Marine Zones file prefixed with "mz"
Select the coastal marine zones including the Great Lakes
Download the file with the correct date as the data changes based on certain transition dates. Basically, do not download a file dated in the future until that date arrives.
Download the shape files from this link:
Generally, you will place these files in the directory path "C:\Program Files\Peak Systems\UI-View32\NWS\Shapefiles" or wherever you loaded the UI-View software.
To help you get up to speed a little faster, I put together some maps for North Alabama to help you test the software. You need to load these maps in the directory path "C:\Program Files\Peak Systems\UI-View32\MAPS" or wherever you installed UI-View. The password is my callsign using all lower case letters.
You will notice that Product codes will be used in the NWS Bulletins on APRS. There are many different codes that can cause confusion. Here is a link that will help you decipher what HUNSVS or HUNSVR really mean. HUN is our are weather forecast office and the 3 letters following it is the Product Code.
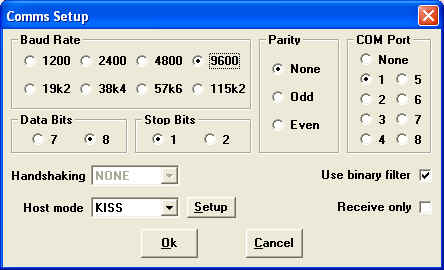
Go to Setup -> Comms Setup
This Comms Setup screen is used to setup the communications port on your computer to talk to your TNC or whatever device you are using. You will need to know what baud rate your device supports and select the computer port to which it is connected. It is highly recommended to set the Host Mode to KISS. This avoids numerous setup problems.
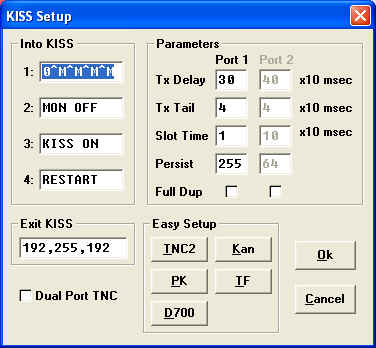
Once you set the KISS mode you will need to click on the Setup button next to the right of that box.
On the KISS setup screen you can select the appropriate Easy Setup button that corresponds to your packet communications device. The Kenwood D710 requires a different command file than the D700, so you will need to read you instruction manual for the details on where to get the necessary command file. the following settings are used for a Kenwood D700 and should work for most TNC2 compatible devices to put them in the KISS mode and to exit from the KISS mode interface.
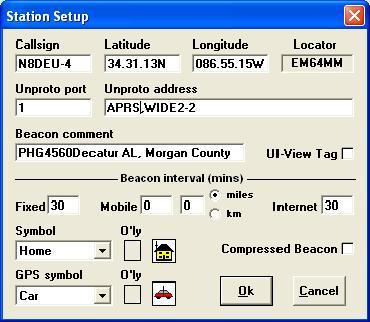
Next you will need to visit Setup -> Station Setup to program you lat/lon coordinates, Unproto port, Unprot address, Beacon comment, Beacon interval, and your symbol to represent you operation (car, home, etc)
You must enter your callsign. If you are are using more than one station on the air you can use your callsign and your callsign followed by a "-" and any number from 1 to 15. You are limited to 16 variations of your callsign due to the AX.25 protocol. Enter you Latitude and Longitude. If you do not know it you can select it by holding the HOME button and double click on your location on the map to fill in the lat/lon entry. The Unproto Port is generally set to 1 if you are using a TNC compatible device. If you are using BPQ or AGWPE you can enter multiple ports separated by commas (read the documentation in UI-View and the application you are using). The Unproto address will contain the TOCALL and the packet path your transmissions will follow. For home operation this entry is generally "APRS,WIDE2-2". For mobile operation this entry is generally "APRS,WIDE1-1,WIDE2-1". If you are operating from a home station and having difficulty with a digipeater hearing your signal, then you should try the recommended mobile settings to see if this helps. There may be some areas that do not have good coverage. Get a better antenna or a small beam and point it to a digipeater. If all else fails you can also connect to the Internet and perform the same communications from an Internet connection. You will need to set your Beacon Interval (mins). For home stations this should be no less than 20 minutes (30 minutes is a good number). For mobile stations 1 minute if you are moving frequently (50 miles/hr or faster) or 3 minutes if you are driving in slow traffic is a general recommendation. Basically, the faster you move the more you might want to send a beacon to update your location for Fixed, Mobile, or Internet operations. You will need to select a symbol that best represents you service (house, truck, car, motorcycle, 18 wheeler, bicycle, on foot, etc). A setting of "0" disables the beacon. A beacon is your station location and symbol information broadcast to other users on APRS in a single transmission. When operating with a GPS device the GPS symbol will be used. Do not select the Compressed Beacon. Be warned that some Internet Gateways may be configured incorrectly and your position data might be altered by interpretation.
If you plan to transmit data via an Internet connection, then you want to set the Internet entry on the right side under Beacon interval to 30 as shown below. If you leave this setting set to 0, you are effectively disabling a beacon from reaching the internet even if you send a manual beacon. This is a an important setting.
Important Note:
If your Unproto address entry starts with TCPIP, you will not be able to send messages or acknowledgements through the Internet to the RF network. You have been warned! If you are using an Internet only connection, you can enter a path of APRS (only) or APRS,WIDE2-2, it really does not matter, unless your are connected to the RF network.
Also note the "PHG4550" entry at the beginning of the beacon comment. This is Power, Height, and Gain information that you can include (must be the first 7 characters of your beacon Comment) and most APRS software will decode it (not part of the actual message that is displayed) to show other stations your range or area of coverage circle when this feature is activated with the UI-PHG plug-in. Keep in mind that the Height Above Average Terrain (HAAT) is important since that height is relative to the area around you, not the actual elevation above sea level. For example, if the HAAT is 640ft above sea level, you live on a 100ft hill and your antenna is 60ft in the air, then your HAAT is 160ft. For more detail see
You will need to uncheck every box under Select One Or More Servers.
Now you must add an entry. To add an entry make sure the dialogue box is active and press the "Insert" key on your keyboard. This will create a white space under Select One Or More Servers for you to type "rotate.aprs2.net:14580" and press Enter. This will create a new entry and you must check the box to make it active as shown below:
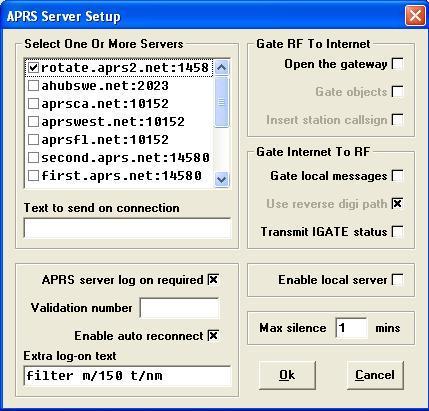
This entry for the servers will search for an available server on the APRS IS automatically so you do not have to constantly tweak and fiddle with every known server in the world.
Under the Extra log-on text entry, I suggest typing "filter m/150 t/nm" for a good start. The m/150 command will filter stations located within 150 miles from your Lat/Lon programmed in the Station Setup dialogue. You can can the number to expand the range or decrease the range you want to have sent to you from the server. The additional "t/nm" setting allows NWS messages and standard messages to be sent from the server.
The reason we have filters in APRS is to manage the amount of data that is allowed to be sent from the server to your computer. If you allow everything to be sent to your computer and it would likely consume bandwidth on your Internet link.
For greater detail on filter settings visit the following web site:
http://www.aprs-is.net/javAPRSFilter.aspx
To connect to a server on the APRS IS perform the following action:
File->Action->Connect To APRS Server
To disconnect from a server on the APRS IS perform the following action:
File->Action->Disconnect From APRS Server
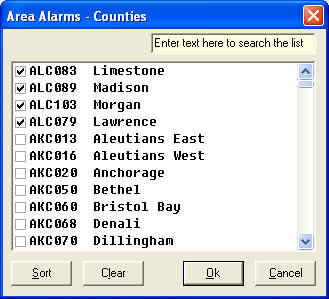
To activate the UI-NWS plug-in go to File -> UI-NWS. Do not close the UI-NWS window or you will stop UI-NWS and no longer see counties highlighted from NWS bulletins. If you want to setup an alarm to sound on your computer when a warning is issued for a county, you can select the counties to attach an alarm in the UI-NWS window by going to SETUP -> AREA ALARMS. UI-NWS is the plug-in software that posts the warnings, watches, and advisories on your map y highlighting the counties. When a warning is posted by the NWS and you have a county selected in the Area Alarms, UI-View will sound an audible siren on your computer to alert you.
When UI-NWS is activated, your map will start to show some color during an active storm. The NWS bulletins are transmitted a few times (generally every 3 minutes) after the initial posting to insure delivery to everybody. If you do not receive the first transmission, then you will have to wait until it is posted again. If you are talking on an adjacent 2-meter radio which causes interference to your APRS tactical data communications system then you could miss a packet broadcast from the NWS.
When it is all working you should see the following type of display:
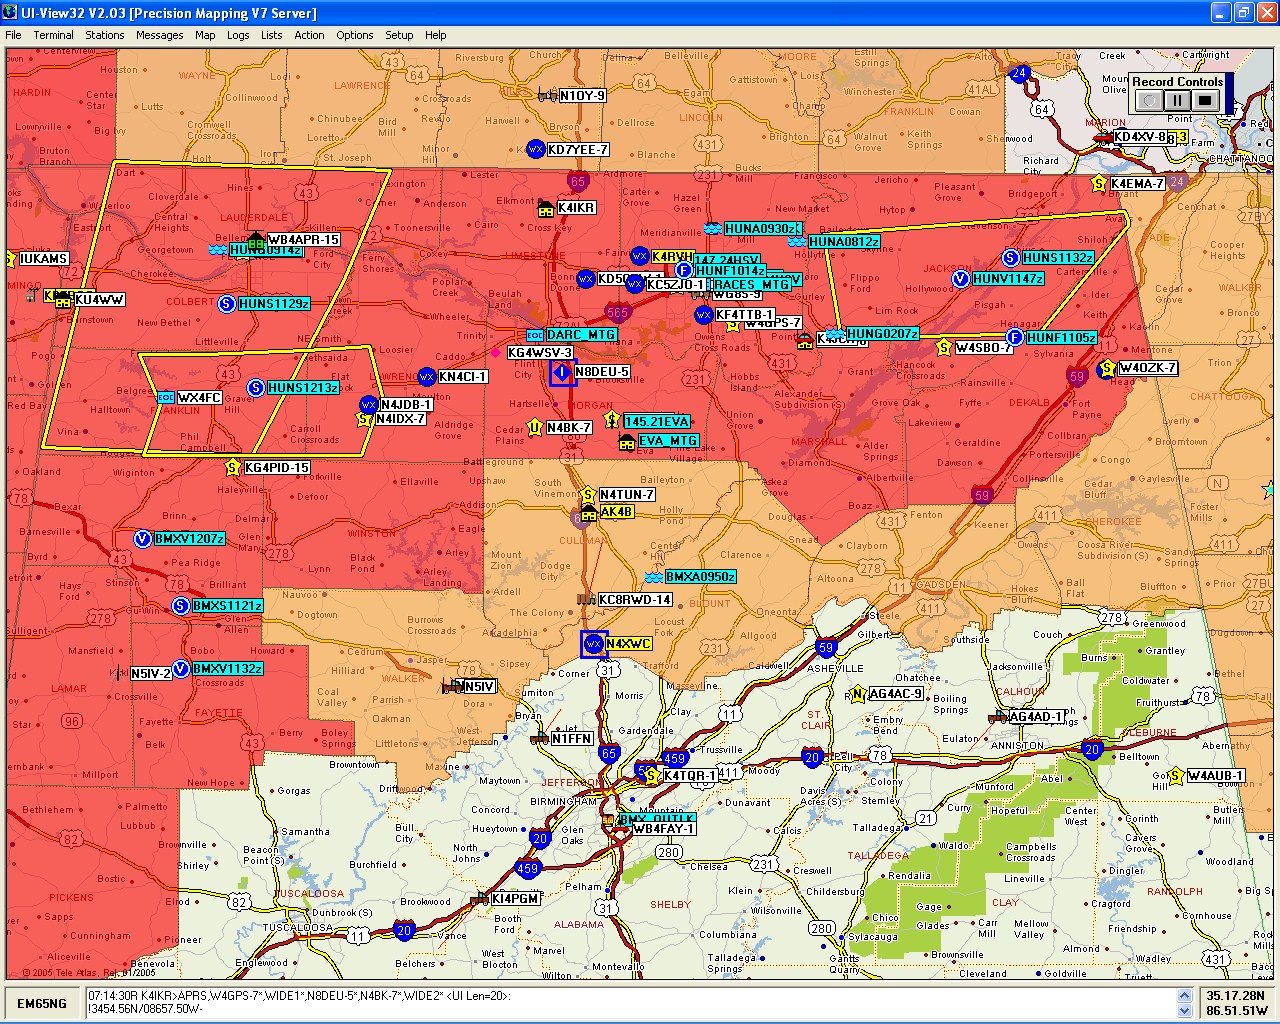
To get an interactive set of NWS bulletins issued for a county you can double click on any county and all the active bulletins posted for that county will be displayed. You can also see the list of counties with active NWS bulletins in the UI-NWS dialog window.
There are numerous other settings in UI-View that are not covered here at this time, but these steps should help you get on the air quickly with a radio and a compatible TNC (Terminal Node Controller) device.
If I have missed something, please drop me a note (N8DEU at ARRL dot NET).
This page was last updated on 21-Aug-2013